When I moved away from San Francisco, I knew there would be three things I would miss more than anything else in the world or even more than life itself. I was going to miss Green Apple Books, Mission Chinese Food, and Tartine Bakery. The twisting corners of the book store, the numbing sichuan lamb face of Mission Chinese food, and most of all, the great french style desserts at Tartine. I loved their lemon tarts, their almond croissants, everything.
I'm not at the place yet where I feel comfortable making those amazing croissants, but I thought I would try their shortbread cookies. These were by far the best shortbread cookies I've had in my life. They were firm when you broke them apart with your fingers, but they melted in your mouth the second they touched your tongue. They were light and super buttery. I've never had a cookie like this before in my life. Best of all, this recipe is extremely easy. Anyone can make it just as delicious as the bakery.
Tartine Shortbread Cookies
Ingredients
1 cup + 2 Tbsp soft unsalted butter
¼ tsp salt
1 ¾ cup +2 Tbsp flour
⅓ cup sugar + more for topping
Directions
Preheat oven to 325 degrees
Cream salt, sugar and butter together. Mix flour in with butter until smooth
Pat dough into a 6x10 inch pan and bake for 30-40 minutes or until golden
Remove from oven and sprinkle with extra sugar. Cut into small fingers while warm but let cool completely before removing from pan
Well, 1st grade has been cooking again! This time, as you've probably already figured out, we made pumpkin butter. And, oh, was it ever good.
Our vocabulary unit this week was centered around the job of a chef, and included the words 'utensils' and 'ingredients' ... among other words, of course. I just couldn't resist incorporating a hands-on cooking activity! And it just so happened that we were also learning about the pumpkin growth life cycle ... ya know, pumpkins start as a seed, then grow into a sprout, which grows into a plant ... remember learning that kind of stuff?
Hmmmm, combine cooking vocabulary with pumpkins? Could it get any easier?? I mean, really, no challenge at all. I decided this slow-cooker pumpkin butter would be perfect!
So, my crockpot once again made the journey into school, along with a few other utensils and the ingredients to make this rich, flavorful pumpkin butter. Then my little helpers and I set about whipping this up.
It's sooooooo easy. Easy-sneezy, as we'd say in our class.
Put two cans of pumpkin into a slow-cooker and stir in a bunch (quite a big bunch!) of brown sugar ...
In goes the brown sugar
... and some cinnamon and ground cloves. (Two of my boys did a fantastic job stirring this up. They really got into it! Notice the two-handed grips on that spoon??)
In go the spices
Cook it for a while until it's a gorgeous and rich dark brown color ...
... and then slather a big ol' dollop on a biscuit (or other mouth-delivery vehicle of your choice). We tried it on biscuits and graham crackers, and decided as a class that we liked the biscuit best. Oh, but rest assured, there was certainly a fair share of us eating it straight up with a spoon! Fabulously delicious.
Pumpkin Butter
Source: My nieces (They both made this, along with other recipes, when they were in 1st grade. Their teacher then compiled a cook book for them that they still have ... so sweet.)
Ingredients
2 (15 oz.) cans 100% pure pumpkin (about 4 c.)
1 (16 oz.) box light brown sugar
1 1/2 tsp. ground cinnamon
1/4 tsp. ground cloves
Dash of salt
Directions
1. Combine all ingredients in a slow-cooker. Cook on low heat for 3 to 4 hours. Or, combine all ingredients in a large saucepan and cook over medium until the color is dark brown.
2. Serve warm or cold with graham crackers, chocolate graham crackers, or biscuits.
Enjoy!
(I bet it would also be great on toast, English muffins, bagels, or mild-flavored crackers. Yum.)
Gyoza are one of the cheapest snack foods you can make that store well in. I don't remember the last time I bought potstickers at the store but when I price out the cost of these gyoza (using asian market prices), I get something like:
1 lb ground pork: $1.99 1 lb napa cabbage: $0.80 2 bunches scallions: $0.60 2 packs of gyoza wrappers: $1.40 x 2 other costs: negligible.
That's about $6.00 for 100 pieces of gyoza. Is Trader Joes cheaper than that? I think not. And this way, you can make it exactly how you like best with the ingredients you like best. I like mine heavy on the ginger flavor so I would probably add more than this recipe calls for, but that's up to you. You can also swap out the chicken for shrimp if you want and make the least kosher gyoza ever. Delicious.
Pork Gyoza
Ingredients
1 lb course ground chicken or pork (I use half and half)
1 lb napa cabbage
1 cup chopped garlic chives (or chopped scallions and 1 Tbsp added grated garlic)
1 ½ tsp white pepper
2 tsp sesame oil
2 tsp grated ginger
2 T sea salt or rock salt
2 package gyoza wrappers (50 count, as thin as possible)
Directions
Add salt to minced cabbage and garlic chives to sweat out of water. Let sit for 20 minutes
Squeeze water out of the cabbage and chives. Mix with pork/chicken, pepper and oil
Fill gyoza wrappers, pleating one side for form a crescent moon shape. If not using, bag and freeze to cook later.
Place gyoza on a heated griddle or heavy bottom sautee pan on a small layer of oil. Add a little water to the pan and cover to steam the gyoza. Add more water once through the steaming process
Remove from heat after 5 minutes or when gyoza or cooked through and golden brown. Serve with chili oil, soy sauce, vinegar and green onions.
This is one of those creations born out of necessity. The necessity to make something to eat ... with just what you have around the kitchen. You know those days. You thought you had something figured out to make for dinner, and then find you're missing a key ingredient. I swear there must be gremlins in my pantry. Pesky little gremlins who take ingredients when I'm not looking. Sneaky little devils.
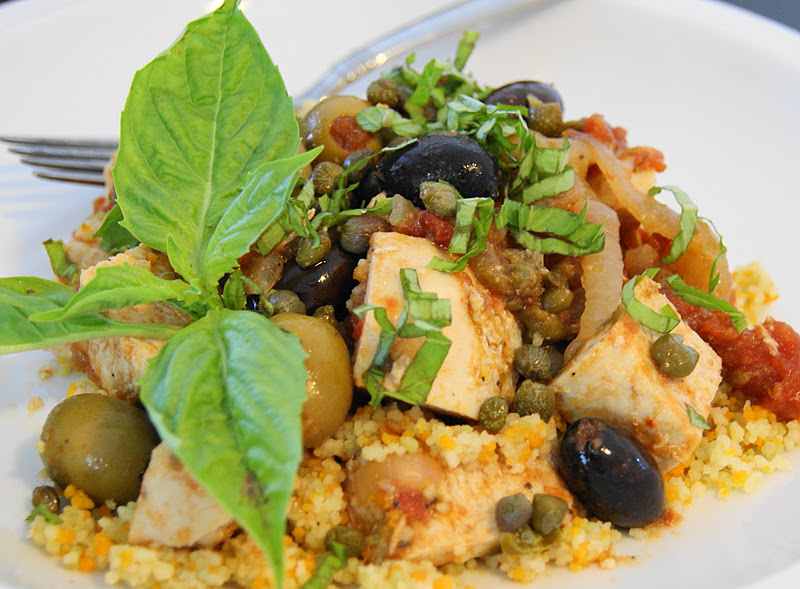
And so this easy Mediterranean Chicken with Cous-Cous came to be. I had thawed out chicken from the freezer, so had to use it up. I looked around my kitchen to see what I had, and went to work assembling. Chicken ... onions ... garlic ... olives ... capers ...
canned tomatoes ... fresh basil ...
And, WOW, did this ever turn out delicious! I knew it would be edible ... I mean, you can't go too wrong with the ingredients I found laying around. But I didn't know it would turn out as tasty as it did! Easy and quick too. As we say at our house, it's a keeper!
Easy Mediterranean Chicken with Cous-Cous
Source: Tracey Original (I'm sure there are similar recipes out there, but I didn't reference any when tossing this together!)
Ingredients
Olive oil
4 boneless & skinless chicken breast halves (whole or cut into bite-sized chunks)
1 onion, sliced in round slices
1 clove garlic, minced
Salt & black pepper, to taste
A shake of crushed red pepper, to taste
4 T. capers
1 c. olives (a mix of kalamata and green olives)
1 (15 oz.) can whole tomatoes
Fresh basil
Prepared cous-cous
Directions
1. Season chicken breast halves with salt and black pepper. Heat a small amount of olive oil in a skillet; brown chicken in heated oil and then remove chicken from pan.
2. Heat another small amount of olive oil in the same skillet. Add onion slices and garlic; saute until onions soften a bit, about 2-3 minutes. Add black pepper, crushed red pepper, capers, and olives. Break up tomatoes with a fork (or your hands); add tomatoes, with juice, to the pan. Heat until simmering.
3. Add browned chicken to the pan. Simmer browned chicken in the olive-tomato mixture until cooked through and tender, about 15-20 minutes.
4. Serve over prepared cous-cous and top with fresh basil.
This is one of those creations born out of necessity. The necessity to make something to eat ... with just what you have around the kitchen. You know those days. You thought you had something figured out to make for dinner, and then find you're missing a key ingredient. I swear there must be gremlins in my pantry. Pesky little gremlins who take ingredients when I'm not looking. Sneaky little devils.
And so this easy Mediterranean Chicken with Cous-Cous came to be. I had thawed out chicken from the freezer, so had to use it up. I looked around my kitchen to see what I had, and went to work assembling. Chicken ... onions ... garlic ... olives ... capers ...
canned tomatoes ... fresh basil ...
And, WOW, did this ever turn out delicious! I knew it would be edible ... I mean, you can't go too wrong with the ingredients I found laying around. But I didn't know it would turn out as tasty as it did! Easy and quick too. As we say at our house, it's a keeper!
Easy Mediterranean Chicken with Cous-Cous
Source: Tracey Original (I'm sure there are similar recipes out there, but I didn't reference any when tossing this together!)
Ingredients
Olive oil
4 boneless & skinless chicken breast halves (whole or cut into bite-sized chunks)
1 onion, sliced in round slices
1 clove garlic, minced
Salt & black pepper, to taste
A shake of crushed red pepper, to taste
4 T. capers
1 c. olives (a mix of kalamata and green olives)
1 (15 oz.) can whole tomatoes
Fresh basil
Prepared cous-cous
Directions
1. Season chicken breast halves with salt and black pepper. Heat a small amount of olive oil in a skillet; brown chicken in heated oil and then remove chicken from pan.
2. Heat another small amount of olive oil in the same skillet. Add onion slices and garlic; saute until onions soften a bit, about 2-3 minutes. Add black pepper, crushed red pepper, capers, and olives. Break up tomatoes with a fork (or your hands); add tomatoes, with juice, to the pan. Heat until simmering.
3. Add browned chicken to the pan. Simmer browned chicken in the olive-tomato mixture until cooked through and tender, about 15-20 minutes.
4. Serve over prepared cous-cous and top with fresh basil.
I remember seeing these cookies on a blog this summer and wanting to make them. They seemed so appropriate for the season, especially to bring to a picnic at the beach.
Now that it's no longer summer, and now that I don't live very close to the ocean, anymore, I felt it was appropriate to make them again and bring back a little feeling of summer.
Sand Dollar Cookies
Ingredients
½ cup unsalted butter
1 cup sugar
2 eggs (1 whole, one separated)
1 tsp vanilla
1 generous pinch of salt
¼ tsp baking powder
1 ¾ cup flour
Cinnamon sugar
sliced almonds
Directions
Cream together butter and sugar
Add 1 whole egg and one egg yolk, vanilla, salt, flour and baking powder until incorporated
Refrigerate for 1 hour. Then preheat oven to 350 degrees
Roll out cookie dough to ¼ inch thick and cut out 2 inch circles in the cookies. Place on parchment paper and brush with egg white.
Immediately sprinkle sugar on cookies and press almonds in the center in a star shape
Bake 4 minutes. Press almonds in again and continue to bake 8 more minutes. Let cool completely before serving.
Think apple crisp. Drizzled with caramel. Served over cheesecake with a brown sugar crust. With a little bit more caramel for good measure. And there you have Caramel Apple Cheesecake Bars. Are you drooling? Well, you probably should be.
I made these bars for the first-ever Improv Cooking Challenge, orchestrated and hosted by the fabulous Sheryl at Lady Behind the Curtain. Our challenge? Bake up a dish using the two ingredients specified by our challenge hostess - this time around, apples and caramel.
Truth be told, I'm not a fan of apples and caramel together. Apple desserts? Love them! Caramel? Love it! Together? Not so much. Those ooey-gooey, oh-so-sticky, almost-pull-my-teeth-out caramel apples on a stick? Detest them. So, probably needless to say, I wasn't just absolutely over-the-moon thrilled about this ingredient pairing (sorry, Sheryl!).
But, I really wanted to participate in the Improv Cooking Challenge, with this group of bloggers. So off I went in search of a caramel-and-apple recipe that would pique my interest. Oh, how I do love a challenge! I came across several possibilities in my searching travels, but none grabbed me quite like these cheesecake bars from The Girl Who Ate Everything. My mind and my eyes just kept on coming back to them. So, these little gems are what I went with! And I'm so glad I did.
I mean, basically apple crisp on top of cheesecake?? With caramel??? Come on! What's not to love?
You build these little beauties in layers - starting with a brown sugar-based crust. Then you pour on cheesecake batter, layer on cinnamon-coated apples, and top that with a buttery streusel layer.
Pop it in the oven until it's set and golden brown, and then drizzle on some caramel topping.
The only change I made to this recipe was to reduce the amount of butter in the crust and the streusel topping. I think it could be reduced even more, if you would like. It is, originally, a Paula Deen recipe, after all! ... and we all know how she loves her butter.
When the bars are cooled, cut into 'em and drizzle on a little more caramel topping ... ya know, just because you can. Then dig on in! I shared these with my team at school, and almost everyone asked for the recipe. Yes, this is one of those recipes.
And I have to say, this is one caramel and apple combination even a non-caramel apple lover can get behind! And biting into it won't pull your teeth out. I promise.
Caramel Apple Cheesecake Squares Source: Adapted from The Girl Who Ate Everything(who adapted from Paula Deen)
Ingredients Crust Layer: 2 c. all-purpose flour 1/2 c. firmly packed brown sugar 3/4 c. (1 1/2 sticks) butter, softened
Apple Layer: 3 tart apples (such as Rome or Granny Smith), peeled, cored and finely chopped 2 T. sugar 1/2 tsp. ground cinnamon 1/4 tsp. ground nutmeg
Streusel Layer: 1 c. firmly packed brown sugar 1 c. all-purpose flour 1/2 c. quick cooking oats 1/3 c. butter, softened
Caramel Layer: 1/2 c. caramel topping
Directions 1. Preheat oven to 350 degrees.
Crust Layer: 2. In a medium bowl, combine flour and brown sugar. Cut in butter with a pastry blender (or 2 forks) until mixture is crumbly.
3. Press evenly into a 9x13 baking pan lined with heavy-duty aluminum foil and sprayed with cooking spray. Bake 15 minutes or until lightly browned.
Cheesecake Layer: 4. In a large bowl, beat cream cheese with the 3/4 cup sugar in an electric mixer at medium speed until smooth. Add eggs, 1 at a time, and then add vanilla. Stir to combine. Pour over warm crust.
Apple Layer: 5. In a small bowl, stir together chopped apples, 2 tablespoons sugar, cinnamon, and nutmeg. Spoon evenly over cream cheese mixture.
Streusel Layer: 6. In a small bowl, combine all streusel ingredients. Using your hands or a fork, mix until the ingredients come together and form small crumbs. Sprinkle apples evenly with Streusel topping.
7. Bake 40-45 minutes, or until filling is set.
Caramel Layer: 8. Drizzle baked bars with caramel topping and let cool. Serve cold.
Enjoy!
Click the pictures below to visit other Improv Cooking Challenge participants. Looks like there are lots of creative and delicious caramel and apple dishes to choose from!
I always loved bagels (that is, until I decided to go on a diet and learned that one bagel is equal to about five slices of bread). It just didn't seem worth it, but from time to time the mood for a bagel with cream cheese would just strike me. It was inescapable. The subtle chewiness, the breadiness, the texture when an onion bagel was perfectly toasted: those were the wonderful little things.
Yet I learned from several friends who were New York natives that, in all likelihood, I had probably never had a good bagel. They said things packaged from the store didn't count, and Noah's bagels likewise did not count. They would speak poetically about the chewiness and distint flavor of a New York bagel. They said they hadn't found anything like it in California.
Since moving to the East Coast, I've found quite a few more people who are natives of New York/New Jersey. I decided to bring bagels in for one of them to try so they would give constructive pointers. After all, I cannot say I make bagels unless they really are New York or New Jersey approved. I figure no one else will be as picky about these round doughy delights.
For the most part, this bagel was New Jersey approved. They loved the flavor, thought it had a good density, and felt I got the interior right, but they said the exterior needed a long boiling time. It needed to be stickier and to have more of an alkaline flavor (more baking soda). Those are easy things to fix, so I called this recipe approved.
Bagels
Ingredients
1 tsp yeast
17 oz bread flour
2 ½ cups water
½ tsp yeast
15.25 oz bread flour
2 ¾ tsp salt
1 tbsp packed brown sugar or 2 tsp malt
Directions
Proof 1 tsp yeast in water. When it begins to bubble, add 17 oz bread flour. Let sit covered at room temperature for 2 hours.
After two hours, add salt, sugar/malt, remaining yeast and flour. Mix until incorporated and knead for 10 minutes
Immediately split dough into 12 pieces and roll into balls. Let rest 20 minutes
Shape bagels by punching a thumb through the center. Place dough on oiled parchment paper and let rise 20 minutes (or until bagels float in water). After rising, retard bagels in the refrigerator overnight.
The next morning, preheat oven to 500 degrees. Boil bagels for 1 minute on each side in water with baking soda (about 2 Tbsp for a pot)
Place bagels on cornmeal covered baking sheet with desired toppings. Bake for 5 minutes. Reduce heat to 450 degrees and bake another 5 minutes.
Last summer my husband and I took a trip to Tangier Island, Virginia ~ a small historic island in the middle of the Chesapeake Bay, 12 miles off shore and accessible only by boat or small airplane. So why am I writing about a summer trip now, in the Fall? Because I think this corn pudding dish we discovered while there is a perfect Thanksgiving side! With Thanksgiving fast approaching, I figured now was a great time to share this find.
But before we get to the scrumptious corn pudding, let me tell you a little about this unique and interesting island.
Approximately 500 people make 0.2 square-mile Tangier Island their home. There are no cars (well, we saw two), no city sounds, no traffic lights, no rushing around, no chain restaurants. There are narrow quaint streets, lots of marshes and seagrass, the beautiful sounds of boat engines and waves, a laid-back atmosphere, bicycles and golf carts for transportation, and crabs. Lots of tasty crabs. This quiet island is certainly not for everyone. My husband and I? - we loved it.
To be honest, Mark was immediately comfortable on Tangier, but I was a bit apprehensive at first. It took me a couple of days to settle into the island way. But Tangier certainly grew on me. It's not easy to describe the island, it's people, the Tangier way of life, or exactly why we loved it. And I'm sure I won't even come close to doing it justice. But here are a few snippets of Tangier life to give a tiny glimpse into this unique place.
Water & Quiet: I think these pictures speak for themselves!
The beach ... in JULY!! If you want a private beach, here you go.
How beautiful is that? And a beach in July with nobody on it? Not many other places you can find that!
There's an airport on the island, accessible for small aircraft - it's quiet, too. Have you ever walked to the beach on an airstrip? Well, Mark and I have! That's how quiet the airport is. You simply need just look up in the sky before embarking on your walk to the beach. All clear? Then go ahead!
Our feet on the airstrip, walking back from the beach
Super-Fresh Crab: Crabbing is the way of life on Tangier. In fact, Tangier is referred to as the soft shell crab capital of the world. I had crab in some form or another for every meal while we were on Tangier. I love crab, and could eat it every day. I swear I could.
Thanks to Ooker, a local waterman and mayor of Tangier, we had the pleasure of visiting a crab shack and learning about the soft shell crabbing industry. From what I could tell, being a waterman is tough work, but also a tradition and labor of love for the residents of Tangier.
Crab shacks
Tourism: During the summer, a couple of ferry boats come to the island each day, allowing passengers to explore the island. The tiny streets would bustle with activity for a few hours each mid-day while these short-time guests visited the island offerings.
Ferry coming in
Golf carts (one of the island's modes of transportation) would buzz visitors around ...
Island transportation
... and then the visitors would board back on their ferry boats and the streets would return to their 'normal' quiet.
Quiet street
Unique Dialect: One of the most intriguing experiences on Tangier Island was hearing the unusual accent of the residents. Because of centuries of relative isolation, the islanders still speak in a unique island way that is similar to the speech spoken when Tangier was settled in 1686. The accent is still strong enough that some people are not able to understand everything that is said. I was one of these people. After several days on Tangier I was getting much better at conversing with the residents, but I admit that I had to concentrate. Many videos and documentaries have been made about the island, highlighting the unique island dialect, if you'd like to learn more. I've included one brief video here - an ESPN commercial filmed on the island (this, and a couple of others, were actually filmed the week after we left the island) - so you can hear a bit of the dialect.
Hilda Crockett's Chesapeake House: And, finally, let's talk about Hilda Crockett's Chesapeake House, one of the three inns on the island, and the only inn also serving lunch and dinner. Family-style. With lots of food. Yummy home-cooking kinda food.
John Crockett settled Tangier island in 1686. Many of the inhabitants still have the surname Crockett - and I can only assume Hilda Crockett was descended from the island founder. Hilda Crockett's Chesapeake House was started in 1939 by Hilda herself, and is now run by Denny and Glenna Crockett.
Thankfully, Hilda Crockett's Chesapeake House is willing to share it's recipes. And, as you know if you're a frequent reader of this blog, I am a totally-obsessed recipe collector! So, naturally, I gathered all the recipes I could while visiting Tangier. I've made many of the dishes I learned about during our visit, and Hilda Crockett's Corn Pudding is one of my favorites. I hope you enjoy it's smooth-and-creamy, sweet-and-tasty deliciousness as much as I do! Thank you to Hilda and her family for graciously sharing her wonderfully scrumptious recipe.
(Visit Wikipedia to read more about Tangier Island.)
Ingredients 3 T. cornstarch 3/4 c. sugar 2 eggs 1 (14.75 oz.) can cream style corn 1 (12 oz.) can evaporated milk 1/4 tsp. salt 2 T. butter, cut into small pieces
Directions 1. In a bowl, combine the cornstarch and sugar with a whisk. Add eggs and beat well. Add corn and evaporated milk; mix well.
2. Pour into a greased 1-1/2 quart casserole dish. Dot with butter pieces.
3. Bake at 350 degrees for approximately 1 hour, until set and golden brown.
My parents brought the kids to see us at the birthing center about 5 hours after Miranda was born.
Ellia thinks Miranda is awesome!
For now.
Marissa is in baby heaven.
The next day - we had to leave the birthing center section of the hospital to regular mom/baby postpartum in the middle of the night so someone else could use the room.
Grant is pretty smitten with his 4th daughter.
Corban has decided that a 4th sister isn't such a bad thing.
Annika with Miranda
My parents brought the kids to see us at the birthing center about 5 hours after Miranda was born.
Ellia thinks Miranda is awesome!
For now.
Marissa is in baby heaven.
The next day - we had to leave the birthing center section of the hospital to regular mom/baby postpartum in the middle of the night so someone else could use the room.
Grant is pretty smitten with his 4th daughter.
Corban has decided that a 4th sister isn't such a bad thing.