Pages

Showing posts with label Other. Show all posts

My {NEW} Menu Board

 
*Disclaimer:  I received a free DecoBoard in order to write this post. This post is written by me.  All opinions are 100% mine.  You can read my advertising & disclosure policy HERE.

I am an avid menu planner.  I have self-proclaimed OCD when it comes to organization & cleanliness, so I am a planner by nature & I ALWAYS have a list for anything & everything.  Meal planning is huge for me because I hate to do things on a whim, especially cooking dinner.  I like to know what I am making, so I can plan my grocery shopping (which has it's own list), & then I know what meat to pull from my freezer the night before so it's thawed & ready to cook the next night for dinner.  My menu planning also helps me prepare my blog posts so I can fit them into our regular meal times or busy schedule.

I love the stress-free nature of cooking dinner when it is all planned & prepared for.  Up until now I have been using just a piece of paper from a notebook, & then I upgraded & got this little notepad from my mom that has a magnet on the back so it sticks to my fridge, but it's still not the cutest thing to write my menu on.  But then again, I didn't really care about how it looked until now.


DecoBoards Unlimited helped sponsor my group giveaway a couple weeks ago & offered each of us bloggers a free board to try out.  Oh man!  I was so excited!  I knew that I would be using it for this menu board.  I probably should have played around the site more because I found out they have these cute Menu Clings.  I totally should have ordered one!  
Anyway, I ordered the Solid Steel Magnetic Dry Erase Board, picked one of the backgrounds from their gallery (or you can totally upload your own photo--how cool is that?) and wrote out the days of the week with a cute colored font.  

When I got the board (it took a while, not sure what the hold up was, but it was worth it) the board was shipped really well.  They ensured that thing was not going to get broken.  I kind of had to work to get the cardboard corners off because they were staple gunned on, for protection, obviously.  I was so anxious to get it out of the wrapping, I almost forgot to take pictures!
These boards are absolutely well-made!  Like great quality, solid boards.  The frame is even kind of antiqued with the edges sanded a little bit (which is hard to tell from the pictures.)  Adorable!  It's almost too pretty to write on, almost.  The board came with a magnetic dry erase marker with an eraser on the lid & mounting brackets which were super easy to hammer into the frame right where I wanted them.
Once I hammered my brackets on the back, I nailed some holes in the wall, hung my beautiful board & moved my menu over from my ugly notepad to my cute new board.  I LOVE IT!  


If you are thinking of a great gift for someone, personalize a board & give it to them, or just buy one for yourself...you know you want to!

*These boards are easy to clean too.  Just use dry erase marker cleaner & a microfiber cloth or 90% Isopropyl Alcohol.  (These instructions are on the back of the board, so you never forget.)
 
*Disclaimer:  I received a free DecoBoard in order to write this post. This post is written by me.  All opinions are 100% mine.  You can read my advertising & disclosure policy HERE.

I am an avid menu planner.  I have self-proclaimed OCD when it comes to organization & cleanliness, so I am a planner by nature & I ALWAYS have a list for anything & everything.  Meal planning is huge for me because I hate to do things on a whim, especially cooking dinner.  I like to know what I am making, so I can plan my grocery shopping (which has it's own list), & then I know what meat to pull from my freezer the night before so it's thawed & ready to cook the next night for dinner.  My menu planning also helps me prepare my blog posts so I can fit them into our regular meal times or busy schedule.

I love the stress-free nature of cooking dinner when it is all planned & prepared for.  Up until now I have been using just a piece of paper from a notebook, & then I upgraded & got this little notepad from my mom that has a magnet on the back so it sticks to my fridge, but it's still not the cutest thing to write my menu on.  But then again, I didn't really care about how it looked until now.


DecoBoards Unlimited helped sponsor my group giveaway a couple weeks ago & offered each of us bloggers a free board to try out.  Oh man!  I was so excited!  I knew that I would be using it for this menu board.  I probably should have played around the site more because I found out they have these cute Menu Clings.  I totally should have ordered one!  
Anyway, I ordered the Solid Steel Magnetic Dry Erase Board, picked one of the backgrounds from their gallery (or you can totally upload your own photo--how cool is that?) and wrote out the days of the week with a cute colored font.  

When I got the board (it took a while, not sure what the hold up was, but it was worth it) the board was shipped really well.  They ensured that thing was not going to get broken.  I kind of had to work to get the cardboard corners off because they were staple gunned on, for protection, obviously.  I was so anxious to get it out of the wrapping, I almost forgot to take pictures!
These boards are absolutely well-made!  Like great quality, solid boards.  The frame is even kind of antiqued with the edges sanded a little bit (which is hard to tell from the pictures.)  Adorable!  It's almost too pretty to write on, almost.  The board came with a magnetic dry erase marker with an eraser on the lid & mounting brackets which were super easy to hammer into the frame right where I wanted them.
Once I hammered my brackets on the back, I nailed some holes in the wall, hung my beautiful board & moved my menu over from my ugly notepad to my cute new board.  I LOVE IT!  


If you are thinking of a great gift for someone, personalize a board & give it to them, or just buy one for yourself...you know you want to!

*These boards are easy to clean too.  Just use dry erase marker cleaner & a microfiber cloth or 90% Isopropyl Alcohol.  (These instructions are on the back of the board, so you never forget.)
reade more... Résuméabuiyad

Felt Flower Ribbon Necklace


This might be the only craft post you will ever see on this blog, but I did this little project & it turned out so cute, that I had to share it!


I am in charge of planning activities for the 8-9 year old girls at my church & I was trying to come up with a Mother's Day craft we could do that is my skill level (I'm very beginner.)  I needed it to be cute enough that the moms will actually like it, or in this case, wear it.


I found some felt flower tutorials from Craftiness is Not Optional.  And thought I could make a necklace with them.  


And the small flowers are called Mini Scalloped Felt Flowers (with step-by-step instructions in this link.)
I do not have any fancy die cut things that have shapes, so I made my own template; fold the felt in half, pin it, cut it out, repeat.

I used 3/8" satin ribbon (about 44 1/2" long) for the necklace & Pearl White Pearlized Beads (found in the craft section at Walmart) for extra detail.  

Stringing the pearls on the ribbon was a little tricky because the hole is very small.  I seared the ends of the ribbon with a match so it wouldn't unravel,  then I stuffed the ribbon through with a toothpick.  I am sure there is an easier way, like a sewing needle of some sort, but remember, I am not typically a crafty girl, so I used what I had.  

Everything else is done with a hot glue gun (just my style!)  Cut & hot glue the flowers, then glue them in the desired spot to the ribbon with extra felt on back to hold things in place (I glued my flowers kind of off-center to the side, but the flowers are kind of heavy, so don't glue them too far off-center.)  Extra felt on back is especially important for the smaller flowers that are not quite on the ribbon.


Tie the necklace for the length you like.


 Tip: The flowers kind of weigh the ribbon down, so it's nice to safety pin the necklace to your shirt; keeps it looking nice & in place.  :) 

Image Map

This might be the only craft post you will ever see on this blog, but I did this little project & it turned out so cute, that I had to share it!


I am in charge of planning activities for the 8-9 year old girls at my church & I was trying to come up with a Mother's Day craft we could do that is my skill level (I'm very beginner.)  I needed it to be cute enough that the moms will actually like it, or in this case, wear it.


I found some felt flower tutorials from Craftiness is Not Optional.  And thought I could make a necklace with them.  


And the small flowers are called Mini Scalloped Felt Flowers (with step-by-step instructions in this link.)
I do not have any fancy die cut things that have shapes, so I made my own template; fold the felt in half, pin it, cut it out, repeat.

I used 3/8" satin ribbon (about 44 1/2" long) for the necklace & Pearl White Pearlized Beads (found in the craft section at Walmart) for extra detail.  

Stringing the pearls on the ribbon was a little tricky because the hole is very small.  I seared the ends of the ribbon with a match so it wouldn't unravel,  then I stuffed the ribbon through with a toothpick.  I am sure there is an easier way, like a sewing needle of some sort, but remember, I am not typically a crafty girl, so I used what I had.  

Everything else is done with a hot glue gun (just my style!)  Cut & hot glue the flowers, then glue them in the desired spot to the ribbon with extra felt on back to hold things in place (I glued my flowers kind of off-center to the side, but the flowers are kind of heavy, so don't glue them too far off-center.)  Extra felt on back is especially important for the smaller flowers that are not quite on the ribbon.


Tie the necklace for the length you like.


 Tip: The flowers kind of weigh the ribbon down, so it's nice to safety pin the necklace to your shirt; keeps it looking nice & in place.  :) 

Image Map
reade more... Résuméabuiyad

Sneak Peak into my Disneyland Vacation

I thought it would be fun to share a few pictures from my family vacation to Disneyland.  We sure had a lot of fun... 4 days at both Disneyland Parks & 1 day at the beach.  Vacations are always nice, but it's always nice to be back home & in our own beds, getting back to the regular routine.

A couple family photos...(the jogger stroller was easy to maneuver & reclined so the kids could nap when they got tired.)


If you ever eat at Disneyland, I recommend the Jolly Holiday Bakery Café.  They have scrumptious desserts & tasty sandwiches.


Check out this cupcake ($4.99)...
Moist Chocolate Cake
Raspberry Creme Filling
Chocolate MOUSSE Frosting
Chocolate Ganache on top
Fancy Glitter, Shaved Chocolate, & Decorations


I. WAS. IN. HEAVEN!!!


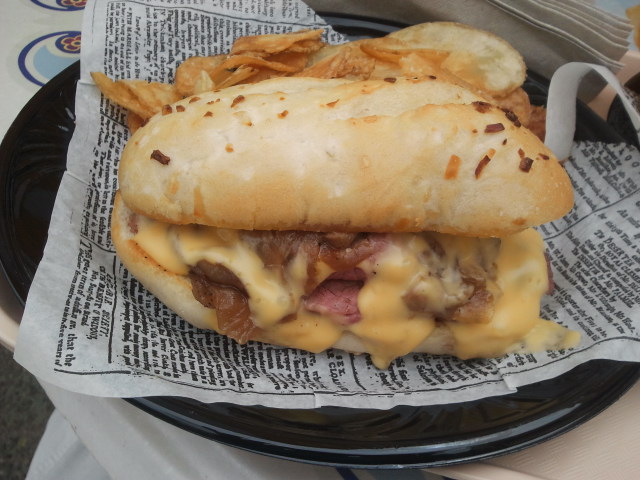
This Roast Beef Sandwich (just under $10) with saucy cheese, caramelized onions, & horseradish spread on a toasted onion roll was fabulous & also came from the Jolly Holiday Bakery Café.  Side note: I think it's really cute that they put it on parchment that looked like newspaper print.


Here are a couple more pics of my cute kids...


Another must try at Disneyland is the Dole Pineapple Whips or Floats from the Tiki Juice Bar.  I like both, but I think I liked the float a little bit more.  It's just pineapple soft serve ice cream with pineapple juice, but it is to die for!

 Looks like Disneyland cheaped out on us...look at that hole in the middle!  When you pay $3-ish for the whip & $5-ish for the float, they need to fill that sucker up!


Another favorite was the corn dogs from Corn Dog Castle in California Adventure...sorry I am talking all about food, this is a food blog after all.  

Just look at the size of those things!  They are $6-ish dollars per corn dog (that comes with a bag of chips or sliced apples) but the corn batter is thick & flavorful.  My kids ate one every day we were there!  They loved them!

A couple more places we loved that I don't have pictures for:

  • Cocina Cucamonga Mexican Grill (California Adventure)- my husband got the Fire Grilled Citrus Chicken (comes with a couple of tortillas, refried beans & seasoned rice) & I got an amazing Mexican Chicken Caesar Salad.  My husband's chicken was so moist & my salad was crisp & full of flavor.  Delicious!  This place is a little more pricey though about $12-$15 an entree.
  • Boardwalk Pizza & Pasta (California Adventure)- Again this one is a little more money about the $15 & under range.  But the pasta servings are large & saucy.
  • Redd Rockett's Pizza Port (Disneyland)- The pizza slices are huge, the pasta is saucy with a decent sized serving, & the salads are fresh & delicious.
I have also heard good things about:
DO NOT EAT HERE:
  • Village Haus Restaurant (Disneyland)- this one has very average burgers, fries, & pizzas.  Everything was cold & not good at all!  Do NOT waste your money.
If you are looking to save money, the lunch prices are cheaper than dinners.  We would buy lunch & bring sandwiches in a lunch box for dinner.  It still felt like we had an enjoyable time, & got to try a lot of things even though we were on a budget. 


I hope you enjoyed this little snippet into my personal life.  I don't post things like this very often, but I thought it would be fun to share some of our favorite finds.
I thought it would be fun to share a few pictures from my family vacation to Disneyland.  We sure had a lot of fun... 4 days at both Disneyland Parks & 1 day at the beach.  Vacations are always nice, but it's always nice to be back home & in our own beds, getting back to the regular routine.

A couple family photos...(the jogger stroller was easy to maneuver & reclined so the kids could nap when they got tired.)


If you ever eat at Disneyland, I recommend the Jolly Holiday Bakery Café.  They have scrumptious desserts & tasty sandwiches.


Check out this cupcake ($4.99)...
Moist Chocolate Cake
Raspberry Creme Filling
Chocolate MOUSSE Frosting
Chocolate Ganache on top
Fancy Glitter, Shaved Chocolate, & Decorations


I. WAS. IN. HEAVEN!!!


This Roast Beef Sandwich (just under $10) with saucy cheese, caramelized onions, & horseradish spread on a toasted onion roll was fabulous & also came from the Jolly Holiday Bakery Café.  Side note: I think it's really cute that they put it on parchment that looked like newspaper print.


Here are a couple more pics of my cute kids...


Another must try at Disneyland is the Dole Pineapple Whips or Floats from the Tiki Juice Bar.  I like both, but I think I liked the float a little bit more.  It's just pineapple soft serve ice cream with pineapple juice, but it is to die for!

 Looks like Disneyland cheaped out on us...look at that hole in the middle!  When you pay $3-ish for the whip & $5-ish for the float, they need to fill that sucker up!


Another favorite was the corn dogs from Corn Dog Castle in California Adventure...sorry I am talking all about food, this is a food blog after all.  

Just look at the size of those things!  They are $6-ish dollars per corn dog (that comes with a bag of chips or sliced apples) but the corn batter is thick & flavorful.  My kids ate one every day we were there!  They loved them!

A couple more places we loved that I don't have pictures for:

  • Cocina Cucamonga Mexican Grill (California Adventure)- my husband got the Fire Grilled Citrus Chicken (comes with a couple of tortillas, refried beans & seasoned rice) & I got an amazing Mexican Chicken Caesar Salad.  My husband's chicken was so moist & my salad was crisp & full of flavor.  Delicious!  This place is a little more pricey though about $12-$15 an entree.
  • Boardwalk Pizza & Pasta (California Adventure)- Again this one is a little more money about the $15 & under range.  But the pasta servings are large & saucy.
  • Redd Rockett's Pizza Port (Disneyland)- The pizza slices are huge, the pasta is saucy with a decent sized serving, & the salads are fresh & delicious.
I have also heard good things about:
DO NOT EAT HERE:
  • Village Haus Restaurant (Disneyland)- this one has very average burgers, fries, & pizzas.  Everything was cold & not good at all!  Do NOT waste your money.
If you are looking to save money, the lunch prices are cheaper than dinners.  We would buy lunch & bring sandwiches in a lunch box for dinner.  It still felt like we had an enjoyable time, & got to try a lot of things even though we were on a budget. 


I hope you enjoyed this little snippet into my personal life.  I don't post things like this very often, but I thought it would be fun to share some of our favorite finds.
reade more... Résuméabuiyad

What I Believe

Come listen to living prophets
Every now & then on this blog you hear me talk about my religion; like why I do choose not to drink alcoholic beverages, or I will talk about certain activities that involved food at my church, or with my LDS friends, etc.  If you have ever been curious about what Mormons are really about, tomorrow and Sunday, The Church of Jesus Christ of Latter-Day Saints holds a General Conference where the Prophet & Apostles will be speaking.  This is a FREE event and you can head to a local LDS church building to watch it with others.  Or, in many places you can watch it on TV in your home. It can be seen anywhere in the World.
No matter what your religious affiliation, this is just an overall uplifting series of talks on how we can become better people, & improve our relationship with Christ and our families.
To get more info on how you can watch this great event, head over here.  Look under the “How Do I Watch” section. You can even watch it live on your computer!
Or if you want to just learn more about what this Free General Conference is all about, this 60 Second Video will give you some more information:
Come listen to living prophets
Every now & then on this blog you hear me talk about my religion; like why I do choose not to drink alcoholic beverages, or I will talk about certain activities that involved food at my church, or with my LDS friends, etc.  If you have ever been curious about what Mormons are really about, tomorrow and Sunday, The Church of Jesus Christ of Latter-Day Saints holds a General Conference where the Prophet & Apostles will be speaking.  This is a FREE event and you can head to a local LDS church building to watch it with others.  Or, in many places you can watch it on TV in your home. It can be seen anywhere in the World.
No matter what your religious affiliation, this is just an overall uplifting series of talks on how we can become better people, & improve our relationship with Christ and our families.
To get more info on how you can watch this great event, head over here.  Look under the “How Do I Watch” section. You can even watch it live on your computer!
Or if you want to just learn more about what this Free General Conference is all about, this 60 Second Video will give you some more information:
reade more... Résuméabuiyad

Six Sisters' Stuff My Recipe Magic Launch Party

So I am a follower of the Six Sisters' Stuff blog & they had an open invitation to attend their My Recipe Magic launch party for any food bloggers or food lovers.  I saw it & thought I should go, but wimped out because I am a stay-at-home mom, what if I forget what it is like to socialize?  What if I look like a creepy stalker when I talk to the sisters?  Blah, blah, blah.  Even though my husband nudged me to go I made a million excuses why I shouldn't.

Then, I got a message on facebook from Camille, eldest sister of the Six Sisters' Stuff, saying that she liked my blog, saw that I had put recipes into My Recipe Magic & that she wanted to invite me to the launch party.  She also mentioned that she was an Aggie, go USU!  So I thought, okay, that was really nice, so I better just suck it up & go.  I was totally an RA (Resident Assistant) in college & you have to be bubbly & outgoing for that job, so it shouldn't be hard to be that person again right?  Despite my currently cooped up stay-at-home mom type ways, I decided to go.  Thankfully we have some friends that lived close to the event location so my husband & kids could play while I attended the launch party for the evening.

What a great party!  We got lovely bags with coupons, they had a made-to-order crepe bar, prizes, & lots of bloggers.  I got the chance to chat with Camille when I was in line for the crepes & she is so sweet.  She even recognized me & she has the cutest little baby girl.  Those sisters are so nice & their dad is super funny.  You can tell they are just a great, loving family which probably helps make them so successful.  Anyway, I had so much fun I have decided I am going to their Build Your Blog Conference in February.  If you are a fellow blogger in Utah & want more information, click on the link I have in my sidebar.  It is going to be amazing I just know it!

Anyway, I can't finish this post without showing you the fun ladies I met while I was there.

Meet The Real Housewives of Riverton!  These ladies are a hoot!  They shared lots of stories & are great friends.  Their blog has a little bit of everything.  Go check them out & tell them Amber @ Dessert Now, Dinner Later! sent you.


Lastly, meet Alexis from We Like to Learn As We Go!  She is a mom sharing her adventures & tips as her kids grow.  She has lots to share.  Go check her out & don't forget to let her know I sent ya!

So I am a follower of the Six Sisters' Stuff blog & they had an open invitation to attend their My Recipe Magic launch party for any food bloggers or food lovers.  I saw it & thought I should go, but wimped out because I am a stay-at-home mom, what if I forget what it is like to socialize?  What if I look like a creepy stalker when I talk to the sisters?  Blah, blah, blah.  Even though my husband nudged me to go I made a million excuses why I shouldn't.

Then, I got a message on facebook from Camille, eldest sister of the Six Sisters' Stuff, saying that she liked my blog, saw that I had put recipes into My Recipe Magic & that she wanted to invite me to the launch party.  She also mentioned that she was an Aggie, go USU!  So I thought, okay, that was really nice, so I better just suck it up & go.  I was totally an RA (Resident Assistant) in college & you have to be bubbly & outgoing for that job, so it shouldn't be hard to be that person again right?  Despite my currently cooped up stay-at-home mom type ways, I decided to go.  Thankfully we have some friends that lived close to the event location so my husband & kids could play while I attended the launch party for the evening.

What a great party!  We got lovely bags with coupons, they had a made-to-order crepe bar, prizes, & lots of bloggers.  I got the chance to chat with Camille when I was in line for the crepes & she is so sweet.  She even recognized me & she has the cutest little baby girl.  Those sisters are so nice & their dad is super funny.  You can tell they are just a great, loving family which probably helps make them so successful.  Anyway, I had so much fun I have decided I am going to their Build Your Blog Conference in February.  If you are a fellow blogger in Utah & want more information, click on the link I have in my sidebar.  It is going to be amazing I just know it!

Anyway, I can't finish this post without showing you the fun ladies I met while I was there.

Meet The Real Housewives of Riverton!  These ladies are a hoot!  They shared lots of stories & are great friends.  Their blog has a little bit of everything.  Go check them out & tell them Amber @ Dessert Now, Dinner Later! sent you.


Lastly, meet Alexis from We Like to Learn As We Go!  She is a mom sharing her adventures & tips as her kids grow.  She has lots to share.  Go check her out & don't forget to let her know I sent ya!

reade more... Résuméabuiyad

12 Days of Christmas Sweets!


There is going to be some CHRISTMAS CHAOS going on at my house these next couple weeks. 
I am going all out & compiling 12 delicious holiday treats, sweets, & drinks for you to enjoy! 
There will be one new recipe each day until Christmas starting Thursday, December 13th.

You won't want to miss out! Share this picture/post, tell your friends, & keep coming back for all the holiday goodies you won't want to miss! 
I can't wait to share them with you! 

There is going to be some CHRISTMAS CHAOS going on at my house these next couple weeks. 
I am going all out & compiling 12 delicious holiday treats, sweets, & drinks for you to enjoy! 
There will be one new recipe each day until Christmas starting Thursday, December 13th.

You won't want to miss out! Share this picture/post, tell your friends, & keep coming back for all the holiday goodies you won't want to miss! 
I can't wait to share them with you! 
reade more... Résuméabuiyad

Liebster Blog Awards

On Saturday, Dessert Now, Dinner Later! was awarded the Liebster Blog Award from Kristin @ Grateful Belly.  Kristin is great!  She has lots of awesome recipes with great photos & is a very sweet gal!  Go check her out!


The Liebster Award is given to up and coming blogs with less than 200 followers:

When you receive the award, this is what you do:
(Besides being really excited)

1.  Thank the person who gave it to you, and link back to their blog in your post.
(Thanks, again!!)

2. Display the Liebster Award on your blog.

3.  Choose five other blogs with less than 200 followers to pass the award on to.


I had to look around, but I found some fabulous blogs that are very close to reaching 200 followers, but still qualify for this cute little award.

Liebster.png

Once a Mom Always a Cook: Yummy food blog, & I love food!
Silver Boxes: Food & Crafts, this gal is multi-talented!
A Crafty Cook: Food, Crafts, Crochet, this gal does it all!
The Food Pusher: More good creative food!
Burn Me Not: Lots of good recipes with beautiful photos! 
 Congrats ladies!  Please take a minute to check out these fabulous bloggers!
On Saturday, Dessert Now, Dinner Later! was awarded the Liebster Blog Award from Kristin @ Grateful Belly.  Kristin is great!  She has lots of awesome recipes with great photos & is a very sweet gal!  Go check her out!


The Liebster Award is given to up and coming blogs with less than 200 followers:

When you receive the award, this is what you do:
(Besides being really excited)

1.  Thank the person who gave it to you, and link back to their blog in your post.
(Thanks, again!!)

2. Display the Liebster Award on your blog.

3.  Choose five other blogs with less than 200 followers to pass the award on to.


I had to look around, but I found some fabulous blogs that are very close to reaching 200 followers, but still qualify for this cute little award.

Liebster.png

Once a Mom Always a Cook: Yummy food blog, & I love food!
Silver Boxes: Food & Crafts, this gal is multi-talented!
A Crafty Cook: Food, Crafts, Crochet, this gal does it all!
The Food Pusher: More good creative food!
Burn Me Not: Lots of good recipes with beautiful photos! 
 Congrats ladies!  Please take a minute to check out these fabulous bloggers!
reade more... Résuméabuiyad