Pages

Showing posts with label Educational. Show all posts

Freezing Meats


I have another budget friendly kitchen tip for you all today.  We are talking about freezing meats.  I ALWAYS buy meat on sale.  I cringe if I ever run out & have to buy more at regular price.  I like to spend about $2 or less per pound for most of my meats, especially chicken & ground beef.  Pork is usually cheaper too.  So tip number one is buy in bulk on sale!  Family size packages are the best deals anyway, but when you see the price has dropped between $1.99-$2.25/lb it's time to stock up.  


Now that you have bought all that chicken & beef & such what do you do with it?  We'll start with chicken.  Frozen breasts seem to be more expensive per pound & they are almost always huge, which means you are eating way more than the proper serving size of 4oz.  I always buy FRESH chicken breasts.  I actually prefer to purchase mine from Walmart.  They seem to be trimmed the best compared to Sam's Club or Smith's (Kroger), so even if I have to pay like $2.09/lb I am still saving money from all the fat & trimming that I have to throw out because they hide it under the chicken in the other brands' packages.  Even so, you will have to do a little bit of trimming, but buying pre-trimmed breasts is going to cost you way more.

Now that you have trimmed your chicken breast, I like to cut mine in half width-wise to create 2 chicken breasts out of the one original breast.  You are basically butterflying your breast, but cutting the whole way through.  This helps with portion control, especially when the chicken breasts are huge.  I even try to buy the smaller ones.  Your chicken breasts will be smaller if you buy natural/organic chicken, but we simply buy the hormone injected chicken; it's gross to think about, I know, so let's move on.  

Cutting the chicken width-wise, like this, helps us use less meat in our meals as well, so it stretches farther between purchases.  Also, when you are cutting, make sure your knife is sharp & you don't saw the knife back & forth.  Use swift, swiping motions & pull up on the top part of the chicken as you cut across the length of the breast.

So now that you have two chicken breasts from the one original breast, you are going to stack them back on top of each other, but remember that there are two there when you go to use it from the freezer.  Keep your portions small.  One portion of chicken or any meat should be similar to a deck of cards or equal to 4oz. which is why we are making two servings out of one chicken breast.


Wash your hands.  Then, using a regular fold-top sandwich bag that has been flipped inside out, grab the chicken breast & fold the bag around it - trapping the chicken breast inside the sandwich bag.  You should be able to do this without getting your hands contaminated if you bought smaller breasts.

Repeat with all of the chicken breasts.  My method: I will trim one breast & cut it in half width-wise, set it on the other end of my large cutting board & repeat those steps with all of the chicken breasts.  Then, I will wash my hands & fold the chicken breasts in the sandwich bags.  Make sure you have a system down so you can move quickly & efficiently.


The very last step is to LABEL & DATE a gallon sized zip-top bag.  I use regular gallon bags (not freezer bags), but I am efficient with rotating my meat, so it rarely gets freezer burnt.  Lay the individually wrapped chicken breasts into the bag & freeze it flat in the freezer.  When you need the chicken you can pull out however many breasts you need & thaw them in a bowl, with the sandwich bag on, in the fridge overnight, or in the microwave directly before cooking.  Remember to separate the two pieces of the chicken breast before cooking.


My method for ground beef or ground turkey is the same.  I buy it in bulk (about 5-10lbs at a time.  Then I use my kitchen scale to weigh approximately 1lb each & press it flat into a quart sized zip-top bag.  I NEVER use freezer bags because I feel like it is a waste of money, but I rotate my meat very well & I have organized meal plans.  If you are the unorganized or forgetful type, buy the freezer bags.  Also one thing to note about freezing your meat this way, is to not handle it too much.  You don't want your meat being tough from being squished like crazy.  Just press it enough to lay it flat in the freezer, squeeze out any excess air & seal the bag shut.  LABEL your bags clearly BEFORE you fill them.  


Your meat should last about 6 months this way with little to no freezer burn as long as you squeeze out as much air as you can before sealing your bag shut.  My turkey looks very crystalized in this picture, but it's not freezer burned yet.  This is because there is naturally more moisture in ground turkey breast than ground beef.  When you need one of these for dinner, you can thaw it in the fridge overnight or thaw in the microwave directly before cooking.

Well, those are my tips for freezing meats!  Your freezer will look so organized & will fit a lot more meats this way.  Saving you money since you are buying on sale & using better portion control.  Plus, if you can see what you have in your freezer, it makes dinner planning that much easier!

I have another budget friendly kitchen tip for you all today.  We are talking about freezing meats.  I ALWAYS buy meat on sale.  I cringe if I ever run out & have to buy more at regular price.  I like to spend about $2 or less per pound for most of my meats, especially chicken & ground beef.  Pork is usually cheaper too.  So tip number one is buy in bulk on sale!  Family size packages are the best deals anyway, but when you see the price has dropped between $1.99-$2.25/lb it's time to stock up.  


Now that you have bought all that chicken & beef & such what do you do with it?  We'll start with chicken.  Frozen breasts seem to be more expensive per pound & they are almost always huge, which means you are eating way more than the proper serving size of 4oz.  I always buy FRESH chicken breasts.  I actually prefer to purchase mine from Walmart.  They seem to be trimmed the best compared to Sam's Club or Smith's (Kroger), so even if I have to pay like $2.09/lb I am still saving money from all the fat & trimming that I have to throw out because they hide it under the chicken in the other brands' packages.  Even so, you will have to do a little bit of trimming, but buying pre-trimmed breasts is going to cost you way more.

Now that you have trimmed your chicken breast, I like to cut mine in half width-wise to create 2 chicken breasts out of the one original breast.  You are basically butterflying your breast, but cutting the whole way through.  This helps with portion control, especially when the chicken breasts are huge.  I even try to buy the smaller ones.  Your chicken breasts will be smaller if you buy natural/organic chicken, but we simply buy the hormone injected chicken; it's gross to think about, I know, so let's move on.  

Cutting the chicken width-wise, like this, helps us use less meat in our meals as well, so it stretches farther between purchases.  Also, when you are cutting, make sure your knife is sharp & you don't saw the knife back & forth.  Use swift, swiping motions & pull up on the top part of the chicken as you cut across the length of the breast.

So now that you have two chicken breasts from the one original breast, you are going to stack them back on top of each other, but remember that there are two there when you go to use it from the freezer.  Keep your portions small.  One portion of chicken or any meat should be similar to a deck of cards or equal to 4oz. which is why we are making two servings out of one chicken breast.


Wash your hands.  Then, using a regular fold-top sandwich bag that has been flipped inside out, grab the chicken breast & fold the bag around it - trapping the chicken breast inside the sandwich bag.  You should be able to do this without getting your hands contaminated if you bought smaller breasts.

Repeat with all of the chicken breasts.  My method: I will trim one breast & cut it in half width-wise, set it on the other end of my large cutting board & repeat those steps with all of the chicken breasts.  Then, I will wash my hands & fold the chicken breasts in the sandwich bags.  Make sure you have a system down so you can move quickly & efficiently.


The very last step is to LABEL & DATE a gallon sized zip-top bag.  I use regular gallon bags (not freezer bags), but I am efficient with rotating my meat, so it rarely gets freezer burnt.  Lay the individually wrapped chicken breasts into the bag & freeze it flat in the freezer.  When you need the chicken you can pull out however many breasts you need & thaw them in a bowl, with the sandwich bag on, in the fridge overnight, or in the microwave directly before cooking.  Remember to separate the two pieces of the chicken breast before cooking.


My method for ground beef or ground turkey is the same.  I buy it in bulk (about 5-10lbs at a time.  Then I use my kitchen scale to weigh approximately 1lb each & press it flat into a quart sized zip-top bag.  I NEVER use freezer bags because I feel like it is a waste of money, but I rotate my meat very well & I have organized meal plans.  If you are the unorganized or forgetful type, buy the freezer bags.  Also one thing to note about freezing your meat this way, is to not handle it too much.  You don't want your meat being tough from being squished like crazy.  Just press it enough to lay it flat in the freezer, squeeze out any excess air & seal the bag shut.  LABEL your bags clearly BEFORE you fill them.  


Your meat should last about 6 months this way with little to no freezer burn as long as you squeeze out as much air as you can before sealing your bag shut.  My turkey looks very crystalized in this picture, but it's not freezer burned yet.  This is because there is naturally more moisture in ground turkey breast than ground beef.  When you need one of these for dinner, you can thaw it in the fridge overnight or thaw in the microwave directly before cooking.

Well, those are my tips for freezing meats!  Your freezer will look so organized & will fit a lot more meats this way.  Saving you money since you are buying on sale & using better portion control.  Plus, if you can see what you have in your freezer, it makes dinner planning that much easier!
reade more... Résuméabuiyad

How to... Cut a Mango


I love mangoes in fruit salsas, salads & to snack on.  They are the perfect summer fruit!  Today I am sharing some knife skills education on how to cut a mango.
SELECT A RIPE MANGO: Look for mangoes that are football shaped rather than thin or flat. The flatter mangoes may be stringy. Avoid stringy looking, shriveled mangoes. The mangoes that are fuller & rounder usually have the deep color of a ripe peach instead of the yellowish green that the other varieties have.
Check the area around the stem; if it looks plump & round, the mango is ripe.  With the stem end up, smell the mango.  A ripe mango will have a sweet, fruity aroma & be slightly soft to the touch, like an avocado or peach.  A few brown speckles is also a normal indication of ripeness. 

PREPARE to cut the fruit with a sturdy cutting board & desired knives.  (I used a chef's & paring knife.)

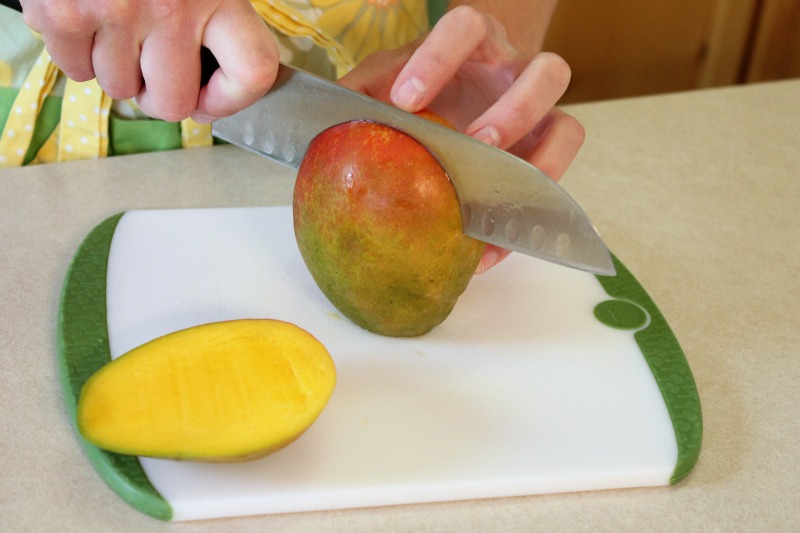
SLICE the mango lengthwise on either side of the center core.


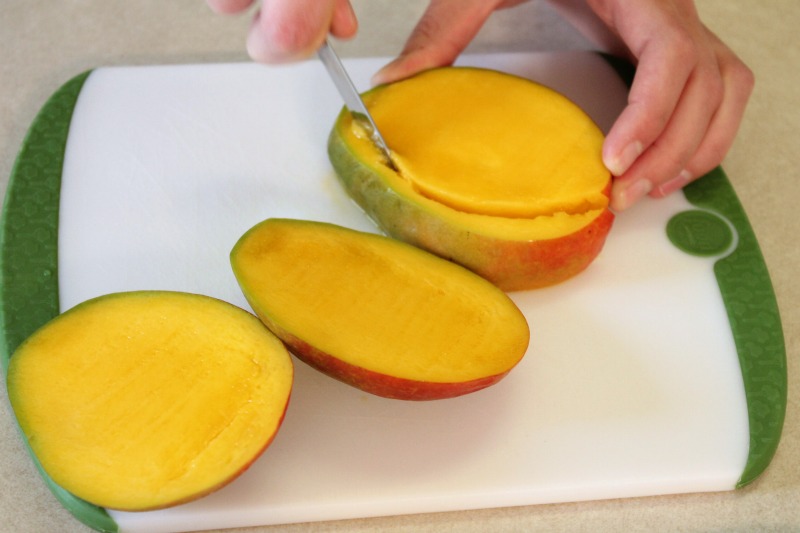
TRIM the sides around the center core.


SCORE the fruit inside the peel, but not through the skin of the peel.


PUSH the fruit outwards.


Carefully REMOVE the cubes of fruit by cutting down towards the cutting board as close to the skin that you can.

REPEAT until all fruit is removed from the peel.

*1 medium to large Mango yields about 3/4 to 1 cup of cubed fruit.

I love mangoes in fruit salsas, salads & to snack on.  They are the perfect summer fruit!  Today I am sharing some knife skills education on how to cut a mango.
SELECT A RIPE MANGO: Look for mangoes that are football shaped rather than thin or flat. The flatter mangoes may be stringy. Avoid stringy looking, shriveled mangoes. The mangoes that are fuller & rounder usually have the deep color of a ripe peach instead of the yellowish green that the other varieties have.
Check the area around the stem; if it looks plump & round, the mango is ripe.  With the stem end up, smell the mango.  A ripe mango will have a sweet, fruity aroma & be slightly soft to the touch, like an avocado or peach.  A few brown speckles is also a normal indication of ripeness. 

PREPARE to cut the fruit with a sturdy cutting board & desired knives.  (I used a chef's & paring knife.)

SLICE the mango lengthwise on either side of the center core.


TRIM the sides around the center core.


SCORE the fruit inside the peel, but not through the skin of the peel.


PUSH the fruit outwards.


Carefully REMOVE the cubes of fruit by cutting down towards the cutting board as close to the skin that you can.

REPEAT until all fruit is removed from the peel.

*1 medium to large Mango yields about 3/4 to 1 cup of cubed fruit.
reade more... Résuméabuiyad

How To... Make Your Strawberries Last Longer!


Today's post is the first of {hopefully} many educational posts.  I am trying to give you tips & tricks on this blog that I have learned on my own or through culinary school.  This one is totally a Pinterest trick that I learned.  I had to test it out & let you know if it worked & I am pleased with the results.

If you saw my Low-Sugar Strawberry Freezer Jam recipe, then you know I had a lot of strawberries from a flat (8lbs) of strawberries I had purchased super cheap ($3.99!)  I went through my strawberries, picked out the moldy/rotting ones & then did this little trick:


Place whole strawberries, stems & all in a clean sink with 1 part white vinegar to 10 parts cold water.  (I did 2 cups of vinegar to 20 cups of water--I had 8lbs of strawberries after all.)  The vinegar cleans, sanitizes, & kills mold spores keeping the strawberries fresh longer (The vinegar does not affect the taste.)  The cold water shocks the strawberries to wake them up a little bit, helping them stay crisp.  Let soak for 5 minutes.


  Then, GENTLY spin strawberries in a salad spinner until mostly dry. 


Place clean & dry strawberries in a paper towel lined bowl (to help soak up any extra moisture) & leave uncovered in the refrigerator.  Done!

I know this cleaned the strawberries really well because my sink was full of dirt after I finished with all the strawberries.

I bought my flat of strawberries on a Wednesday, did this trick on Thursday & half of them (4lbs) have lasted almost 1 whole week!  We of course ate some of the softer ones, made jam with others, & then I had a party for my friends with fruit & Coconut Cream Fruit Dip (my favorite & most popular recipe.)  I would say the majority of them lasted 4 days after washing them, & then they started getting a little wrinkled on the outside by days 5 & 6.  They were pretty ripe when I bought them too.

This trick should work on any berries you have.  Try it!

Image Map

Today's post is the first of {hopefully} many educational posts.  I am trying to give you tips & tricks on this blog that I have learned on my own or through culinary school.  This one is totally a Pinterest trick that I learned.  I had to test it out & let you know if it worked & I am pleased with the results.

If you saw my Low-Sugar Strawberry Freezer Jam recipe, then you know I had a lot of strawberries from a flat (8lbs) of strawberries I had purchased super cheap ($3.99!)  I went through my strawberries, picked out the moldy/rotting ones & then did this little trick:


Place whole strawberries, stems & all in a clean sink with 1 part white vinegar to 10 parts cold water.  (I did 2 cups of vinegar to 20 cups of water--I had 8lbs of strawberries after all.)  The vinegar cleans, sanitizes, & kills mold spores keeping the strawberries fresh longer (The vinegar does not affect the taste.)  The cold water shocks the strawberries to wake them up a little bit, helping them stay crisp.  Let soak for 5 minutes.


  Then, GENTLY spin strawberries in a salad spinner until mostly dry. 


Place clean & dry strawberries in a paper towel lined bowl (to help soak up any extra moisture) & leave uncovered in the refrigerator.  Done!

I know this cleaned the strawberries really well because my sink was full of dirt after I finished with all the strawberries.

I bought my flat of strawberries on a Wednesday, did this trick on Thursday & half of them (4lbs) have lasted almost 1 whole week!  We of course ate some of the softer ones, made jam with others, & then I had a party for my friends with fruit & Coconut Cream Fruit Dip (my favorite & most popular recipe.)  I would say the majority of them lasted 4 days after washing them, & then they started getting a little wrinkled on the outside by days 5 & 6.  They were pretty ripe when I bought them too.

This trick should work on any berries you have.  Try it!

Image Map
reade more... Résuméabuiyad

Guest Speaking Today at Mommy & Me Creations!

Mommy and Me Creations

My blog is being featured over at Mommy & Me Creations today & I am so excited!

  Jacque's blog is geared towards fun, creative, and educational activities for you to use in your homes and classrooms.  She has a passion for creating things with kids & educating children, so I wrote her a post about cooking with kids.

If you are a mom, this is one post you will not want to miss!  It's complete with lists on age appropriate kitchen skills/tasks for your little ones.  The lists range from Toddlers 3 & under all the way up to Teens 16-18 years old.

Go check it out HERE!
Mommy and Me Creations

My blog is being featured over at Mommy & Me Creations today & I am so excited!

  Jacque's blog is geared towards fun, creative, and educational activities for you to use in your homes and classrooms.  She has a passion for creating things with kids & educating children, so I wrote her a post about cooking with kids.

If you are a mom, this is one post you will not want to miss!  It's complete with lists on age appropriate kitchen skills/tasks for your little ones.  The lists range from Toddlers 3 & under all the way up to Teens 16-18 years old.

Go check it out HERE!
reade more... Résuméabuiyad

Make Ahead Freezer Meals


There are a lot of situations in life that it's nice to be prepared ahead of time.  Sometimes you have a really busy work week, sometimes you are about to have a baby & won't have energy, time or motivation to cook, sometimes you just want a lazy day dinner, or sometimes you are helping out a friend by bringing them a meal they can have later on for whatever their circumstance might be.  


When I was in a married student ward several years ago, I was the compassionate service leader.  Since our ward was so young, we mostly only ever needed to provide meals for new mothers.  I would call people on a list I had previously handed out for volunteers to provide hot or freezer meals for the families.  Most of the time when I would mention the awful word, "freezer meal" the gal on the other end, would panic:


"Uh, I don't know how to make any freezer meals." 
"What kind of foods can you make into a freezer meal?" 
"Um, sure..."(puzzled & confused)


I don't know what scares people about freezer meals, but they are so easy, & make your life simple on the days when you need something quick.  And freezer meals don't just mean lasagna! *Gasp!


To give you some ideas:

  • Any soup, stew or chili can be made in bulk & frozen in a gallon freezer bag.
  • You can double any casserole recipe, buy some tin foil pans from the dollar store, & make an extra to freeze with foil over the top.
  • Pastas, rice, & potatoes all freeze relatively well.
  • Crockpot meals are your friend: raw meat, sauce, vegetables, put in a ziplock bag, freeze, done!
  • Breakfast burritos, english muffin breakfast sandwiches, pancakes/waffles, muffins, etc all freeze well too.  Freezer meals are not just dinners!
If you are planning on preparing meals ahead of time, pick a day where you can devote to cutting vegetables & preparing dinners to freeze.  Crockpot meals are the fastest to put together because they require the least amount of preparation & don't need the meat to be cooked.  Get the work done, & enjoy the freedom of a made ahead freezer meal.

Check out Once a Month Mom for a TON of great recipes to freeze.

As for me, I had fun putting together four of my favorite meals for one of my husband's co-workers who is due really soon with her fourth baby, so of course she will have her hands full, but she'll be fed well for several days after the baby gets here!

These meals were simple because I did two at a time.  The first two I browned up my hamburger for both at the same time.  The second two, I got a store-bought already cooked rotisserie chicken & split it in half for those recipes.  EASY!


Another thing to think about when preparing meals to give for families is any bread or sides to go with the dish.  It's always nice to have something extra than just one thing on your plate.  I like to do homemade garlic bread with store bought french bread, wrap it in foil & return it to the bag you bought it in, or bake up some cornbread muffins in cupcake liners & freeze in a ziplock bag, or you can also make your own "Rhodes Rolls" freeze them separately on a lightly floured cookie sheet (see here for some tasty recipes) or you can place them close together in a tin foil round cake pan, let them rise slightly, cover with foil & freeze.  

It's important when giving freezer meals away, to prepare a label that tells them how to cook the freezer meal & or sides.  


Example Label/Instructions:

*ALL MEALS SHOULD BE THAWED IN THE REFRIGERATOR OVERNIGHT.  DEPENDING ON THE SETTING OF YOUR FREEZER, IT MIGHT TAKE UP TO 2 DAYS TO THAW COMPLETELY.  ALSO, IT MIGHT BE A GOOD IDEA TO PLACE THE MEAL ON A LARGE COOKIE SHEET WHILE BAKING BECAUSE SOME OF THEM ARE FULL & MAY SPILL OVER. 

Tator Tot Casserole
Bake at 350*F for 45 minutes or until bubbling & heated through.  Remove foil last 10 minutes to brown the cheese.

Chicken Alfredo Roll-ups & Garlic Bread
Remove foil.  Bake roll-ups at 350*F for 45 minutes or until bubbling & heated through.  Bake Garlic Bread frozen @ 400*F for 9min+ or thawed @ 350*F for 15min+ (Remove foil, separate halves, & place on a cookie sheet before baking.)

Chicken Divan & Dinner Rolls
Remove foil.  Place casserole onto a large baking sheet.  Bake at 350*F for 45 minutes or until bubbling & heated through.  For the Rolls: Replace foil with saran wrap lightly covering rolls.  Let rise in refrigerator overnight.  If they need additional proofing, allow them to rest at room temperature until well raised.  Remove saran wrap & bake rolls at 375* for 10-15 minutes or until tops are browned.  Optional: Brush tops with butter after finished baking.

Taco Soup & Cornbread
Pour contents of pouch into a slow cooker.  Cook on low for 3-4 hours or place in a large pot on top of the stove & simmer until heated through stirring occasionally.  For the cornbread: Thaw at room temperature; may heat in the microwave right before eating with soup.  


Generally, casseroles take 30-45 minutes if they are thawed completely.  If they are frozen expect them to take 60-75 minutes in the oven.

Make sure you label everything well.  If you know it's going to get eaten quickly, you don't have to put the date you made it, but if you are holding it in your own freezer for a later date, label it clearly with the date & use it within 3 months.

Well, that is a start to preparing freezer meals.  I hope this helps some of you out!  Don't be afraid of freezer meals.  They really can be almost anything!  


There are a lot of situations in life that it's nice to be prepared ahead of time.  Sometimes you have a really busy work week, sometimes you are about to have a baby & won't have energy, time or motivation to cook, sometimes you just want a lazy day dinner, or sometimes you are helping out a friend by bringing them a meal they can have later on for whatever their circumstance might be.  


When I was in a married student ward several years ago, I was the compassionate service leader.  Since our ward was so young, we mostly only ever needed to provide meals for new mothers.  I would call people on a list I had previously handed out for volunteers to provide hot or freezer meals for the families.  Most of the time when I would mention the awful word, "freezer meal" the gal on the other end, would panic:


"Uh, I don't know how to make any freezer meals." 
"What kind of foods can you make into a freezer meal?" 
"Um, sure..."(puzzled & confused)


I don't know what scares people about freezer meals, but they are so easy, & make your life simple on the days when you need something quick.  And freezer meals don't just mean lasagna! *Gasp!


To give you some ideas:

  • Any soup, stew or chili can be made in bulk & frozen in a gallon freezer bag.
  • You can double any casserole recipe, buy some tin foil pans from the dollar store, & make an extra to freeze with foil over the top.
  • Pastas, rice, & potatoes all freeze relatively well.
  • Crockpot meals are your friend: raw meat, sauce, vegetables, put in a ziplock bag, freeze, done!
  • Breakfast burritos, english muffin breakfast sandwiches, pancakes/waffles, muffins, etc all freeze well too.  Freezer meals are not just dinners!
If you are planning on preparing meals ahead of time, pick a day where you can devote to cutting vegetables & preparing dinners to freeze.  Crockpot meals are the fastest to put together because they require the least amount of preparation & don't need the meat to be cooked.  Get the work done, & enjoy the freedom of a made ahead freezer meal.

Check out Once a Month Mom for a TON of great recipes to freeze.

As for me, I had fun putting together four of my favorite meals for one of my husband's co-workers who is due really soon with her fourth baby, so of course she will have her hands full, but she'll be fed well for several days after the baby gets here!

These meals were simple because I did two at a time.  The first two I browned up my hamburger for both at the same time.  The second two, I got a store-bought already cooked rotisserie chicken & split it in half for those recipes.  EASY!


Another thing to think about when preparing meals to give for families is any bread or sides to go with the dish.  It's always nice to have something extra than just one thing on your plate.  I like to do homemade garlic bread with store bought french bread, wrap it in foil & return it to the bag you bought it in, or bake up some cornbread muffins in cupcake liners & freeze in a ziplock bag, or you can also make your own "Rhodes Rolls" freeze them separately on a lightly floured cookie sheet (see here for some tasty recipes) or you can place them close together in a tin foil round cake pan, let them rise slightly, cover with foil & freeze.  

It's important when giving freezer meals away, to prepare a label that tells them how to cook the freezer meal & or sides.  


Example Label/Instructions:

*ALL MEALS SHOULD BE THAWED IN THE REFRIGERATOR OVERNIGHT.  DEPENDING ON THE SETTING OF YOUR FREEZER, IT MIGHT TAKE UP TO 2 DAYS TO THAW COMPLETELY.  ALSO, IT MIGHT BE A GOOD IDEA TO PLACE THE MEAL ON A LARGE COOKIE SHEET WHILE BAKING BECAUSE SOME OF THEM ARE FULL & MAY SPILL OVER. 

Tator Tot Casserole
Bake at 350*F for 45 minutes or until bubbling & heated through.  Remove foil last 10 minutes to brown the cheese.

Chicken Alfredo Roll-ups & Garlic Bread
Remove foil.  Bake roll-ups at 350*F for 45 minutes or until bubbling & heated through.  Bake Garlic Bread frozen @ 400*F for 9min+ or thawed @ 350*F for 15min+ (Remove foil, separate halves, & place on a cookie sheet before baking.)

Chicken Divan & Dinner Rolls
Remove foil.  Place casserole onto a large baking sheet.  Bake at 350*F for 45 minutes or until bubbling & heated through.  For the Rolls: Replace foil with saran wrap lightly covering rolls.  Let rise in refrigerator overnight.  If they need additional proofing, allow them to rest at room temperature until well raised.  Remove saran wrap & bake rolls at 375* for 10-15 minutes or until tops are browned.  Optional: Brush tops with butter after finished baking.

Taco Soup & Cornbread
Pour contents of pouch into a slow cooker.  Cook on low for 3-4 hours or place in a large pot on top of the stove & simmer until heated through stirring occasionally.  For the cornbread: Thaw at room temperature; may heat in the microwave right before eating with soup.  


Generally, casseroles take 30-45 minutes if they are thawed completely.  If they are frozen expect them to take 60-75 minutes in the oven.

Make sure you label everything well.  If you know it's going to get eaten quickly, you don't have to put the date you made it, but if you are holding it in your own freezer for a later date, label it clearly with the date & use it within 3 months.

Well, that is a start to preparing freezer meals.  I hope this helps some of you out!  Don't be afraid of freezer meals.  They really can be almost anything!  
reade more... Résuméabuiyad