Pages

Showing posts with label Tips and Tricks. Show all posts

Freezing Cheese

Today's post is another educational post about how to save money on buying in bulk & freezing your food.  This time I am talking all about CHEESE!  We love cheese, but it's expensive, so I buy it in bulk & freeze mine.  Or anytime I see a deal, like a 2lb block of cheese for $5 or less, it's stock up time!  This is how I freeze my cheese to use later. 

Basically, you need to get your cheese in the form you will be using it before you freeze it.  Freezing the whole block of cheese won't work because the structure of the cheese changes when it freezes.  So shredding & slicing cheese after it has been frozen, turns the cheese into a crumbly mess.  

I have frozen mozzarella, cheddar, colby jack & parmesan cheese with success, so I am fairly confident this works with any cheese.  Here is how you do it:


I buy some of my cheese already shredded.  I actually prefer it that way because they put some kind of coating on the cheese so it doesn't stick.  I buy the big 5lb bag at Sam's club for about $13.  Then I use my trusty quart size baggies that have been labeled with that days date & the name of the cheese if I think I will forget.  I don't use freezer bags, but I rotate the bags of cheese well.  Then I scale each bag to weigh 1lb, squeeze as much air out as possible & then zip it shut.  Weighing the bags is optional, you can eyeball it pretty easily.  Just squeeze as much air out as you can before you zip it shut.  


If you buy a block of cheese, which I like to buy the 2lb blocks when they go on sale for $5 or less, then you can shred that yourself as well.  Just cut the block into manageable pieces, then shred it in a food processor or by hand if you don't have one.  Don't shred it all at once or it will get packed into your machine & it will stick together.  I will put a 2lb block into 3 quart sized bags.  This also helps the cheese from getting packed down & stuck together.  Stack bags of prepared shredded cheese flat on top of each other to freeze.


To slice the cheese for sandwiches, I absolutely LOVE my marble cheese slicer.  It cuts so smooth & straight & I can get a lot more slices than any other knives or hand held slicers I have tried.  Colby Jack comes apart the easiest, but the harder cheeses like cheddar do okay as well.  When I stack mine, I stagger them.  You might need the assistance of a butter knife to peel it apart when you go to use it, but it should stay in tact pretty well.  You can also choose to cut little pieces of wax paper to place between the slices.  To me that is more work & more stuff to buy, so I just stagger mine & use a butter knife to separate my slice from the stack.  Again you will want to label your bags before filling them.  I use plain old sandwich bags & I like to store the cheese slices in the side door of the freezer.


When you pull any of these cheeses from the freezer to use, you want to allow some time for it to thaw in the fridge for best food safety practices.  That's it!  Just remember to prepare your cheese, portion it out, & package it squeezing as much of the air out that you can!  My cheese slices last about 2-3 months without any freezer burn & the shredded usually does better, about 4 months.  You can try using freezer bags to help with freezer burn, but we usually use the cheese before it sees any effects from the freezer.  Happy Freezing!
Today's post is another educational post about how to save money on buying in bulk & freezing your food.  This time I am talking all about CHEESE!  We love cheese, but it's expensive, so I buy it in bulk & freeze mine.  Or anytime I see a deal, like a 2lb block of cheese for $5 or less, it's stock up time!  This is how I freeze my cheese to use later. 

Basically, you need to get your cheese in the form you will be using it before you freeze it.  Freezing the whole block of cheese won't work because the structure of the cheese changes when it freezes.  So shredding & slicing cheese after it has been frozen, turns the cheese into a crumbly mess.  

I have frozen mozzarella, cheddar, colby jack & parmesan cheese with success, so I am fairly confident this works with any cheese.  Here is how you do it:


I buy some of my cheese already shredded.  I actually prefer it that way because they put some kind of coating on the cheese so it doesn't stick.  I buy the big 5lb bag at Sam's club for about $13.  Then I use my trusty quart size baggies that have been labeled with that days date & the name of the cheese if I think I will forget.  I don't use freezer bags, but I rotate the bags of cheese well.  Then I scale each bag to weigh 1lb, squeeze as much air out as possible & then zip it shut.  Weighing the bags is optional, you can eyeball it pretty easily.  Just squeeze as much air out as you can before you zip it shut.  


If you buy a block of cheese, which I like to buy the 2lb blocks when they go on sale for $5 or less, then you can shred that yourself as well.  Just cut the block into manageable pieces, then shred it in a food processor or by hand if you don't have one.  Don't shred it all at once or it will get packed into your machine & it will stick together.  I will put a 2lb block into 3 quart sized bags.  This also helps the cheese from getting packed down & stuck together.  Stack bags of prepared shredded cheese flat on top of each other to freeze.


To slice the cheese for sandwiches, I absolutely LOVE my marble cheese slicer.  It cuts so smooth & straight & I can get a lot more slices than any other knives or hand held slicers I have tried.  Colby Jack comes apart the easiest, but the harder cheeses like cheddar do okay as well.  When I stack mine, I stagger them.  You might need the assistance of a butter knife to peel it apart when you go to use it, but it should stay in tact pretty well.  You can also choose to cut little pieces of wax paper to place between the slices.  To me that is more work & more stuff to buy, so I just stagger mine & use a butter knife to separate my slice from the stack.  Again you will want to label your bags before filling them.  I use plain old sandwich bags & I like to store the cheese slices in the side door of the freezer.


When you pull any of these cheeses from the freezer to use, you want to allow some time for it to thaw in the fridge for best food safety practices.  That's it!  Just remember to prepare your cheese, portion it out, & package it squeezing as much of the air out that you can!  My cheese slices last about 2-3 months without any freezer burn & the shredded usually does better, about 4 months.  You can try using freezer bags to help with freezer burn, but we usually use the cheese before it sees any effects from the freezer.  Happy Freezing!
reade more... Résuméabuiyad

Favorite Kitchen Items & Baking Tricks for Perfect Holiday Food

Today I am going to share some of my favorite kitchen items that I use around the holidays to make getting that big fancy meal on the table as perfectly as possible.  I am also going to let you in on a few baking tricks!

The first thing I think of about the holidays is baking!  I really started enjoying baking with my mom when I was 11 years old.  Thanksgiving was my favorite because we would make like six desserts just for our little family of 6.  A little ridiculous you might say, but it was the memories that I love about baking.  

The BIGGEST, most IMPORTANT tip when it comes to any baked good: breads, cookies, pies, etc...basically anything that uses flour, is that you NEED to stir that flour up before measuring it.  Think about it!  That flour has been sitting in it's bag/bin since the last time you used it.  It has settled.  If you were to measure 1 cup of flour straight from your bag/bin & weigh it, then stir up that flour & weigh a new cup they would be two different weights as illustrated in the photo below.

The first cup weighs more than the second cup that was stirred.  I added flour to the scale of the stirred cup to equal the 5.3oz of the settled cup & it was 2 TBSP more flour!  Think about that next time you bake!  If every cup of un-stirred flour you measured automatically added 2 TBSP more flour to your product, a recipe with 3 cups of flour would have 6 TBSP more flour which is a little more than 1/3 of a cup!  Can you see why this is so important?  You can even see that the settled flour looks more packed, whereas the stirred flour is lighter.  So stirring the flour incorporates air into the flour, giving you a more light, airy product, than a dense & dry roll or cookie.  So think of it as THE UNWRITTEN RULE OF BAKING: Stir the flour before measuring it!


Since we are on the topic of flour, I can't help but share my favorite yeast product.  There is nothing like this yeast from SAF.  It's a premium, high power yeast that really does work faster than plain old yeast.  The only place that I can find it, not directly from sellers to bakeries, is a store in Utah called Emergency Essentials.  I actually didn't know they had it.  I got my first bag from a direct seller when I worked in a bakery.  It lasted me 3 YEARS & was still working great through the end!  I only make dough with yeast like once a week or twice a month, and a great tip for extending the life of yeast is that you can FREEZE IT!  Have you seen my other posts about freezing things?  I'm obsessed.  Anyway, when I first open a bag like this, it fits into two, 2-cup containers.  I will put the date on both of them & I will put one straight into the freezer & the other in the fridge (if I don't have room for both in the freezer.)  You can use the yeast cold from the fridge or freezer, just use slightly warmer water to bloom your yeast with.

Speaking of blooming yeast, another trick I learned in Culinary School is that if you give yeast some sugar when you stir it up in the warm water, it blooms faster.  I typically do double the sugar to yeast (2:1 ratio) so if I do 1/2 TBSP of yeast I will do 1 TBSP of sugar.  The sugar is kind of like food for the yeast.  But this SAF yeast is seriously the best because the dough doubles in size in like 15-20 minutes for rolls/breadsticks.  I am not even kidding!  LOVE this yeast!  And if I didn't live in Utah, I would still pay the $6 shipping for it because it's that good!


Another MUST HAVE when it comes to baking is a silicone baking mat.  I looked long & hard before I bought mine.  I just hated the thought of paying $25 for one mat, no matter how cool it was.  I was looking at this 4-pack of Sil-Eco mats & the only difference that I could find was that they are made in China, compared to France where Sil-Pat's are manufactured, & guess what?  They are $29.99 for all 4!  Talk about perfect Christmas gifts!  I have opened two of mine & I might gift the other two to my mom & my mother-in-law, if I think I can live with only two mats.  Nothing sticks to them!  Not cheese, not cookies, not biscuits, not anything!  And they clean so easily.  Just read the instructions to care for them (no cutting on them with knives, keep them flat or rolled up) & you will be golden!
Another favorite kitchen item of mine are these magnetic measuring spoons.  Like whoever invented these is a genius.  I hate the ones on a ring, & I even have some that adjust from like 1/8 tsp to 1 tsp, but I can't use one measuring spoon for everything & the ones on the ring always get in the way.  These magnetic measuring spoons have two ends per spoon, & they magnetically stack & un-stack in a cinch!  LOVE THESE!!!  They even have pretty colored ones now too!


I hope these tips & products help make your life in the kitchen easier this holiday season!  
Happy Baking! ~Amber @ Dessert Now, Dinner Later!
Today I am going to share some of my favorite kitchen items that I use around the holidays to make getting that big fancy meal on the table as perfectly as possible.  I am also going to let you in on a few baking tricks!

The first thing I think of about the holidays is baking!  I really started enjoying baking with my mom when I was 11 years old.  Thanksgiving was my favorite because we would make like six desserts just for our little family of 6.  A little ridiculous you might say, but it was the memories that I love about baking.  

The BIGGEST, most IMPORTANT tip when it comes to any baked good: breads, cookies, pies, etc...basically anything that uses flour, is that you NEED to stir that flour up before measuring it.  Think about it!  That flour has been sitting in it's bag/bin since the last time you used it.  It has settled.  If you were to measure 1 cup of flour straight from your bag/bin & weigh it, then stir up that flour & weigh a new cup they would be two different weights as illustrated in the photo below.

The first cup weighs more than the second cup that was stirred.  I added flour to the scale of the stirred cup to equal the 5.3oz of the settled cup & it was 2 TBSP more flour!  Think about that next time you bake!  If every cup of un-stirred flour you measured automatically added 2 TBSP more flour to your product, a recipe with 3 cups of flour would have 6 TBSP more flour which is a little more than 1/3 of a cup!  Can you see why this is so important?  You can even see that the settled flour looks more packed, whereas the stirred flour is lighter.  So stirring the flour incorporates air into the flour, giving you a more light, airy product, than a dense & dry roll or cookie.  So think of it as THE UNWRITTEN RULE OF BAKING: Stir the flour before measuring it!


Since we are on the topic of flour, I can't help but share my favorite yeast product.  There is nothing like this yeast from SAF.  It's a premium, high power yeast that really does work faster than plain old yeast.  The only place that I can find it, not directly from sellers to bakeries, is a store in Utah called Emergency Essentials.  I actually didn't know they had it.  I got my first bag from a direct seller when I worked in a bakery.  It lasted me 3 YEARS & was still working great through the end!  I only make dough with yeast like once a week or twice a month, and a great tip for extending the life of yeast is that you can FREEZE IT!  Have you seen my other posts about freezing things?  I'm obsessed.  Anyway, when I first open a bag like this, it fits into two, 2-cup containers.  I will put the date on both of them & I will put one straight into the freezer & the other in the fridge (if I don't have room for both in the freezer.)  You can use the yeast cold from the fridge or freezer, just use slightly warmer water to bloom your yeast with.

Speaking of blooming yeast, another trick I learned in Culinary School is that if you give yeast some sugar when you stir it up in the warm water, it blooms faster.  I typically do double the sugar to yeast (2:1 ratio) so if I do 1/2 TBSP of yeast I will do 1 TBSP of sugar.  The sugar is kind of like food for the yeast.  But this SAF yeast is seriously the best because the dough doubles in size in like 15-20 minutes for rolls/breadsticks.  I am not even kidding!  LOVE this yeast!  And if I didn't live in Utah, I would still pay the $6 shipping for it because it's that good!


Another MUST HAVE when it comes to baking is a silicone baking mat.  I looked long & hard before I bought mine.  I just hated the thought of paying $25 for one mat, no matter how cool it was.  I was looking at this 4-pack of Sil-Eco mats & the only difference that I could find was that they are made in China, compared to France where Sil-Pat's are manufactured, & guess what?  They are $29.99 for all 4!  Talk about perfect Christmas gifts!  I have opened two of mine & I might gift the other two to my mom & my mother-in-law, if I think I can live with only two mats.  Nothing sticks to them!  Not cheese, not cookies, not biscuits, not anything!  And they clean so easily.  Just read the instructions to care for them (no cutting on them with knives, keep them flat or rolled up) & you will be golden!

Another favorite kitchen item of mine are these magnetic measuring spoons.  Like whoever invented these is a genius.  I hate the ones on a ring, & I even have some that adjust from like 1/8 tsp to 1 tsp, but I can't use one measuring spoon for everything & the ones on the ring always get in the way.  These magnetic measuring spoons have two ends per spoon, & they magnetically stack & un-stack in a cinch!  LOVE THESE!!!  They even have pretty colored ones now too!


I hope these tips & products help make your life in the kitchen easier this holiday season!  
Happy Baking! ~Amber @ Dessert Now, Dinner Later!
reade more... Résuméabuiyad

Freezer Vegetables


I am a soup gal.  Some of you regular readers may have noticed that last year.  If you are a new reader to my blog, you will start to take notice real soon since soup season is coming up.  I am already whipping out soup recipes.  I LOVE soup!  Like, LoVe, LOVE soup!  Soups can be super easy & comforting for the cool fall & winter weather coming up.  Some of you may say, "Soup is not easy.  Soup sucks to make because I am chopping vegetables all the time.  And then the extra vegetables go bad & I have to throw them out."  


If you are a soup person like me, then you will want to do this trick.  You can even use these for pot pies, pot roasts, & casseroles.  No need to throw out any vegetables.  Freeze your vegetables!  Then you will have most of the chopping done when it comes time to prepare your soups & other recipes.  Most soups call for Mirepoix - which is basically an onion, celery, carrot mixture.  In the cold weather months, I keep these three things in stock in my freezer, just because I know I make soups, pot pies, & other casseroles that use them.  And there is never any waste.  You ready to learn how to do it?  Ok.  I will show you:


Rinse & dice celery.  Sometimes it is good to put the celery in a bowl with a paper towel so you can pat off any water spots from rinsing.  This helps it not clump so bad once it is frozen.


Place it into a labeled zip-top bag.  Squeeze any air out & seal shut.  Place into the freezer.


Dice an onion.


Place diced onion into a labeled zip-top bag.  Squeeze out any air & seal shut.  Place into the freezer. You may want to double bag this one because sometimes it stinks up your freezer depending on how strong the onion is.  It also helps the smell if you don't touch the outside of the bag with onion hands.


Rinse, peel & dice carrots.


Place carrots into a zip-top bag, squeeze out any excess air & seal shut.  Place into the freezer.

Voila!  Your vegetables are ready for your recipes!
You may have to break up the dices in the bag before measuring them for recipes, but it's easy to do if you bang it on the edge of the counter.

*Note: Freezing these vegetables does soften them, so they are good for recipes where you cook them anyway: Soups, Stews, Pot Roasts, Pot Pies, Casseroles, etc.  The celery will not be crisp to use for chicken salads & things like that.  Just FYI.

**For more vegetables you can freeze, check out this post from The How To Mom.

I am a soup gal.  Some of you regular readers may have noticed that last year.  If you are a new reader to my blog, you will start to take notice real soon since soup season is coming up.  I am already whipping out soup recipes.  I LOVE soup!  Like, LoVe, LOVE soup!  Soups can be super easy & comforting for the cool fall & winter weather coming up.  Some of you may say, "Soup is not easy.  Soup sucks to make because I am chopping vegetables all the time.  And then the extra vegetables go bad & I have to throw them out."  


If you are a soup person like me, then you will want to do this trick.  You can even use these for pot pies, pot roasts, & casseroles.  No need to throw out any vegetables.  Freeze your vegetables!  Then you will have most of the chopping done when it comes time to prepare your soups & other recipes.  Most soups call for Mirepoix - which is basically an onion, celery, carrot mixture.  In the cold weather months, I keep these three things in stock in my freezer, just because I know I make soups, pot pies, & other casseroles that use them.  And there is never any waste.  You ready to learn how to do it?  Ok.  I will show you:


Rinse & dice celery.  Sometimes it is good to put the celery in a bowl with a paper towel so you can pat off any water spots from rinsing.  This helps it not clump so bad once it is frozen.


Place it into a labeled zip-top bag.  Squeeze any air out & seal shut.  Place into the freezer.


Dice an onion.


Place diced onion into a labeled zip-top bag.  Squeeze out any air & seal shut.  Place into the freezer. You may want to double bag this one because sometimes it stinks up your freezer depending on how strong the onion is.  It also helps the smell if you don't touch the outside of the bag with onion hands.


Rinse, peel & dice carrots.


Place carrots into a zip-top bag, squeeze out any excess air & seal shut.  Place into the freezer.

Voila!  Your vegetables are ready for your recipes!
You may have to break up the dices in the bag before measuring them for recipes, but it's easy to do if you bang it on the edge of the counter.

*Note: Freezing these vegetables does soften them, so they are good for recipes where you cook them anyway: Soups, Stews, Pot Roasts, Pot Pies, Casseroles, etc.  The celery will not be crisp to use for chicken salads & things like that.  Just FYI.

**For more vegetables you can freeze, check out this post from The How To Mom.
reade more... Résuméabuiyad

How to... Cut a Mango


I love mangoes in fruit salsas, salads & to snack on.  They are the perfect summer fruit!  Today I am sharing some knife skills education on how to cut a mango.
SELECT A RIPE MANGO: Look for mangoes that are football shaped rather than thin or flat. The flatter mangoes may be stringy. Avoid stringy looking, shriveled mangoes. The mangoes that are fuller & rounder usually have the deep color of a ripe peach instead of the yellowish green that the other varieties have.
Check the area around the stem; if it looks plump & round, the mango is ripe.  With the stem end up, smell the mango.  A ripe mango will have a sweet, fruity aroma & be slightly soft to the touch, like an avocado or peach.  A few brown speckles is also a normal indication of ripeness. 

PREPARE to cut the fruit with a sturdy cutting board & desired knives.  (I used a chef's & paring knife.)

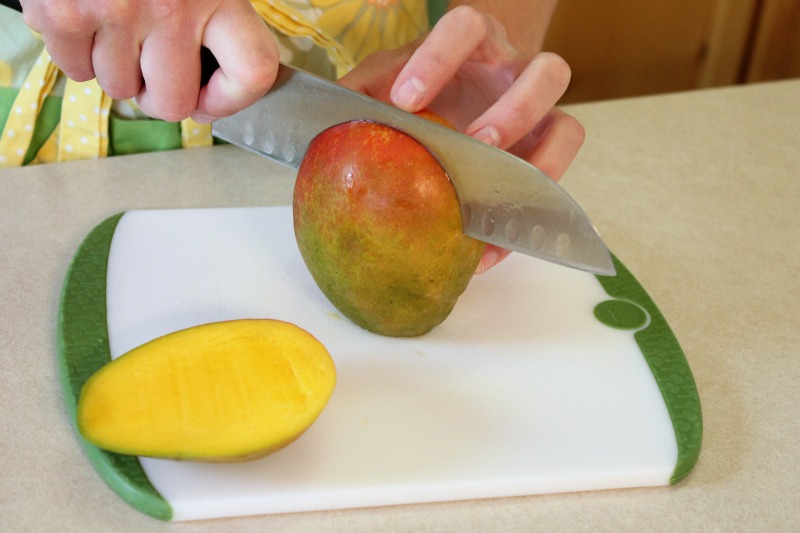
SLICE the mango lengthwise on either side of the center core.


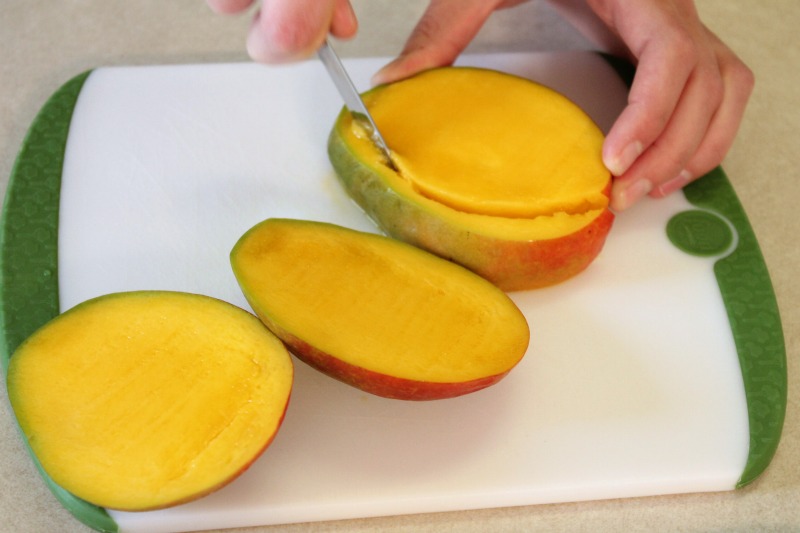
TRIM the sides around the center core.


SCORE the fruit inside the peel, but not through the skin of the peel.


PUSH the fruit outwards.


Carefully REMOVE the cubes of fruit by cutting down towards the cutting board as close to the skin that you can.

REPEAT until all fruit is removed from the peel.

*1 medium to large Mango yields about 3/4 to 1 cup of cubed fruit.

I love mangoes in fruit salsas, salads & to snack on.  They are the perfect summer fruit!  Today I am sharing some knife skills education on how to cut a mango.
SELECT A RIPE MANGO: Look for mangoes that are football shaped rather than thin or flat. The flatter mangoes may be stringy. Avoid stringy looking, shriveled mangoes. The mangoes that are fuller & rounder usually have the deep color of a ripe peach instead of the yellowish green that the other varieties have.
Check the area around the stem; if it looks plump & round, the mango is ripe.  With the stem end up, smell the mango.  A ripe mango will have a sweet, fruity aroma & be slightly soft to the touch, like an avocado or peach.  A few brown speckles is also a normal indication of ripeness. 

PREPARE to cut the fruit with a sturdy cutting board & desired knives.  (I used a chef's & paring knife.)

SLICE the mango lengthwise on either side of the center core.


TRIM the sides around the center core.


SCORE the fruit inside the peel, but not through the skin of the peel.


PUSH the fruit outwards.


Carefully REMOVE the cubes of fruit by cutting down towards the cutting board as close to the skin that you can.

REPEAT until all fruit is removed from the peel.

*1 medium to large Mango yields about 3/4 to 1 cup of cubed fruit.
reade more... Résuméabuiyad

How To... Make Your Strawberries Last Longer!


Today's post is the first of {hopefully} many educational posts.  I am trying to give you tips & tricks on this blog that I have learned on my own or through culinary school.  This one is totally a Pinterest trick that I learned.  I had to test it out & let you know if it worked & I am pleased with the results.

If you saw my Low-Sugar Strawberry Freezer Jam recipe, then you know I had a lot of strawberries from a flat (8lbs) of strawberries I had purchased super cheap ($3.99!)  I went through my strawberries, picked out the moldy/rotting ones & then did this little trick:


Place whole strawberries, stems & all in a clean sink with 1 part white vinegar to 10 parts cold water.  (I did 2 cups of vinegar to 20 cups of water--I had 8lbs of strawberries after all.)  The vinegar cleans, sanitizes, & kills mold spores keeping the strawberries fresh longer (The vinegar does not affect the taste.)  The cold water shocks the strawberries to wake them up a little bit, helping them stay crisp.  Let soak for 5 minutes.


  Then, GENTLY spin strawberries in a salad spinner until mostly dry. 


Place clean & dry strawberries in a paper towel lined bowl (to help soak up any extra moisture) & leave uncovered in the refrigerator.  Done!

I know this cleaned the strawberries really well because my sink was full of dirt after I finished with all the strawberries.

I bought my flat of strawberries on a Wednesday, did this trick on Thursday & half of them (4lbs) have lasted almost 1 whole week!  We of course ate some of the softer ones, made jam with others, & then I had a party for my friends with fruit & Coconut Cream Fruit Dip (my favorite & most popular recipe.)  I would say the majority of them lasted 4 days after washing them, & then they started getting a little wrinkled on the outside by days 5 & 6.  They were pretty ripe when I bought them too.

This trick should work on any berries you have.  Try it!

Image Map

Today's post is the first of {hopefully} many educational posts.  I am trying to give you tips & tricks on this blog that I have learned on my own or through culinary school.  This one is totally a Pinterest trick that I learned.  I had to test it out & let you know if it worked & I am pleased with the results.

If you saw my Low-Sugar Strawberry Freezer Jam recipe, then you know I had a lot of strawberries from a flat (8lbs) of strawberries I had purchased super cheap ($3.99!)  I went through my strawberries, picked out the moldy/rotting ones & then did this little trick:


Place whole strawberries, stems & all in a clean sink with 1 part white vinegar to 10 parts cold water.  (I did 2 cups of vinegar to 20 cups of water--I had 8lbs of strawberries after all.)  The vinegar cleans, sanitizes, & kills mold spores keeping the strawberries fresh longer (The vinegar does not affect the taste.)  The cold water shocks the strawberries to wake them up a little bit, helping them stay crisp.  Let soak for 5 minutes.


  Then, GENTLY spin strawberries in a salad spinner until mostly dry. 


Place clean & dry strawberries in a paper towel lined bowl (to help soak up any extra moisture) & leave uncovered in the refrigerator.  Done!

I know this cleaned the strawberries really well because my sink was full of dirt after I finished with all the strawberries.

I bought my flat of strawberries on a Wednesday, did this trick on Thursday & half of them (4lbs) have lasted almost 1 whole week!  We of course ate some of the softer ones, made jam with others, & then I had a party for my friends with fruit & Coconut Cream Fruit Dip (my favorite & most popular recipe.)  I would say the majority of them lasted 4 days after washing them, & then they started getting a little wrinkled on the outside by days 5 & 6.  They were pretty ripe when I bought them too.

This trick should work on any berries you have.  Try it!

Image Map
reade more... Résuméabuiyad

Gingersnap Pumpkin Cheesecake

My mouth waters just looking at these pictures because this pumpkin cheesecake is absolutely amazing with the gingersnap crust & all.  I almost cried when it was gone.  Not only do I have this fantastic pumpkin cheesecake recipe to share with you, I also have the tricks to the perfectly smooth cheesecake top that has NO CRACKS!  Many people shy away from cheesecakes because they are worried about the presentation when it comes out of the oven split down the center.  So are you ready to hear the secrets to the perfect cheesecake?  Okay I will tell you.


  • First you want to wrap the outside of your springform pan with foil.  Then after you have baked the crust, you want to put your springform pan in the center of a large rimmed baking sheet.  


  • Make sure all of your ingredients are at room temperature.  Whip the cream cheese & sugar until smooth & light, scraping the bowl well before adding additional ingredients.  If you beat the mixture after you add the other ingredients, it can over-work the batter, leaving you with air bubbles that rise to the surface & look bad.


  • Pour your cheesecake filling on top of the cooked crust.  Do NOT scrape the bowl like crazy b/c some of the filling won't be completely mixed, but this is a bad time to scrape & re-mix the batter.  Remember, too much mixing will create air bubbles.  Place the rimmed baking sheet that's holding the cheesecake into the center of the oven.  


  • Ok, here's the special trick: Next, pour water into rimmed baking sheet around the cheesecake about 1 inch high.  Close the oven & bake.  The foil acts to keep the water out of the cheesecake & the water forms a bain-marie, or water bath, which helps the cheesecake cook slowly & evenly without browning the top. The water bath also prevents the edges from cooking faster than the center.  Low & slow is the way to go for cheesecakes.


  • Now, DO NOT OPEN THE OVEN, EVER!  That is a huge mistake people make.  I know it's tempting to look at that beautiful dessert you are baking, but just watch it from the oven window.  A 9-inch cheesecake will take about 45-55 minutes to bake.  It will no longer look shiny on the top or center, but will be dull/matte when cooked, even if it is slightly jiggly, but you should not be jiggling your pretty cheesecake!  No need to open the oven to jiggle, or stick a knife or toothpick in your work of art.  Be patient!  It will be done, or get done with the last step, I promise.


  • Lastly, turn the oven off & leave that cheesecake alone, INSIDE the oven, for at least 2-3 hours.  While working in a bakery, we would even leave our cheesecakes in the oven overnight until we came in the next morning.  By gradually cooling off in the closed oven, & with the help of carry-over cooking, the cheesecake will be fully-cooked & this process will continue to prevent cracks from forming.  This also keeps the top of the cheesecake from sinking in the center.  
  • Finally, remove the cheesecake from the oven (yay!) and let it refrigerate for 4+hours.  Chilling the cheesecake will also solidify any remaining jiggles.  
Hooray!  Now that you know the secrets to the perfect cheesecake, here is the recipe to impress your families with this Thanksgiving or for any fall event you may happen to go to.  Some say it's so good, you can make this instead of pumpkin pie.

Gingersnap Pumpkin Cheesecake
Recipe adapted from Martha Stewart by: Amber (Dessert Now, Dinner Later!)

For the Crust
  • 1 1/2 cups gingersnap crumbs (about 30 store-bought cookies, crushed with a food processor)
  • 1/4 cup sugar
  • 4 Tbsp unsalted butter, melted
For the Filling (all ingredients at ROOM TEMPERATURE)
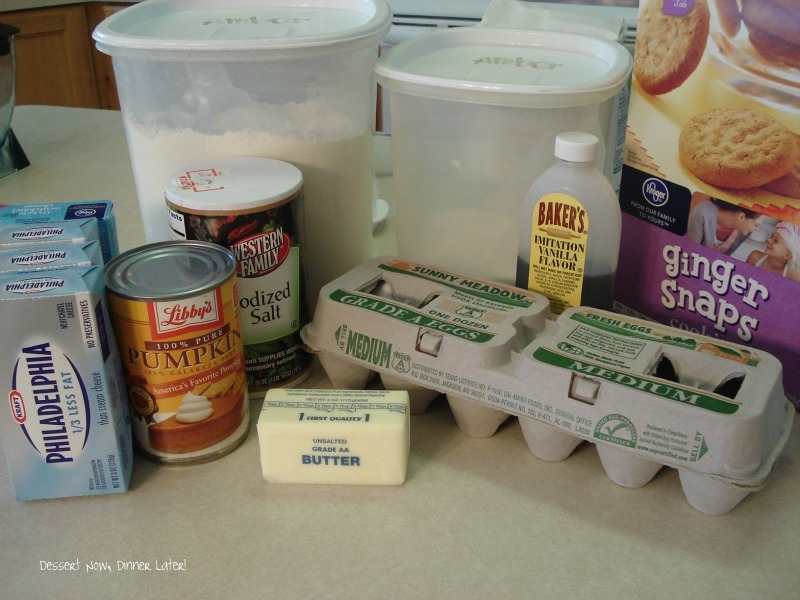
  • 4 (8oz) packages cream cheese, room temperature (I totally used Neufchatel, but use Philadelphia, not the cheap store brand.)
  • 1 1/4 cups sugar
  • 3 Tbsp all-purpose flour
  • 1 cup canned pumpkin puree, room temperature (I am a Libby's only snob on this ingredient)
  • 2 Tbsp Homemade Pumpkin Pie Spice or McCormick/Store-Bought
  • 1 Tbsp vanilla extract
  • 1/2 tsp salt
  • 4 large eggs, cracked open into a bowl, room temperature
  1. Preheat oven to 350*F.  Assemble a 9-inch nonstick springform pan, with the raised side of the bottom part facing up.  Wrap outside of springform pan with foil.
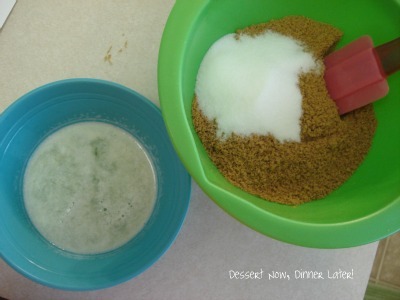
  2. Make crust:  In a medium bowl, mix cracker crumbs, sugar, & butter until moistened; press firmly into bottom of pan.  Bake 10-12 minutes until golden around edges.
  3. Make the filling:  With a stand mixer, beat cream cheese & sugar on low speed until smooth, scraping bowl well occasionally.  Add flour until just incorporated.  Add pumpkin puree, pie spice, vanilla & salt; mix just until smooth.  Scrape bowl one last time.  Add eggs, one at a time, mixing until each is incorporated before adding the next.  (DO NOT SCRAPE BOWL ANYMORE, or overmix filling.)
  4. Place springform pan on a rimmed baking sheet.  Pour filling into springform pan over the prepared crust, & gently smooth top.  Transfer to oven; reduce heat to 300*F.  Bake for 45-55 minutes or until top is dull/matte.  DO NOT OPEN OVEN, EVER!  After it's baked, turn off oven; let cheesecake stay in closed oven 2-3 hours more (without opening.)
  5. Remove cheesecake from oven; cool completely.  Cover cheesecake pan with plastic wrap; refrigerate until firm, at least 4 hours.  Un-mold before serving.  Use a HOT knife to slice pieces, rinsing & drying the knife between each pass.  Top with a dollop of whipped cream & a dash of cinnamon.  Enjoy!  Yields: 12-16 slices.

My mouth waters just looking at these pictures because this pumpkin cheesecake is absolutely amazing with the gingersnap crust & all.  I almost cried when it was gone.  Not only do I have this fantastic pumpkin cheesecake recipe to share with you, I also have the tricks to the perfectly smooth cheesecake top that has NO CRACKS!  Many people shy away from cheesecakes because they are worried about the presentation when it comes out of the oven split down the center.  So are you ready to hear the secrets to the perfect cheesecake?  Okay I will tell you.


  • First you want to wrap the outside of your springform pan with foil.  Then after you have baked the crust, you want to put your springform pan in the center of a large rimmed baking sheet.  


  • Make sure all of your ingredients are at room temperature.  Whip the cream cheese & sugar until smooth & light, scraping the bowl well before adding additional ingredients.  If you beat the mixture after you add the other ingredients, it can over-work the batter, leaving you with air bubbles that rise to the surface & look bad.


  • Pour your cheesecake filling on top of the cooked crust.  Do NOT scrape the bowl like crazy b/c some of the filling won't be completely mixed, but this is a bad time to scrape & re-mix the batter.  Remember, too much mixing will create air bubbles.  Place the rimmed baking sheet that's holding the cheesecake into the center of the oven.  


  • Ok, here's the special trick: Next, pour water into rimmed baking sheet around the cheesecake about 1 inch high.  Close the oven & bake.  The foil acts to keep the water out of the cheesecake & the water forms a bain-marie, or water bath, which helps the cheesecake cook slowly & evenly without browning the top. The water bath also prevents the edges from cooking faster than the center.  Low & slow is the way to go for cheesecakes.


  • Now, DO NOT OPEN THE OVEN, EVER!  That is a huge mistake people make.  I know it's tempting to look at that beautiful dessert you are baking, but just watch it from the oven window.  A 9-inch cheesecake will take about 45-55 minutes to bake.  It will no longer look shiny on the top or center, but will be dull/matte when cooked, even if it is slightly jiggly, but you should not be jiggling your pretty cheesecake!  No need to open the oven to jiggle, or stick a knife or toothpick in your work of art.  Be patient!  It will be done, or get done with the last step, I promise.


  • Lastly, turn the oven off & leave that cheesecake alone, INSIDE the oven, for at least 2-3 hours.  While working in a bakery, we would even leave our cheesecakes in the oven overnight until we came in the next morning.  By gradually cooling off in the closed oven, & with the help of carry-over cooking, the cheesecake will be fully-cooked & this process will continue to prevent cracks from forming.  This also keeps the top of the cheesecake from sinking in the center.  
  • Finally, remove the cheesecake from the oven (yay!) and let it refrigerate for 4+hours.  Chilling the cheesecake will also solidify any remaining jiggles.  
Hooray!  Now that you know the secrets to the perfect cheesecake, here is the recipe to impress your families with this Thanksgiving or for any fall event you may happen to go to.  Some say it's so good, you can make this instead of pumpkin pie.

Gingersnap Pumpkin Cheesecake
Recipe adapted from Martha Stewart by: Amber (Dessert Now, Dinner Later!)

For the Crust
  • 1 1/2 cups gingersnap crumbs (about 30 store-bought cookies, crushed with a food processor)
  • 1/4 cup sugar
  • 4 Tbsp unsalted butter, melted
For the Filling (all ingredients at ROOM TEMPERATURE)
  • 4 (8oz) packages cream cheese, room temperature (I totally used Neufchatel, but use Philadelphia, not the cheap store brand.)
  • 1 1/4 cups sugar
  • 3 Tbsp all-purpose flour
  • 1 cup canned pumpkin puree, room temperature (I am a Libby's only snob on this ingredient)
  • 2 Tbsp Homemade Pumpkin Pie Spice or McCormick/Store-Bought
  • 1 Tbsp vanilla extract
  • 1/2 tsp salt
  • 4 large eggs, cracked open into a bowl, room temperature
  1. Preheat oven to 350*F.  Assemble a 9-inch nonstick springform pan, with the raised side of the bottom part facing up.  Wrap outside of springform pan with foil.
  2. Make crust:  In a medium bowl, mix cracker crumbs, sugar, & butter until moistened; press firmly into bottom of pan.  Bake 10-12 minutes until golden around edges.
  3. Make the filling:  With a stand mixer, beat cream cheese & sugar on low speed until smooth, scraping bowl well occasionally.  Add flour until just incorporated.  Add pumpkin puree, pie spice, vanilla & salt; mix just until smooth.  Scrape bowl one last time.  Add eggs, one at a time, mixing until each is incorporated before adding the next.  (DO NOT SCRAPE BOWL ANYMORE, or overmix filling.)
  4. Place springform pan on a rimmed baking sheet.  Pour filling into springform pan over the prepared crust, & gently smooth top.  Transfer to oven; reduce heat to 300*F.  Bake for 45-55 minutes or until top is dull/matte.  DO NOT OPEN OVEN, EVER!  After it's baked, turn off oven; let cheesecake stay in closed oven 2-3 hours more (without opening.)
  5. Remove cheesecake from oven; cool completely.  Cover cheesecake pan with plastic wrap; refrigerate until firm, at least 4 hours.  Un-mold before serving.  Use a HOT knife to slice pieces, rinsing & drying the knife between each pass.  Top with a dollop of whipped cream & a dash of cinnamon.  Enjoy!  Yields: 12-16 slices.

reade more... Résuméabuiyad