Pages

Showing posts with label Misc Sweet. Show all posts

Dark Chocolate Trail Mix Bites

You guys!  These little snacks are my new favorite!  I don't know about you, but I have this salty/sweet addiction & it has to be completely balanced or my mouth gets angry.  Anytime I have anything sweet, I need like a cracker or chip to counteract that sweetness in my mouth.  And vice versa, like after dinner, I need a piece of chocolate or sour gummy worm just to tap off my mouth.  Maybe I am weird, or maybe you are like me?!  These Dark Chocolate Trail Mix Bites hit that perfect balance of salty/sweet for me.  And I love them!

So anyway, I cannot think of an easier treat to whip up to serve at a party, gift to your neighbor, or take on a road trip.  I love popping one, or two, or maybe three of these in my mouth for a little snack.  They are pretty to look at & healthy too (dark chocolate, nuts & fruit...healthy!)  And the recipe is two ingredients...if you didn't gather that from the title already.  See? EASY!!!


Dark Chocolate Trail Mix Bites
Recipe lightly altered from Undressed Skeleton by: Amber (Dessert Now, Dinner Later!)
  • 1/2 cup dark chocolate or semi-sweet chocolate chips
  • 1/2 cup antioxidant trail mix (I just bought enough of what I needed in the bulk section at Winco, but it is some tasty trail mix!)
  1. Melt chocolate chips for 30 seconds in the microwave.  Stir.  Then do 10-15 second bursts in the microwave until melted.  Don't burn the chocolate!
  2. Dollop about a heaping teaspoon of melted chocolate onto a piece of wax paper, & spread it into a round circle with the back of your spoon.  Repeat until you have made about 16 circles.
  3. Immediately top with a variety of trail mix pieces.  Let chocolate set.  Enjoy!
You guys!  These little snacks are my new favorite!  I don't know about you, but I have this salty/sweet addiction & it has to be completely balanced or my mouth gets angry.  Anytime I have anything sweet, I need like a cracker or chip to counteract that sweetness in my mouth.  And vice versa, like after dinner, I need a piece of chocolate or sour gummy worm just to tap off my mouth.  Maybe I am weird, or maybe you are like me?!  These Dark Chocolate Trail Mix Bites hit that perfect balance of salty/sweet for me.  And I love them!

So anyway, I cannot think of an easier treat to whip up to serve at a party, gift to your neighbor, or take on a road trip.  I love popping one, or two, or maybe three of these in my mouth for a little snack.  They are pretty to look at & healthy too (dark chocolate, nuts & fruit...healthy!)  And the recipe is two ingredients...if you didn't gather that from the title already.  See? EASY!!!


Dark Chocolate Trail Mix Bites
Recipe lightly altered from Undressed Skeleton by: Amber (Dessert Now, Dinner Later!)
  • 1/2 cup dark chocolate or semi-sweet chocolate chips
  • 1/2 cup antioxidant trail mix (I just bought enough of what I needed in the bulk section at Winco, but it is some tasty trail mix!)
  1. Melt chocolate chips for 30 seconds in the microwave.  Stir.  Then do 10-15 second bursts in the microwave until melted.  Don't burn the chocolate!
  2. Dollop about a heaping teaspoon of melted chocolate onto a piece of wax paper, & spread it into a round circle with the back of your spoon.  Repeat until you have made about 16 circles.
  3. Immediately top with a variety of trail mix pieces.  Let chocolate set.  Enjoy!
reade more... Résuméabuiyad

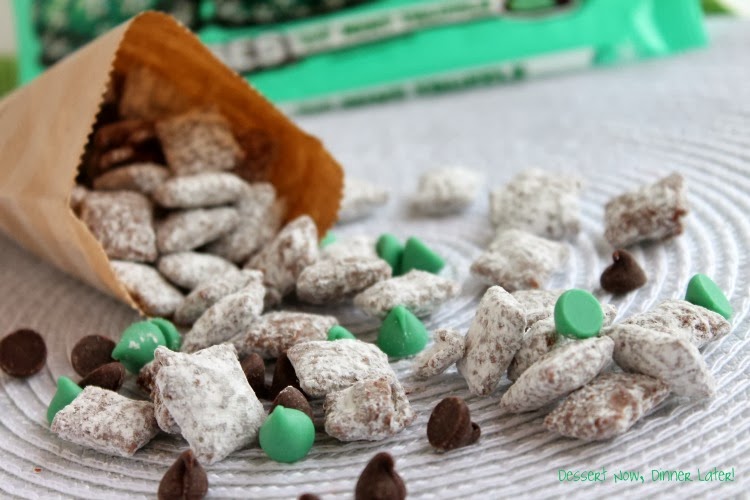
Mint Truffle Muddy Buddies


I am a muddy buddy fan!  There is nothing quicker to whip up for a fun party snack than any version of these tasty treats!  Last year I made a Gingerbread Puppy Chow that was crazy good!  So, continuing with my Christmas tradition of muddy buddies, I have made the easiest Mint Truffle variation!  This one is probably the easiest flavors to make because it's only four ingredients.  I have also learned that these are a fabulous snack to have on hand for your children to munch on as you grocery shop.  Well, they get a little messy, but my daughter was so quiet & good in the cart the whole time as she snacked on these!  Haha.  Just sayin'....  Make these on Christmas eve & watch a good old Christmas classic movie & you've got yourself a fun night!


Mint Truffle Muddy Buddies
Recipe from Amber (Dessert Now, Dinner Later!)
  • 5 cups Rice Chex Cereal
  • 1 (10oz) bag Hershey's Mint Truffle Kisses
  • 1 Tbsp shortening
  • 1 1/2 cups powdered sugar
  • Optional: Mint & Semi-Sweet Chocolate Chips for garnish (love Guittard chips!)
  1. Unwrap the whole bag of Mint Truffle Kisses & place the chocolates into a large bowl with 1 Tablespoon of shortening (this makes it a smoother consistency once it's melted).  
  2. Microwave for 30 seconds.  Stir.  Microwave 15 seconds.  Stir.  Microwave 15 seconds. Stir.  Continue until chocolate is completely melted, but don't burn it.  Add cereal to bowl & GENTLY fold the chocolate over the Chex cereal until the it's fully coated.
  3. Place powdered sugar into a gallon-size zip-top baggie.  Add the coated cereal, zip the bag shut, & shake the bag until all the cereal is covered with powdered sugar & no longer sticking together.  Empty into a bowl & start snacking.  *Optional: Toss some mint & semi-sweet chocolate chips into the bowl with the muddy buddies for a pop of color & additional treats to eat.


I am a muddy buddy fan!  There is nothing quicker to whip up for a fun party snack than any version of these tasty treats!  Last year I made a Gingerbread Puppy Chow that was crazy good!  So, continuing with my Christmas tradition of muddy buddies, I have made the easiest Mint Truffle variation!  This one is probably the easiest flavors to make because it's only four ingredients.  I have also learned that these are a fabulous snack to have on hand for your children to munch on as you grocery shop.  Well, they get a little messy, but my daughter was so quiet & good in the cart the whole time as she snacked on these!  Haha.  Just sayin'....  Make these on Christmas eve & watch a good old Christmas classic movie & you've got yourself a fun night!


Mint Truffle Muddy Buddies
Recipe from Amber (Dessert Now, Dinner Later!)
  • 5 cups Rice Chex Cereal
  • 1 (10oz) bag Hershey's Mint Truffle Kisses
  • 1 Tbsp shortening
  • 1 1/2 cups powdered sugar
  • Optional: Mint & Semi-Sweet Chocolate Chips for garnish (love Guittard chips!)
  1. Unwrap the whole bag of Mint Truffle Kisses & place the chocolates into a large bowl with 1 Tablespoon of shortening (this makes it a smoother consistency once it's melted).  
  2. Microwave for 30 seconds.  Stir.  Microwave 15 seconds.  Stir.  Microwave 15 seconds. Stir.  Continue until chocolate is completely melted, but don't burn it.  Add cereal to bowl & GENTLY fold the chocolate over the Chex cereal until the it's fully coated.
  3. Place powdered sugar into a gallon-size zip-top baggie.  Add the coated cereal, zip the bag shut, & shake the bag until all the cereal is covered with powdered sugar & no longer sticking together.  Empty into a bowl & start snacking.  *Optional: Toss some mint & semi-sweet chocolate chips into the bowl with the muddy buddies for a pop of color & additional treats to eat.


reade more... Résuméabuiyad

ABC Fall Snack Mix

This post brought to you by Alphabits & Mom It Forward Blogger Network.

I love fall, I really do, don't get me wrong, my favorite season is late spring, early summer, but the colors in nature during the fall really excite me.  One bad thing about fall, is that as the weather gets colder, I bundle up, stay inside & snack.  It's true!  So you might as well snack on something healthy right?  I am also trying to be a good mom & give my kids healthy snacks.  It's so hard to give them something that isn't fruit snacks, chips or granola bars.  


When I had the chance to try this Alpha-Bits cereal from Post, I was surprised at how tasty it was.  We all know kids like to snack on sugary cereal, but this one has just a hint of sweetness, yet enough that my kids like to eat it.  As I read the box I learned that Alphabits has 20g of whole grains and 12 essential vitamins & nutrients per 30g serving.  With nutrients like zinc & iron to help support healthy brain development, I know I am giving my kids something good to eat.  When my kids first saw the box, my daughter screamed "Super Why!"  That's right, we are PBS fans in our house & that is one of her favorite shows.  She is only 2 & not so good at her letters, but my son is 4 years old, in preschool, & found this box of cereal to be a lot of fun.  He kept wanting to find the letters in his name.  

So I decided, why not let him play with this cereal?!  We went for a little adventure outside our house & then came back inside.  We took pictures of things that make us happy in the fall & I created a worksheet for him to practice matching his letters.  We decided to make up a Fall Snack Mix with the cereal so the kids could munch & play with the letters.  We used mostly cereal & a few other little munchies to make it pretty like the fall colors we were seeing outside.  It was so much fun!  My son would even try & teach his sister the letters he was using as he worked on finding the letters to the words of the pictures.  Moments like this make me feel like a good mom; healthy snack, fun activity, bonding time!  If you want to learn more about this cereal & where to buy it check out this link: http://bit.ly/19NAYrl


ABC Fall Snack Mix
Recipe by: Amber (Dessert Now, Dinner Later!)
  • 1 1/2 cups Post Alphabits Cereal
  • 1/2 cup stick pretzels, broken in half if you have little, little ones
  • 1/2 cup dried cranberries
  • 1/2 cup marshmallows
  • 1/2 cup Reece's Pieces
  1. Combine ingredients together in a bowl.  Munch away!  Keep mix fresh in a zip-top bag when not snacking.


This post brought to you by Alphabits & Mom It Forward Blogger Network.

I love fall, I really do, don't get me wrong, my favorite season is late spring, early summer, but the colors in nature during the fall really excite me.  One bad thing about fall, is that as the weather gets colder, I bundle up, stay inside & snack.  It's true!  So you might as well snack on something healthy right?  I am also trying to be a good mom & give my kids healthy snacks.  It's so hard to give them something that isn't fruit snacks, chips or granola bars.  


When I had the chance to try this Alpha-Bits cereal from Post, I was surprised at how tasty it was.  We all know kids like to snack on sugary cereal, but this one has just a hint of sweetness, yet enough that my kids like to eat it.  As I read the box I learned that Alphabits has 20g of whole grains and 12 essential vitamins & nutrients per 30g serving.  With nutrients like zinc & iron to help support healthy brain development, I know I am giving my kids something good to eat.  When my kids first saw the box, my daughter screamed "Super Why!"  That's right, we are PBS fans in our house & that is one of her favorite shows.  She is only 2 & not so good at her letters, but my son is 4 years old, in preschool, & found this box of cereal to be a lot of fun.  He kept wanting to find the letters in his name.  

So I decided, why not let him play with this cereal?!  We went for a little adventure outside our house & then came back inside.  We took pictures of things that make us happy in the fall & I created a worksheet for him to practice matching his letters.  We decided to make up a Fall Snack Mix with the cereal so the kids could munch & play with the letters.  We used mostly cereal & a few other little munchies to make it pretty like the fall colors we were seeing outside.  It was so much fun!  My son would even try & teach his sister the letters he was using as he worked on finding the letters to the words of the pictures.  Moments like this make me feel like a good mom; healthy snack, fun activity, bonding time!  If you want to learn more about this cereal & where to buy it check out this link: http://bit.ly/19NAYrl


ABC Fall Snack Mix
Recipe by: Amber (Dessert Now, Dinner Later!)
  • 1 1/2 cups Post Alphabits Cereal
  • 1/2 cup stick pretzels, broken in half if you have little, little ones
  • 1/2 cup dried cranberries
  • 1/2 cup marshmallows
  • 1/2 cup Reece's Pieces
  1. Combine ingredients together in a bowl.  Munch away!  Keep mix fresh in a zip-top bag when not snacking.


reade more... Résuméabuiyad

Apple Cinnamon Muddy Buddies

 
It's time for some more muddy buddy treats!  I love these little things, probably too much!  Like, they are so yummy to munch on that I eat too many most of the time.  And I may or may not eat so many that my tummy aches a little bit....(Who me?!)  This is a Fall variation.  It was either Apple or Pumpkin & I went with Apple this time, but don't be surprised if you see a Pumpkin variation later on down the road.  These are a great little after school snack for my kids to munch on while I cook dinner, but that's like eating dessert before dinner, so I guess that makes me a bad mom... or a cool mom!  Haha.  Enjoy!


Apple Cinnamon Muddy Buddies
Recipe adapted from A Pumpkin & A Princess by: Amber (Dessert Now, Dinner Later!)
  • 1 (10-12oz) bag white chocolate chips
  • 1 Tbsp shortening
  • 5-6 cups Apple Cinnamon Chex Cereal
  • 1 (7oz) box Jiffy Apple Cinnamon Muffin Mix (about 1 1/4 cup)
  • 1/4 cup powdered sugar
  • 1 tsp cinnamon
  • 1/8 tsp nutmeg

  1. Melt white chocolate chips with shortening in a LARGE bowl in the microwave on HALF POWER for 60 seconds.  Stir.  Repeat until melted.  (Mine took 2 minutes.)
  2. Add the Chex cereal to the melted chips & fold gently.
  3. In a gallon size zip-top bag combine, muffin mix, powdered sugar, cinnamon & nutmeg.  Add the white chocolate coated cereal, zip the bag shut & shake until everything is covered with the dry mixture.  
  4. Snack away!!!
 
It's time for some more muddy buddy treats!  I love these little things, probably too much!  Like, they are so yummy to munch on that I eat too many most of the time.  And I may or may not eat so many that my tummy aches a little bit....(Who me?!)  This is a Fall variation.  It was either Apple or Pumpkin & I went with Apple this time, but don't be surprised if you see a Pumpkin variation later on down the road.  These are a great little after school snack for my kids to munch on while I cook dinner, but that's like eating dessert before dinner, so I guess that makes me a bad mom... or a cool mom!  Haha.  Enjoy!


Apple Cinnamon Muddy Buddies
Recipe adapted from A Pumpkin & A Princess by: Amber (Dessert Now, Dinner Later!)
  • 1 (10-12oz) bag white chocolate chips
  • 1 Tbsp shortening
  • 5-6 cups Apple Cinnamon Chex Cereal
  • 1 (7oz) box Jiffy Apple Cinnamon Muffin Mix (about 1 1/4 cup)
  • 1/4 cup powdered sugar
  • 1 tsp cinnamon
  • 1/8 tsp nutmeg

  1. Melt white chocolate chips with shortening in a LARGE bowl in the microwave on HALF POWER for 60 seconds.  Stir.  Repeat until melted.  (Mine took 2 minutes.)
  2. Add the Chex cereal to the melted chips & fold gently.
  3. In a gallon size zip-top bag combine, muffin mix, powdered sugar, cinnamon & nutmeg.  Add the white chocolate coated cereal, zip the bag shut & shake until everything is covered with the dry mixture.  
  4. Snack away!!!
reade more... Résuméabuiyad

Candy Corn "Corn"

Today I am excited to be part of a 30 Days of Halloween series over at Cupcake Diaries.  Alli & I are great friends & I love that she adores Halloween so much.  This series is filled with fun food & crafts from some super creative bloggers.  Make sure you check out the links for other ideas in the series that have already been shared (located at the bottom of this post) & check back daily over at Cupcake Diaries through the whole month of September for more Halloween inspiration.


I am sharing some cute Candy Corn "Corn" for this 30 Days of Halloween series.  It's a delicious soft & gooey marshmallow popcorn colored orange & yellow, layered & shaped like candy corn, with real pieces of candy corn candy.  Phew, that was a long sentence.  Basically it's a fun goodie bag that looks like candy corn.  I have even included a link below the recipe for printable tags if you want them.  

Oh & you know how certain colors make you think things taste like certain flavors? Example: Yellow=Lemon. Orange=Orange.  Yeah, this popcorn doesn't taste like those, but I almost expected it to.  Haha.  Instead of this marshmallow popcorn, you can alternately use Wilton colored candy melts to coat the popcorn with & let it dry on a piece of parchment before layering it.  Just have fun with it!  It's for Halloween after all!


Candy Corn "Corn"
Inspired by: LizzieJane Baby & altered by: Amber (Dessert Now, Dinner Later!)
  • 3 bags butter flavored popcorn, popped & divided (6 QT popped popcorn)
  • 1 bag of kettle corn, popped (2 QT popped popcorn)
  • 1 cup butter (2 sticks)
  • 1 1/3 cup sugar
  • 1/2 cup light corn syrup
  • 1 tsp vanilla
  • 1 (16oz) bag mini marshmallows
  • Yellow & Orange Food Coloring/Paste
  • Candy Corn
  • Pan Spray
  • 8 (5"x11") Clear Cellophane Bags & Ribbon
  1. Pop butter flavored popcorn & divide into two bowls.  Pop kettle corn & place into another bowl. (IMPORTANT: Remove any un-popped kernels before moving on with the recipe.)
  2. In a large saucepan combine butter, sugar, & light corn syrup.  Bring mixture to a boil & cook 3 minutes stirring frequently.  Do not overcook or it won't be soft & chewy.  Remove from heat & add vanilla (careful it bubbles up.)  Then add marshmallows & stir until melted.
  3. Pour just under 1/3 of the mixture into the bowl with the kettle corn.  Fold the popcorn until coated.
  4. Pour half of the remaining mixture into a clean bowl.  Color one half yellow & the other half orange with food coloring or paste (I used Wilton paste.)
  5. Quickly add colored marshmallow mixture to the two separate bowls of butter flavored popcorn.  Fold/stir to coat the popcorn.  Allow all the different colored popcorns to cool for 5-10 minutes.
  6. Grease hands with pan spray & grab a handful of yellow popcorn.  Place in the bottom of a clear cellophane bag.  Grab a handful of orange & place on top of the yellow.  Grab a small handful of white popcorn & place it on top of the orange stacking the colors to resemble candy corn.  
  7. Lightly press & shape the popcorn inside the bag into a triangle/candy corn shape.  Fat on bottom where the yellow is & skinny on top where the white is.  Press a few pieces of candy corn on the sides of the sticky popcorn.  Tie bag shut with a ribbon & Candy Corn "Corn" tag.  Repeat with remaining bags.  *It's fine to fill them all at once, then shape them & add the candy corn pieces, but I wanted to tell the step by step instructions before you get too excited :)
Download the Candy Corn "Corn" Printable HERE

Today I am excited to be part of a 30 Days of Halloween series over at Cupcake Diaries.  Alli & I are great friends & I love that she adores Halloween so much.  This series is filled with fun food & crafts from some super creative bloggers.  Make sure you check out the links for other ideas in the series that have already been shared (located at the bottom of this post) & check back daily over at Cupcake Diaries through the whole month of September for more Halloween inspiration.


I am sharing some cute Candy Corn "Corn" for this 30 Days of Halloween series.  It's a delicious soft & gooey marshmallow popcorn colored orange & yellow, layered & shaped like candy corn, with real pieces of candy corn candy.  Phew, that was a long sentence.  Basically it's a fun goodie bag that looks like candy corn.  I have even included a link below the recipe for printable tags if you want them.  

Oh & you know how certain colors make you think things taste like certain flavors? Example: Yellow=Lemon. Orange=Orange.  Yeah, this popcorn doesn't taste like those, but I almost expected it to.  Haha.  Instead of this marshmallow popcorn, you can alternately use Wilton colored candy melts to coat the popcorn with & let it dry on a piece of parchment before layering it.  Just have fun with it!  It's for Halloween after all!


Candy Corn "Corn"
Inspired by: LizzieJane Baby & altered by: Amber (Dessert Now, Dinner Later!)
  • 3 bags butter flavored popcorn, popped & divided (6 QT popped popcorn)
  • 1 bag of kettle corn, popped (2 QT popped popcorn)
  • 1 cup butter (2 sticks)
  • 1 1/3 cup sugar
  • 1/2 cup light corn syrup
  • 1 tsp vanilla
  • 1 (16oz) bag mini marshmallows
  • Yellow & Orange Food Coloring/Paste
  • Candy Corn
  • Pan Spray
  • 8 (5"x11") Clear Cellophane Bags & Ribbon
  1. Pop butter flavored popcorn & divide into two bowls.  Pop kettle corn & place into another bowl. (IMPORTANT: Remove any un-popped kernels before moving on with the recipe.)
  2. In a large saucepan combine butter, sugar, & light corn syrup.  Bring mixture to a boil & cook 3 minutes stirring frequently.  Do not overcook or it won't be soft & chewy.  Remove from heat & add vanilla (careful it bubbles up.)  Then add marshmallows & stir until melted.
  3. Pour just under 1/3 of the mixture into the bowl with the kettle corn.  Fold the popcorn until coated.
  4. Pour half of the remaining mixture into a clean bowl.  Color one half yellow & the other half orange with food coloring or paste (I used Wilton paste.)
  5. Quickly add colored marshmallow mixture to the two separate bowls of butter flavored popcorn.  Fold/stir to coat the popcorn.  Allow all the different colored popcorns to cool for 5-10 minutes.
  6. Grease hands with pan spray & grab a handful of yellow popcorn.  Place in the bottom of a clear cellophane bag.  Grab a handful of orange & place on top of the yellow.  Grab a small handful of white popcorn & place it on top of the orange stacking the colors to resemble candy corn.  
  7. Lightly press & shape the popcorn inside the bag into a triangle/candy corn shape.  Fat on bottom where the yellow is & skinny on top where the white is.  Press a few pieces of candy corn on the sides of the sticky popcorn.  Tie bag shut with a ribbon & Candy Corn "Corn" tag.  Repeat with remaining bags.  *It's fine to fill them all at once, then shape them & add the candy corn pieces, but I wanted to tell the step by step instructions before you get too excited :)
Download the Candy Corn "Corn" Printable HERE

reade more... Résuméabuiyad

Hot Fudge Sauce

If you saw my Crockpot Caramel post on Tuesday, you know that I had a little ice cream party that I was making toppings for.  Well, I decided to make some hot fudge sauce as well.  I even used my Homemade Sweetened Condensed Milk for this recipe!  This fudge is super simple.  It might look a little thinner than most fudge sauce, but once it hits that cold ice cream it becomes that thick, chocolatey texture that we all love about hot fudge.  Keep it refrigerated & use within 2 weeks, but you might find lots of excuses to eat it up before then :)


Hot Fudge Sauce
Recipe from A Little Yumminess & re-written by: Amber (Dessert Now, Dinner Later!)
  • 1 can sweetened condensed milk (or 1 1/4 cup HOMEMADE)
  • 2 Tbsp butter
  • 1 cup semi-sweet chocolate chips
  • 2 Tbsp heavy cream
  • 1/2 tsp vanilla
  1. In a large microwave safe bowl or 4-cup glass measuring cup, combine the condensed milk, butter & chocolate chips.
  2. Microwave on high for 45 seconds.  Whisk.  Heat on high for another 45 seconds.  Whisk again.
  3. Add the cream & vanilla until blended & return to the microwave for an additional 45 seconds.
  4. Cool & store in the refrigerator for 2 weeks.


About Home Canning:  I actually don't recommend canning caramel or chocolate sauce at home.  Home canning only works with high acid foods, and caramel or chocolate sauces are definitely not in that category. Trying to can these in a hot water bath without refrigerating the cans would put you at risk for botulism once consumed.  These products can only safely be canned in a professional processing facility with specialized equipment and usually the use of preservatives.  They are still really fun to give away as gifts, but make sure the recipient understands to keep it refrigerated & consume it within a couple weeks; writing an "expiration date" & refrigeration reminder on top the the lid might not be a bad idea as well.  Enjoy!
If you saw my Crockpot Caramel post on Tuesday, you know that I had a little ice cream party that I was making toppings for.  Well, I decided to make some hot fudge sauce as well.  I even used my Homemade Sweetened Condensed Milk for this recipe!  This fudge is super simple.  It might look a little thinner than most fudge sauce, but once it hits that cold ice cream it becomes that thick, chocolatey texture that we all love about hot fudge.  Keep it refrigerated & use within 2 weeks, but you might find lots of excuses to eat it up before then :)


Hot Fudge Sauce
Recipe from A Little Yumminess & re-written by: Amber (Dessert Now, Dinner Later!)
  • 1 can sweetened condensed milk (or 1 1/4 cup HOMEMADE)
  • 2 Tbsp butter
  • 1 cup semi-sweet chocolate chips
  • 2 Tbsp heavy cream
  • 1/2 tsp vanilla
  1. In a large microwave safe bowl or 4-cup glass measuring cup, combine the condensed milk, butter & chocolate chips.
  2. Microwave on high for 45 seconds.  Whisk.  Heat on high for another 45 seconds.  Whisk again.
  3. Add the cream & vanilla until blended & return to the microwave for an additional 45 seconds.
  4. Cool & store in the refrigerator for 2 weeks.


About Home Canning:  I actually don't recommend canning caramel or chocolate sauce at home.  Home canning only works with high acid foods, and caramel or chocolate sauces are definitely not in that category. Trying to can these in a hot water bath without refrigerating the cans would put you at risk for botulism once consumed.  These products can only safely be canned in a professional processing facility with specialized equipment and usually the use of preservatives.  They are still really fun to give away as gifts, but make sure the recipient understands to keep it refrigerated & consume it within a couple weeks; writing an "expiration date" & refrigeration reminder on top the the lid might not be a bad idea as well.  Enjoy!
reade more... Résuméabuiyad

Crockpot Caramel

I have seen this crock pot/slow cooker caramel trick all over the place for a while now, but I have wanted to try it with my homemade Sweetened Condensed Milk (check that out if you haven't already, because it's so easy).  I was having a little ice cream party for some girls I plan activities for, & finally got the chance to make this caramel for that.  

Although I was nervous the first 7 hours of the cooking time, it actually turned to caramel in the 8th hour & IT. IS. GOOD!  So thick & smooth good!  I actually had to thin mine a little bit to make it drizzle-able.  Use this caramel for ice cream, or on brownies, with apples, or any dessert recipe that calls for caramel.  Have fun with it!

Crockpot Caramel
Recipe instruction taken from Who Needs A Cape? and adjusted slightly by: Amber (Dessert Now, Dinner Later!)
  • Sweetened Condensed Milk (store bought or I used HOMEMADE)
  • A towel if using store bought aluminum cans of sweetened condensed milk
  • Half Pint Mason Jars if using Homemade Sweetened Condensed Milk; you can also pour the canned milk into the jars. (Tip: The shorter the jar the easier it is to cover in your crock pot.)
  • Heavy Cream; for thinning if desired
  1. If you are cooking in the can, remove the label and put a towel underneath the can(s) to prevent rust stains in your slow cooker. (Do NOT open the can until after it's cooked.)
  2. If using mason jars, pour condensed milk into the jar(s) top with lid(s) & and tightly close with canning ring(s).
  3. Fill crock pot completely with water; enough to cover the top of the can(s) or jar(s).
  4. Cover crock pot with the lid and cook on low for 8 hours or until preferred caramelization is achieved.  (Mine turned to caramel right at the end in the 8th hour, so don't freak out if it looks white for a really long time.)
  5. If you are using Homemade Sweetened Condensed Milk, it may look foamy on top once you've opened the lid & that's ok.  Stir it up while it's hot because it will smooth out.  Also, you can add heavy cream, 1 TBSP at a time, to thin the caramel for drizzling purposes or if it is too thick for your liking.
  6. After cooling, refrigerate up to two weeks.


A quick note about canning:  Although this caramel is made in canning jars, it is not being "canned" during this process.  I actually don't recommend canning caramel or chocolate sauce at home.  Home canning only works with high acid foods, and caramel or chocolate sauces are definitely not in that category. Trying to can these in a hot water bath without refrigerating the cans would put you at risk for botulism once consumed.  These products can only safely be canned in a professional processing facility with specialized equipment and usually the use of preservatives.  They are still really fun to give away as gifts, but make sure the recipient understands to keep it refrigerated & consume it within a couple weeks; writing an "expiration date" & refrigeration reminder on top the the lid might not be a bad idea as well.  Enjoy!
I have seen this crock pot/slow cooker caramel trick all over the place for a while now, but I have wanted to try it with my homemade Sweetened Condensed Milk (check that out if you haven't already, because it's so easy).  I was having a little ice cream party for some girls I plan activities for, & finally got the chance to make this caramel for that.  

Although I was nervous the first 7 hours of the cooking time, it actually turned to caramel in the 8th hour & IT. IS. GOOD!  So thick & smooth good!  I actually had to thin mine a little bit to make it drizzle-able.  Use this caramel for ice cream, or on brownies, with apples, or any dessert recipe that calls for caramel.  Have fun with it!

Crockpot Caramel
Recipe instruction taken from Who Needs A Cape? and adjusted slightly by: Amber (Dessert Now, Dinner Later!)
  • Sweetened Condensed Milk (store bought or I used HOMEMADE)
  • A towel if using store bought aluminum cans of sweetened condensed milk
  • Half Pint Mason Jars if using Homemade Sweetened Condensed Milk; you can also pour the canned milk into the jars. (Tip: The shorter the jar the easier it is to cover in your crock pot.)
  • Heavy Cream; for thinning if desired
  1. If you are cooking in the can, remove the label and put a towel underneath the can(s) to prevent rust stains in your slow cooker. (Do NOT open the can until after it's cooked.)
  2. If using mason jars, pour condensed milk into the jar(s) top with lid(s) & and tightly close with canning ring(s).
  3. Fill crock pot completely with water; enough to cover the top of the can(s) or jar(s).
  4. Cover crock pot with the lid and cook on low for 8 hours or until preferred caramelization is achieved.  (Mine turned to caramel right at the end in the 8th hour, so don't freak out if it looks white for a really long time.)
  5. If you are using Homemade Sweetened Condensed Milk, it may look foamy on top once you've opened the lid & that's ok.  Stir it up while it's hot because it will smooth out.  Also, you can add heavy cream, 1 TBSP at a time, to thin the caramel for drizzling purposes or if it is too thick for your liking.
  6. After cooling, refrigerate up to two weeks.


A quick note about canning:  Although this caramel is made in canning jars, it is not being "canned" during this process.  I actually don't recommend canning caramel or chocolate sauce at home.  Home canning only works with high acid foods, and caramel or chocolate sauces are definitely not in that category. Trying to can these in a hot water bath without refrigerating the cans would put you at risk for botulism once consumed.  These products can only safely be canned in a professional processing facility with specialized equipment and usually the use of preservatives.  They are still really fun to give away as gifts, but make sure the recipient understands to keep it refrigerated & consume it within a couple weeks; writing an "expiration date" & refrigeration reminder on top the the lid might not be a bad idea as well.  Enjoy!
reade more... Résuméabuiyad

Pink Fluff Fruit Salad

Today I am super excited to be guest posting over at Cheerios & Lattes.  I am sharing this recipe for Pink Fluff.  If you are not familiar with Pink Fluff, you will want to put it on your make soon list.  It's perfect for summer parties & get-togethers!  My Pink Fluff recipe has a special ingredient that makes it different from all the other creamy fruit salads out there.  Go check it out on Mackenzie's blog & tell her that I sent you!

Today I am super excited to be guest posting over at Cheerios & Lattes.  I am sharing this recipe for Pink Fluff.  If you are not familiar with Pink Fluff, you will want to put it on your make soon list.  It's perfect for summer parties & get-togethers!  My Pink Fluff recipe has a special ingredient that makes it different from all the other creamy fruit salads out there.  Go check it out on Mackenzie's blog & tell her that I sent you!

reade more... Résuméabuiyad

Soft & Gooey Marshmallow Popcorn


My friend Liz raved about this marshmallow popcorn that one of our other friends, Melanie, had the recipe for.  She said it was different than any other recipe you can find on the internet or Pinterest.  I was very interested so I asked Melanie for the recipe & we had it at a girls night party I had.  
This popcorn is seriously amazing!  I don't usually like marshmallows (I guess that might make me weird) but this is absolutely "eat the whole bowl" delicious!  Really!  It is so hard to stop eating!!!  
This recipe makes a RIDICULOUS amount of popcorn, so I would cut it in half if you are not having lots of friends helping you eat it.  Or you could make it & bring a large plate to your friends & neighbors.  Either way, it is definitely worth making & soon!  I can see this as the perfect snack to a late night summer movie outside with the projector.  Make this!

Soft & Gooey Marshmallow Popcorn
Recipe from Melanie Jeppsen & adored by: Amber (Dessert Now, Dinner Later!)
  • 8 quarts popcorn (air popped or about 4 bags of butter flavored microwave popcorn)
  • 1 (16oz) package mini marshmallows
  • 1 cup butter (2 sticks--use salted if using air popped popcorn, or use unsalted if using butter flavored microwave popcorn)
  • 1 1/3 cup sugar
  • 1/2 cup light corn syrup
  • 1 tsp vanilla
  1. Pop corn & place in an EXTRA LARGE bowl; remove any un-popped kernels.  Add marshmallows to popcorn.  Toss lightly.
  2. Bring the butter, sugar & corn syrup to a boil.  Turn down the heat & let simmer for 3 minutes, stirring occasionally.  Do NOT overcook or it will be hard instead of gooey & soft.  Add vanilla (careful, it bubbles up.)  Pour over popcorn/marshmallow mixture & stir well to coat.  *Best served warm, but will stay soft even when cooled down.  Keep leftovers covered.
Makes 32 servings.
*For extra gooey popcorn, you can leave the marshmallows on top of the popcorn before mixing, so when you pour the hot buttery mixture on top & then mix it in, more of the marshmallows will have melted.  I like the chunks of mallows in the popcorn though.  Just have fun with it!


Image Map

 
My friend Liz raved about this marshmallow popcorn that one of our other friends, Melanie, had the recipe for.  She said it was different than any other recipe you can find on the internet or Pinterest.  I was very interested so I asked Melanie for the recipe & we had it at a girls night party I had.  
This popcorn is seriously amazing!  I don't usually like marshmallows (I guess that might make me weird) but this is absolutely "eat the whole bowl" delicious!  Really!  It is so hard to stop eating!!!  
This recipe makes a RIDICULOUS amount of popcorn, so I would cut it in half if you are not having lots of friends helping you eat it.  Or you could make it & bring a large plate to your friends & neighbors.  Either way, it is definitely worth making & soon!  I can see this as the perfect snack to a late night summer movie outside with the projector.  Make this!

Soft & Gooey Marshmallow Popcorn
Recipe from Melanie Jeppsen & adored by: Amber (Dessert Now, Dinner Later!)
  • 8 quarts popcorn (air popped or about 4 bags of butter flavored microwave popcorn)
  • 1 (16oz) package mini marshmallows
  • 1 cup butter (2 sticks--use salted if using air popped popcorn, or use unsalted if using butter flavored microwave popcorn)
  • 1 1/3 cup sugar
  • 1/2 cup light corn syrup
  • 1 tsp vanilla
  1. Pop corn & place in an EXTRA LARGE bowl; remove any un-popped kernels.  Add marshmallows to popcorn.  Toss lightly.
  2. Bring the butter, sugar & corn syrup to a boil.  Turn down the heat & let simmer for 3 minutes, stirring occasionally.  Do NOT overcook or it will be hard instead of gooey & soft.  Add vanilla (careful, it bubbles up.)  Pour over popcorn/marshmallow mixture & stir well to coat.  *Best served warm, but will stay soft even when cooled down.  Keep leftovers covered.
Makes 32 servings.
*For extra gooey popcorn, you can leave the marshmallows on top of the popcorn before mixing, so when you pour the hot buttery mixture on top & then mix it in, more of the marshmallows will have melted.  I like the chunks of mallows in the popcorn though.  Just have fun with it!


Image Map
reade more... Résuméabuiyad

Cherry Cheesecake Muddy Buddies


I found some cherry morsels on sale in the baking aisle & knew I could make something yummy with them.  I decided to make muddy buddies because I wanted something for my kids to munch on for Valentine's Day this week.  These are easy to pack in a school lunch or put in a ziplock baggie to give away to friends.  Plus, who doesn't love muddy buddies?  I am really starting to love all the different variations you can make & I promise I will have more fun options like this in the future.  I am just getting started!  
 
Cherry Cheesecake Muddy Buddies
Recipe by: Amber (Dessert Now, Dinner Later!)
  • 1 (10oz) bag cherry morsels (found in the baking aisle especially during Christmas or at specialty stores if you can't find it at Walmart)
  • 1 Tbsp shortening
  • 5 cups Chex cereal
  • 1 (4oz) box cheesecake pudding mix
  • 1/2 cup powdered sugar
  1. In a LARGE bowl, melt cherry morsels with shortening in the microwave on 50% power for 60 seconds at a time.  Stirring & re-heating until melted.
  2. Add Chex cereal & fold with a spatula gently until cereal is well-coated.
  3. Combine cheesecake pudding mix & powdered sugar in a gallon size ziplock bag.
  4. Add coated cereal to the bag with the pudding/sugar mixture, zip shut & shake until evenly distributed. Enjoy!


I found some cherry morsels on sale in the baking aisle & knew I could make something yummy with them.  I decided to make muddy buddies because I wanted something for my kids to munch on for Valentine's Day this week.  These are easy to pack in a school lunch or put in a ziplock baggie to give away to friends.  Plus, who doesn't love muddy buddies?  I am really starting to love all the different variations you can make & I promise I will have more fun options like this in the future.  I am just getting started!  
 
Cherry Cheesecake Muddy Buddies
Recipe by: Amber (Dessert Now, Dinner Later!)
  • 1 (10oz) bag cherry morsels (found in the baking aisle especially during Christmas or at specialty stores if you can't find it at Walmart)
  • 1 Tbsp shortening
  • 5 cups Chex cereal
  • 1 (4oz) box cheesecake pudding mix
  • 1/2 cup powdered sugar
  1. In a LARGE bowl, melt cherry morsels with shortening in the microwave on 50% power for 60 seconds at a time.  Stirring & re-heating until melted.
  2. Add Chex cereal & fold with a spatula gently until cereal is well-coated.
  3. Combine cheesecake pudding mix & powdered sugar in a gallon size ziplock bag.
  4. Add coated cereal to the bag with the pudding/sugar mixture, zip shut & shake until evenly distributed. Enjoy!

reade more... Résuméabuiyad