Pages

Ozoni (Japanese New Years Soup)


I know the picture of this soup isn't great. I had to take it with the camera on my laptop because I did not bring my legit camera home with me for Christmas. I made this soup the day after Christmas because I wasn't going to be with my family for New Years day. Since my grandmother passed away last year, that was the first year we did not do new years soup at her house. We wanted to bring that tradition back so I made it this year for them, and it was almost as good as my grandmother made it.

Ozoni is unique. No two soups will ever be the same because every region of Japan and every individual family has their own way of making it. In Tokyo region, clear both is more common whereas in Osaka, most people use miso broth. In contemporary Japan, they use a lot of chicken, shrimp, scallops or other more expensive ingredients. Our family came to the United States in the 1950s from a poor region, so we never got meat or anything like that in our soup. Ours was strictly vegetarian (except for dashi) because that's what you eat when you're poor. The shrimp and chicken came in at lunch.

More than that, our family was a family of farmers, not fishermen. It makes sense that our soup then uses more root vegetables than anything else. But no matter what, it seems like all soups have mochi, daikon radish, carrots and gobo (burdock root). I used lotus root instead because I could not find burdock root at the asian market that day, and my father likes lotus root better anyway. I made sure to do mochi exactly like my grandmother used to. She always did "age-mochi" where she put the mochi in a fried tofu pouch instead of boiling it directly in the soup. This was largely so she would not have to wash the sticky rice off the bottom of the pot, but now it's our family tradition.

There were a few things my grandmother did that I no longer do. I no longer use kamaboko (these horrible pink processed fish cakes) and I no longer use konnyaku (really gross laxative yam jelly). Of course, I'm biased. I'm sure some people like them...

Feel free to ignore the amounts of ingredients. It changes depending on your family (for example, my father really likes taro root and I really like lotus root, so there is always lots and lots of lotus root in our soup

Ozoni (my new recipe and tradition) serves 5ish.

Ingredients
  • 8 shiitake mushrooms, stems removed
  • 1 4 inch piece of daikon radish, peeled and cut into circles
  • 1 4 inch piece of lotus root, peeled and cut into circles
  • 10 pieces of age (fried tofu skin)
  • 10 pieces of mochi
  • carrots, cut into circles
  • 1 bag frozen satoimo (baby taro root)
  • 1 pack tied kombu (they come tied like bowties from the asian market)
  • 1/4 head of of a large napa cabbage
  • Dashi
  • soy sauce, sugar, salt to taste
Directions
  1. Boil the fried tofu skin in a large pot for about 5 minutes to remove the oil. Cool the tofu in ice water and reserve the boiling liquid.
  2. Add dashi to your tofu water. If preferred, add instant dashi (can be purchased from the asian market) and extra water. Season with a little soy as desired (and I love MSG, but I understand if you don't). This is more of stew than a liquid soup, so just need enough liquid to boil your vegetables.
  3. Begin simmering the lotus root, daikon, taro root and mushrooms in your soup base. Cover with a lid for about 10 minutes
  4. While simmering, squeeze the liquid out of your tofu pouches and make a slit in one side. Slip a small piece of mochi into your tofu pouch and tie off with kampyo or close with small kushiyaki skewers. Add the mochi pouches to the soup.
  5. Add your carrots and kombu to the soup. The kombu is simmered in soy and sugar already, so it will give the soup a great sweetness. Adjust seasoning to taste
  6. At the very end, add your napa cabbage on top of everything else so it can steam for 5 minutes before serving. Simmer until all vegetables are tender.
Happy New Year everyone!

I know the picture of this soup isn't great. I had to take it with the camera on my laptop because I did not bring my legit camera home with me for Christmas. I made this soup the day after Christmas because I wasn't going to be with my family for New Years day. Since my grandmother passed away last year, that was the first year we did not do new years soup at her house. We wanted to bring that tradition back so I made it this year for them, and it was almost as good as my grandmother made it.

Ozoni is unique. No two soups will ever be the same because every region of Japan and every individual family has their own way of making it. In Tokyo region, clear both is more common whereas in Osaka, most people use miso broth. In contemporary Japan, they use a lot of chicken, shrimp, scallops or other more expensive ingredients. Our family came to the United States in the 1950s from a poor region, so we never got meat or anything like that in our soup. Ours was strictly vegetarian (except for dashi) because that's what you eat when you're poor. The shrimp and chicken came in at lunch.

More than that, our family was a family of farmers, not fishermen. It makes sense that our soup then uses more root vegetables than anything else. But no matter what, it seems like all soups have mochi, daikon radish, carrots and gobo (burdock root). I used lotus root instead because I could not find burdock root at the asian market that day, and my father likes lotus root better anyway. I made sure to do mochi exactly like my grandmother used to. She always did "age-mochi" where she put the mochi in a fried tofu pouch instead of boiling it directly in the soup. This was largely so she would not have to wash the sticky rice off the bottom of the pot, but now it's our family tradition.

There were a few things my grandmother did that I no longer do. I no longer use kamaboko (these horrible pink processed fish cakes) and I no longer use konnyaku (really gross laxative yam jelly). Of course, I'm biased. I'm sure some people like them...

Feel free to ignore the amounts of ingredients. It changes depending on your family (for example, my father really likes taro root and I really like lotus root, so there is always lots and lots of lotus root in our soup

Ozoni (my new recipe and tradition) serves 5ish.

Ingredients
  • 8 shiitake mushrooms, stems removed
  • 1 4 inch piece of daikon radish, peeled and cut into circles
  • 1 4 inch piece of lotus root, peeled and cut into circles
  • 10 pieces of age (fried tofu skin)
  • 10 pieces of mochi
  • carrots, cut into circles
  • 1 bag frozen satoimo (baby taro root)
  • 1 pack tied kombu (they come tied like bowties from the asian market)
  • 1/4 head of of a large napa cabbage
  • Dashi
  • soy sauce, sugar, salt to taste
Directions
  1. Boil the fried tofu skin in a large pot for about 5 minutes to remove the oil. Cool the tofu in ice water and reserve the boiling liquid.
  2. Add dashi to your tofu water. If preferred, add instant dashi (can be purchased from the asian market) and extra water. Season with a little soy as desired (and I love MSG, but I understand if you don't). This is more of stew than a liquid soup, so just need enough liquid to boil your vegetables.
  3. Begin simmering the lotus root, daikon, taro root and mushrooms in your soup base. Cover with a lid for about 10 minutes
  4. While simmering, squeeze the liquid out of your tofu pouches and make a slit in one side. Slip a small piece of mochi into your tofu pouch and tie off with kampyo or close with small kushiyaki skewers. Add the mochi pouches to the soup.
  5. Add your carrots and kombu to the soup. The kombu is simmered in soy and sugar already, so it will give the soup a great sweetness. Adjust seasoning to taste
  6. At the very end, add your napa cabbage on top of everything else so it can steam for 5 minutes before serving. Simmer until all vegetables are tender.
Happy New Year everyone!
reade more... Résuméabuiyad

Countdown to 2012: Best Dessert Recipes of 2011

Just like last year, I couldn't possibly choose only one dessert to highlight, but at least I managed to keep it to ten instead of fourteen.  Of course, that's probably because I just didn't get to bake as much this year.  

This cake just makes me happy.  It's feminine, beautiful, elegant, yet so simple to decorate.  And it tasted fabulous. Three layers of moist chocolate cake, with raspberry filling and chocolate mousse filling, frosted with raspberry butter cream.  It was amazing.  

The best. sugar. cookies. ever. 

Rich and decadent, chocolatey and peanutty, I found these bars impossible to resist.

We could not believe how awesome these were.  They inspired the Cake of Roses mentioned above.

When my chocolate-loving husband said he actually preferred this ice cream, I knew we had a winner.

Very easy to throw together and sure to gather compliments wherever you take them, these are a huge crowd pleaser with tons of chocolate and oreos.

I love caramel.  I love apples.  I love cheesecake.  And don't even get me started on streusel. 
All together?  Awesomeness. 

So so smooth and creamy.  The perfect chocolate ice cream.

Yeah, we like the never-old raspberries and chocolate combination.  These bar treats are just wonderful.

Fruit pizzas are so simple, but so delicious.  My kids have been begging me to make this for months, despite my explanation that we can't get good fresh strawberries at this time of year.  It is seriously one of the top-requested recipes around here.

Be sure to check out Finding Joy in my Kitchen for more collections of Dessert Favorites!
reade more... Résuméabuiyad

Countdown to 2012: Best Crockpot Recipe of 2011


We absolutely love this Spicy Pulled Pork.
It is without question our favorite crockpot meal of the past year. 
I've made it several times for guests and gotten rave reviews from everyone, and Grant says it's one of his absolute favorite meals that I've ever made. 
Try it, you won't be disappointed!

Be sure to check out other crockpot favorites over at Finding Joy in My Kitchen today!
reade more... Résuméabuiyad

Your Top 10 of 2011 {Most-Viewed Recipes of the Year}

Well, here they are!  Your top 10 of 2011 ... as 'voted for' by your clicks.  And I must say, you all have great taste.  Hee, hee.

1.  Funfetti Cake Balls - By farrrrrrr your most clicked post.  This post was viewed a whopping 7 times more than the #2 post.  Boy, who would have thought that one of my biggest 'oops' of the year would turn into such a fabulous-little-favorite treat.  One reader even called me "the MacGuyver of the kitchen" for this recovery of a flop ... I'm so flattered!


2.  Salted Chocolate Cake Pops - Oooohh, this one brings back such a wonderful memory ... an entire day this summer spent making cake pops and cake ball truffles with my friend Jenny.  Thanks so much for giving me this walk down memory lane!


3.  Nutella French Toast with Maple Syrup, Bananas, & Strawberries - I've definitely been on a Nutella kick this year.  Yum.


4.  The BEST Vanilla Cupcake + the BEST Coffee Buttercream - Thank you for coming along on my quest for the BEST vanilla cupcake!  It was surprisingly difficult to find a vanilla cupcake that I was truly happy with.


5.  Stovetop Smoked Gouda Mac & Cheese - This one holds a special place in my heart, because it was created for the first ever Crazy Cooking Challenge, the brain child of and hosted by Tina of Mom's Crazy Cooking.  I love participating in the Challenge with Tina and the other 80-or-so participating bloggers!  (Hey, check us out on January 7th when we'll be going live with a Chicken Noodle Soup Crazy Cooking Challenge ... I know, I know, shameless plug.)

6.  Margarita Cupcakes - a.k.a Top Shelf Margarita Cupcakes.  These were a July creation that were just perfect for summer.


7.  German Chocolate Chip Cookies - These tasty little beauties were also made for a Crazy Cooking Challenge ... the 2nd one, featuring chocolate chip cookies.  I decided not to submit these as my entry though, going instead with Nutella Chocolate Chip Cookies (which also made the top 10 list at #9).  Looks like you all liked these even better than the Nutella Chocolate Chippers ... maybe I should have gone with these for the Challenge!


8.  Black Bottom Cupcakes - Chocolate & cheesecake together in a two-or-maybe-three-bite-sized cupcake.  What more could we ask for?  This is the post in which I included a blast from the past ... Animal of the Muppets singing "mnah-mnum" ... love that little puppet guy.  This is also the sweet treat I featured in my personal cancer story post for 'Frosting for the Cause' in support of breast cancer research.


9.  Nutella Chocolate Chip Cookies - My 2nd Nutella-based treat to make your top 10.  These little tasties were baked up for the Crazy Cooking Challenge.  Delish.


10.  Margarita Cake Ball Truffles - Margarita Cupcakes' little sister!  This post even features a visit from Elvis.


And I would like to include my favorite find from 2011 in blogland ... S'More Pralines, adapted from Bakergirl's Graham Cracker S'mores Candy.  Incidentally, these made Bakergirl's 2011 Top Ten!  Believe me, these are absolutely scrumptious.

Thank you to everyone who has stopped by my little spot in blogland this year!  I truly appreciate you reading, your comments, your support, and your encouragement.  Happy New Year to you!!

I invite you to follow The Kitchen is My Playground with Pinterest, Facebook, Google Friend Connect, Linky Followers, bloglovin', or Feedburner. Buttons are in the right sidebar. I'd love to have you back soon!


Tracey @ The Kitchen is My Playground

This post is linked with Savvy Homemade Monday hosted by Home Savvy A to Z, It's a Keeper Thursday hosted by It's a Keeper, Share Your Creations hosted by Kristen's CreationsCreative Juice hosted by Momnivore's Dilemma, Foodie Friday hosted by Designs by Gollum, Weekend Bloggy Reading hosted by Serenity Now, Sweets for a Saturday hosted by Sweet as Sugar Cookies, Sweet Indulgences Sunday hosted by A Well-Seasoned Life, Countdown to 2012: Best Desserts of 2011 hosted by Finding Joy in My Kitchen, Think Pink Sundays hosted by Flamingo Toes, Sundae Scoop hosted by I {heart} Naptime, Feature Yourself Friday hosted by Fingerprints on the Fridge, Mangia Mondays hosted by Shine Your Light, Cast Party Wednesday hosted by Lady Behind the Curtain, Inspiration Friday hosted by At the Picket Fence.
reade more... Résuméabuiyad

Matcha (Green tea) icebox cookies with White Chocolate Chips


A while ago, I went through a phase of icebox cookies. They were easy and lasted as long as you wanted them to in the freezer. Just slice and bake when ready to eat these slightly sweet, slightly bitter cookies.

Matcha White Chocolate Cookie

Ingredients
  • 240 g flour
  • 15 g matcha powder
  • 150 g butter
  • 130 g sugar
  • pinch of salt
  • 2 egg yolks
  • handful of white chocolate chips


Directions
  1. Cream together butter, sugar and salt.
  2. Add egg yolks. Then sift in flour and stir in chocolate chips
  3. Shape dough into a log and refrigerate for at least one hour
  4. Preheat oven to 325. Slice, and bake for 15-20 minutes
reade more... Résuméabuiyad

Countdown to 2012: Best Main Dishes of 2011

Truth be told, I greatly prefer baking over cooking. 
I know, I know, that comes as a huge surprise to anyone who frequents my blog. 

Ha. 

But there is something very satisfying about cooking up a delicious dinner and having the other five people at your table eat with gusto and clean their plates, possibly asking for seconds.

And there wasn't even chocolate involved.

Yeah, cooking is pretty fun too.  

Here are some of the favorite main dishes of our house this past year.  
(Another top dish is coming tomorrow with the Crockpot Favorites, so don't forget to come back for that one!)


Super Bean Burritos

As always, be sure to check out Finding Joy in My Kitchen for lots of Main Dish Favorites from other bloggers!
reade more... Résuméabuiyad

Countdown to 2012: Best Soups and Stews

Like I've mentioned before, this year has not been one in which I had oodles of time for trying new recipes, as several months we were just in survival mode and sticking to old favorites.  

These two soups definitely made it to our favorites list, and the second one is even vegetarian, part of our attempt to eat less meat.  When you have four young children, it's hard to find meals that everyone will eat without complaining - and both of these dishes pass that criteria for my family.  So that makes them winners in my book!


reade more... Résuméabuiyad

Frozen Mixed Berry Pie

This Christmas we wanted to make a nice berry pie, but berries are obviously not in season right now.  We opted to use frozen berries.  My mom has had problems with a soggy crust while using fresh berries so I adjusted the recipe to help with any excess liquid.  We did a fairly good job, you just want to make sure to either drain most of the liquid, or you can take some of the liquid & put it in a saucepan, heat it up & thicken it with a cornstarch slurry before adding it to your crust.  The pie produces enough sauce as is, in my opinion, so my advice is to do what the recipe says & just drain most of it.  This was a nice treat after our big Christmas dinner.  I love pie!

Pin It


Frozen Mixed Berry Pie
Recipe by: Amber (Dessert Now, Dinner Later!)
  • Pie Dough-for bottom & top crusts
  • 5-6 cups fruit (I used a frozen berry [blackberry, raspberry, blueberry] blend--thawed in the fridge overnight)
  • 1 cup sugar, split in half (more or less depending on the tartness of the berries)
  • 6 Tbsp cornstarch
  • 2 Tbsp butter, cut into small cubes
Thawed berries.

Pie ready for oven...my butter cubes were a little big, cut them smaller.
  1. Drain liquid, if any, from thawed berries.  Add half the sugar.  Let macerate for 5 min or so until the sugars make liquid release from the fruit.  Drain most of the liquid.
  2. Mix other half of sugar with cornstarch & toss with drained fruit.
  3. Add immediately to prepared pie crust, top with small cubes of butter & remaining pie crust topper.  
  4. Egg wash the top (or spray with a little cooking spray), & sprinkle with raw sugar/sugar crystals.  Bake at 350*F for 1hr 15 min. or until crust on top is nice & golden brown and the filling is BUBBLING.
Yield: 1-9inch pie

Finished...ready to eat!


reade more... Résuméabuiyad

Countdown to 2012: Best Bread Recipes of 2011

I love making bread - there's just something so comforting and welcoming about the smells of bread wafting through the house, and there's no denying the health benefits and superior taste of homemade breads.

Here are my favorites from the past year - at least of the ones I got posted!


Homemade Wheat Bread


Old Fashioned Corn Bread


Be sure to check out other favorites over at Finding Joy in My Kitchen!
reade more... Résuméabuiyad

Peanut Brittle


I know, I know, Christmas is over and here I am, posting one of my favorite Christmas candies. What can I say, the past week has been really busy and I just couldn't make time to blog.  I'm just happy I made time to even make the peanut brittle in the first place!

I got this recipe from my grandma many years ago; it was one of the Christmas candy traditions for our family along with Divinity and Buck-Eyes.  I absolutely loved eating the candy, but as I got into my teen years, I treasured the time spent learning how to make it and getting special time with Grandma. She passed away in '98 and to the best of my knowledge, I'm the only one of her grandchildren who makes these recipes anymore.   

I had a batch turn out really badly a couple of years ago - I didn't cook it long enough and the result was so chewy/sticky that you could barely eat it and keep your teeth intact.  It was extra disappointing because I had made it to give as gifts to some ladies in my MOPS group and it was such a flop, I couldn't possibly give it away. 

My point - be SURE to cook it to 300°!

Which brings up another point - be SURE to test your candy thermometer (stick it in boiling water and see if it registers 212°F; if not, make necessary adjustments when making candy) before you start making the candy. 

The end result is a wonderfully crunchy, sweet, peanutty candy that makes a great addition to your candy or cookie trays and really nice gifts to neighbors and friends. 

Recipe:

2 cups sugar
1 cup light corn syrup
1/2 cup water
12 oz. raw Spanish peanuts
2 T. butter
1-1/2 t. vanilla
1/2 t. salt
1 t. baking soda

Grease a large cookie sheet with rims generously with butter.  Set aside.

In a heavy saucepan, combine sugar, corn syrup, and water, cover with a lid, and heat over medium heat for three minutes.  Uncover and cook to 250° or it spins a thread.  Add peanuts and cook until it reaches 300°, stirring frequently. 
Remove from heat and add butter, vanilla, and salt, then baking soda.  Stir until blended.  Mixture will foam up and lighten in color when you stir in the baking soda.
Pour immediately into prepared pan and spread to the edges. 
Break into pieces after it cools.
reade more... Résuméabuiyad

Countdown to 2012: Best Breakfast Recipes

SnoWhite is hosting a Countdown to 2012 this week, with today's feature being Breakfast Recipes.

I participated in the countdown last year and really enjoyed it.....so I decided to give it a shot this year as well.  Hopefully I'll be able to post every day! 

As I was perusing my posts from 2011, I realized that the events of the year really limited my posting of new recipes this year.  Something about dealing with pregnancy nausea for four months, having a newborn, homeschooling with five children 8 and under, and having a knee injury (could be looking at arthroscopic surgery for a meniscus tear soon)....let's just say I've kept my kitchen adventures to a minimum. 

That being said, here are a couple of breakfast recipes that we have enjoyed tremendously this year and that I make often. 


Be sure to check back tomorrow for the best Bread recipes!
reade more... Résuméabuiyad

Tortellini Salad {By Request}

Hello, everyone!  This is just a real quick post to share a recipe that's been requested.  Back this summer, I did a 'My Mom Throws a Great Party!' post series, featuring recipes she served at a wine tasting party.  Well, see the tortellini salad in the bottom left of the photo below?  A fabulous-and-faithful reader of The Kitchen is My Playground has requested the recipe for this salad.  I'm more than happy to oblige!  (And Mom doesn't mind either.)


The reader writes,

"Could you please post the Tortellini Salad recipe pictured in 'My Mom Throws a Great Party {Party Series Part 1}'? I simply can't take my eyes from this picture." 

Sure thing!  Here you go.

Tortellini Salad
Source:  My Mom, and we're pretty sure she adapted the recipe from Cooking Light magazine
Ingredients
1 lb. frozen cheese tortellini  (Mom uses tri-color tortellini - ya know, 'cause it's fun)
1/4 c. wine vinegar (Mom uses white wine vinegar)
1/3 c. extra virgin olive oil
4 tsp. prepared mustard
2 T. lemon juice
2 cloves garlic, mashed
1/2 tsp. ground thyme
1 tsp. dill weed
1 1/2 tsp. salt
1/8 tsp. black pepper
Your favorite vegetables*


Directions
1.  Cook tortellini according to package directions; cool. 

2.  Combine remain ingredients (except vegetables) to make the dressing. 

3.  Combine tortellini and chopped vegetables; top with dressing.  Toss to coat.  Chill at least 2 hours before serving.

*My Mom used a combination of julienned red bell peppers, zucchini, and carrots.  I think yellow bell peppers, yellow squash, or cherry/grape tomatoes would also be wonderful.  Or ... whatever fits your fancy!

Enjoy!


The {Party Series} Posts:
My Mom Throws a Great Party! {Party Series 1}
Grand Marnier & Spiced Rum Fruit Dip {Party Series 2}
Antipasto Platter with Grape Tomato & Caper Salad {Party Series 3}
Marinated Cheese {Party Series 4}
Mini Mocha-Toffee Crunch Cheesecakes {Party Series 5}
Raspberry Chocolate Truffles & Drunken Cherries {Party Series 6}
Raspberry-Almond, Caramel-Walnut, & Lemon-Coconut Bars {Party Series 7}
Toasted Pesto Rounds {Party Series 8}
reade more... Résuméabuiyad

Egg Nog Cream Puffs


Want to try something new & fun for the holidays?  Try these egg nog cream puffs.  This is a recipe to wow the crowds.  Plan ahead & read the recipes carefully, it goes fast so you want to be ready.  Happy Holidays!!!
Pin It


Egg Nog Cream Puffs
Recipe by: Amber (Dessert Now, Dinner Later!)

Pate a Choux (Cream Puff/Eclair Paste)
Recipe by: Alton Brown
  • 1 cup water
  • 6 Tbsp butter
  • 1 Tbsp sugar + 1/8 tsp salt
  • 5 3/4 oz (approx 1 1/4 cup) flour
  • 1 cup eggs (approx 4 large eggs + 1 egg white)
  1. Heat water, butter, sugar in a saucepan until rolling boil.
  2. Remove from heat, add flour stir; return to heat & keep stirring with a spoon until it balls up & is less steamy.
  3. Put mixture in stand mixer.  With a paddle attachment mix on medium speed until it's cooled down slightly; can touch it without it being too hot.
  4. Add eggs in one at a time, waiting until the egg has mixed in completely before adding another one.  
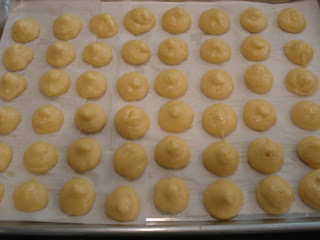
  5. Once all eggs are incorporated, place mixture in a pastry bag & pipe 2" cream puffs on a pan lined with parchment paper.  
  6. Bake at 425*F for 10-13 minutes or until the cream puffs have some nice height.
  7. Lower the oven to 350*F & bake an extra 10 min or until GOLDEN BROWN (It took me like 20 or more extra minutes instead of 10.)  
  8. **You want to make sure the cream puffs are done on the inside & won't fall when you remove them from the oven.  They must be browned well.  You can pull one out of the oven if you think it is done & see if it keeps it's shape.  You should be able to tell when you pick it up if it feels light & airy or dense & heavy.  If it is still heavy, leave them in the oven.  It is basically impossible to fix these if you pull them from the oven too early.
All eggs incorporated; slightly glossy texture.

Putting your bag in a sturdy cup is an easy way to fill it up.

To make sure the tops aren't pointy, I dip my finger with water & press the points down, smoothing the tops.


Egg Nog Pastry Cream
  • 1 cup milk
  • 2 Tbsp sugar
  • 2 Tbsp cornstarch
  • 1 egg yolk
  • 1 whole egg
  • 2 Tbsp sugar
  • 1 Tbsp butter
  • 1 tsp pure vanilla 
  • 1 tsp rum extract
  • 1 tsp nutmeg
  • 1/4 tsp ginger
  • Cool Whip
  1. In a saucepan dissolve the sugar in the milk & bring just to a boil.
  2. With a whip, beat the egg yolks & whole eggs in a bowl.
  3. Sift the cornstarch & sugar into the eggs.  Beat with the whip until perfectly smooth.
  4. Temper the egg mixture by slowly beating in the hot milk in a thin stream.
  5. Return the mixture to the heat & bring to a boil, stirring constantly.
  6. When the mixture comes to a boil & thickens, remove from the heat.
  7. Stir in the butter, vanilla, rum, & spices.  Mix until the butter is melted & completely blended in.
  8. Pour out into a clean, sanitized container; dust lightly with sugar & cover with plastic wrap pressed onto the pastry cream to prevent a crust from forming.
  9. Cool quickly.  (Can use an ice water bath with a stainless steel bowl, or refrigerate immediately in a shallow pan).
  10. Once cooled remove from fridge, add half an 8oz tub of cool whip (or make your own whipped cream) & fold into pastry cream.
  11. With a star tip & pastry bag, poke the bottom of the cream puff & fill with egg nog cream.  Dust tops of cream puffs with powdered sugar & serve.  KEEP COLD.  You may also like to freeze the puffs & pull them 5 min or so before serving.
If you want a stiffer filling, whip your own cream with sugar & vanilla to stiff peaks before folding into the pastry cream.


reade more... Résuméabuiyad

Ginger Cranberry Sauce


This isn't any different than a normal cranberry sauce recipe you'd find on the back of a bag of cranberries. However, I've always found that cranberry sauce too sweet and like to spice it up a bit with a few other flavors. I would probably put more ginger in mine next time, but I suppose it depends how spicy you like it.

The only downside of cranberry sauce: it makes me wish I could find cranberries in the store all year, not just in that glorious period between Thanksgiving and Christmas.

Cranberry Sauce

Ingredients
  • 12 oz fresh cranberries
  • ⅔ cup sugar
  • zest 1 orange
  • juice from one orange + enough water to equal 1 cup
  • 1 cinnamon stick
  • 1 pinch ground cloves
  • 2 inches or fresh grated ginger


Directions
  1. Dissolve sugar, water, cinnamon, cloves and ginger together until simmering.
  2. Add cranberries and simmer for 10 minutes until they have popped. Remove cinnamon stick
reade more... Résuméabuiyad

What's Your 'Perfect' Gingerbread Man?


Each year at Christmas time, I do the tradition of gingerbread with my little 1st graders as we're learning about different holiday traditions.  I'm always surprised to see how many of the students have never tried gingerbread before.  This year was no different ... over half my class had never tried it.  I love to introduce my students to new things!  I've discovered that my idea of the perfect gingerbread man is drastically different than a 1st grader's idea of the perfect gingerbread man.  Take a look at the photographs below and you'll see what I mean.

Here's my perfect gingerbread man ... just plain.  No frosting.  No icing.  No decorations.  Just 'nekked,' some might say.  I like to taste the wonderful spicy gingerbread flavor without any competition from sweet icings or embellishments.

My idea of the perfect gingerbread man ... just 'nekked!'

Here's 1st graders' idea of the perfect gingerbread man ... their philosophy = the more frosting the better!  It's so fun to watch them having a big ol' time decorating their gingerbread.  (I especially love the cookie on the bottom right with the long red hair.)
1st graders' idea of the perfect gingerbread man

On 'Gingerbread Afternoon,' I set up three stations in the room that the students rotate through.  At two of the stations, students work on the gift we make for their parents - a gingerbread ornament with a photograph of the student as the gingerbread "man's" face, and a gingerbread house gift bag made with a brown paper lunch sack.  At the third station ... they get to decorate and eat their gingerbread cookie.  And they love it!

What made this year's gingerbread stations extra fun was that my Mom and Dad came to help out.  I loved having them there!  My Mom facilitated the ornament station.  My Dad helped me with the cookie station.  It was my Dad's first time volunteering in my classroom, and he was so sweet with the kids.  We worked together to demonstrate decorating a cookie for each group, and then we'd let them have at it themselves.  Fun, fun, fun.  It might be one of my favorite 1st grade days each year.

The recipe I use for my gingerbread cookies is adapted from Muster Day Gingerbread in Valerie Barrett's The Complete Book of Gingerbread.  The recipe gets its name from the military Muster Day held in New England each year.  According to the recipe note:

"In New England before the Civil War, the first Tuesday of every June was Muster or Training Day.  All men from 18 to 45 were required to go for military training and many of them took their families along.  It became a festive occasion and gingerbread was an essential part of the day's menu," (p. 18).

So, whether you prefer gingerbread 'just nekked' or the 1st-grade-way, enjoy creating your perfect gingerbread man! 

I wish you a very merry Christmas filled with tasty treats and wonderful times with family and friends.


Gingerbread Cookies
Adapted from: Muster Day Gingerbread in The Complete Book of Gingerbread by Valerie Barrett
Ingredients
1/4 c. brown sugar
Generous 1/3 c. molasses
2 tsp. ground ginger
1 tsp. ground cinnamon
1/4 tsp. ground cloves
2 tsp. baking soda
1/2 c. butter, cut into chunks
1 egg
2 1/2 to 3 c. all-purpose flour


Directions
1.  Put sugar, molasses, ginger, cinnamon, and cloves in a pan* and heat to boiling point.  Stir in baking soda.  Take off heat and pour mixture over the butter in a bowl. 

2.  Stir until the butter has melted.  Break egg into the mixture and then work in the flour.  Mix gently together until it becomes a smooth dough.

3.  Cover the bowl with plastic wrap and refrigerate for about an hour. 

4.  When chilled and stiffened slightly, roll out and cut out cookies with cookie cutters (I roll mine a bit thick ... probably about 1/4" thick.  I like thick, soft cookies). 

5.  Place cookies on a lightly greased cookie sheet.  Bake at 325 degrees for 8-10 minutes.

6.  Decorate with icing, if desired.

(*Note - Place your brown sugar, molasses, and spices in a saucepan larger than you think you'll need.  When you stir in the baking soda, the mixture foams up on you!)


This post is linked with Tea Party Tuesday hosted by Sweetology, Mrs. Fox's Sweets Party hosted by Mrs. Fox's Sweets, These Chicks Cooked hosted by This Chick Cooks, Tuesday Talent Show hosted by Chef in Training, Full Plate Thursday hosted by Miz Helen's Country Cottage, Creative Juice Thursday hosted by Momnivore's Dilemma, Share Your Creations hosted by Kristen's Creations, Foodie Friday hosted by Designs by Gollum, Inspiration Friday hosted by At the Picket Fence, Sweets for a Saturday hosted by Sweet as Sugar Cookies, Sweet Indulgences Sunday hosted by A Well-Seasoned Life, Christmas in JulyChristmas Link Party12 Days of Christmas Cookies.
reade more... Résuméabuiyad