Pages

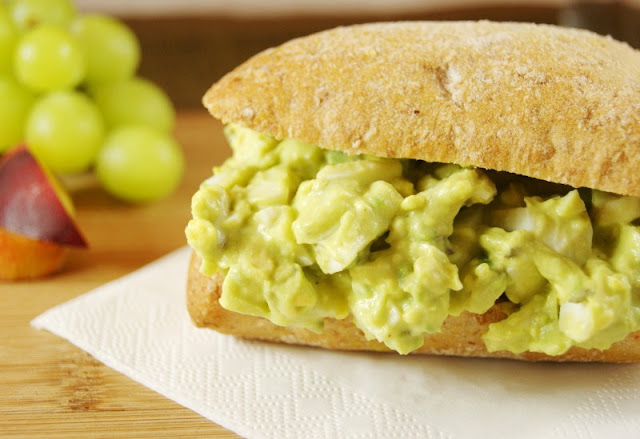
Avocado Egg Salad


Green eggs and ham,
Could it be?
A whole new way
to enjoy thee?

Well, yes it is!
And truth be told,
It's creamy goodness
To behold.

I sure do like it,
Sam I am.
I like this kind
Of green eggs and ham!


I guess my brain's gearing up to get back to my first graders ... I just couldn't resist writing this little Green Eggs and Ham ditty for this one.  And truth be told, ... though I can hear those skeptics out there ... this Avocado Egg Salad is really, really good!

It will definitely be appearing in my lunchbox line-up this coming school year.

Come on.  Be daring.  Give it a try.  You'll be surprised ... in a good way.


I invite you to follow The Kitchen is My Playground with Pinterest, Facebook, Google Friend Connect, Linky Followers, bloglovin', or Feedburner. Buttons are in the right sidebar. I'd love to have you back soon!


Avocado Egg Salad
Source:  Adapted from Skinnytaste.com
Ingredients
6 hard boiled eggs
1 medium avocado, cut into chunks
2 T. mayonnaise (or plain yogurt, or combination of the two)
2 tsp. finely chopped fresh chives or 1 tsp. dried chives
2 tsp. red wine vinegar
1/4 tsp. salt
Pinch of ground black pepper


Directions
1.  Separate the egg yolks and egg whites.  Coarsely chop the egg whites.

2.  Using a fork, mash together the egg yolks and avocado.  Combine with the mayonnaise, chives, red wine vinegar, salt and pepper.  Mix in chopped egg whites.


Enjoy!  (Enjoy those green eggs and ham, oh Sam I am.)


NOTE: The red wine vinegar adds fabulous flavor and helps keep the avocado from turning brownish. This can keep in the refrigerator for a couple of days, and while it won't turn brownish, the color does change a bit to different shades of greenish.


reade more... Résuméabuiyad

Graham Cracker S'Mores Bars


Everyone knows that s'mores are a great summertime treat - but when it's 95° outside, who really wants to go sit around the fire pit in the back yard and roast marshmallows?

Not me, that's who.

These bars take the addicting goodness of s'mores, add in chocolate chip cookie dough with a slight hint of cinnamon and the convenience of a quick bake in the oven, and presto!  A fabulous, people-pleasing dessert without mosquito bites, sweat pouring down your face, and smoky smelling hair.

I guess you can tell I wasn't born to live outdoors.

Marissa took some to her Wed. night class at church and all the girls loved them, I'm told.
"Everyone wanted seconds, Mom!"


And the ones left at home?  Well, let's just say it didn't take long for them to disappear.  And my visiting parents definitely wanted the recipe. (here ya go, Mom!) 

Side note:  Do you have spelling pet peeves?  One of mine is when people spell definitely as "definately."  Or even worse, "defiantly".   Sorry.  Just had to throw that in there.  

So when you're craving s'mores and don't have access to a campfire or want to be around a campfire, give these a try.  You'll love them.

Graham Cracker S'Mores Bars (from Life Made Simple)

11 tbsp. butter, room temperature
1/2 c. granulated sugar
1 c. brown sugar
2 eggs
1-1/2 tsp. vanilla
1/2 tsp. salt
1 tsp. baking soda
1/4 tsp. cinnamon
2-1/2 cups flour
1-1/2 cups mini marshmallows, divided use
1-1/2 cups semi-sweet chocolate chips or chunks
1 package snack size Hershey's bars, broken into sections
2 sleeves honey graham crackers, broken into squares

DIRECTIONS:


Preheat oven to 375°.

In the bowl of a stand mixer, cream butter and sugars (1-2 minutes).

In a medium bowl, combine flour, soda, salt and cinnamon. Whisk to combine.

Add egg one at a time to butter mixture, gently beating after each addition. Add vanilla and mix.

Slowly begin to add flour mixture to the butter mixture, keeping the mixing speed low while doing so.
Once combined, remove and fold in 1 cup mini marshmallows and chocolate chips. Chill mixture in refrigerator for 10-15 minutes.

While mixture is chilling, prepare baking sheet (standard size, with sides) by lining it with parchment paper. Take graham crackers and break in half. Lay out onto sheet, until it is completely full (they should cover the entire sheet and cookies should be tight and touching- see picture).

Remove chilled dough from refrigerator and using a standard cookie scoop, place one ball of dough onto each cracker. use remaining dough to fill in the gaps. It may look like a lot of dough, but it all needs to run together in order to cover the entire sheet.

Place into oven for 6 minutes, then remove and press Hershey's bar pieces into top along with remaining 1/2 cup marshmallows (just fill in the gaps with them a little). Return to oven and bake for 5-7 minutes or until dough and marshmallows beginning to brown, making sure the dough is cooked through. Remove from oven and place sheet on a wire rack to cool. Once it is sufficiently cooled, cut into squares.


Linked to Trick or Treat Tuesday and Crazy Sweet Tuesday
reade more... Résuméabuiyad

Double Chocolate Chip Pizookies


Sometimes, I like to keep cookie dough in the refrigerator & make one of these for a warm dessert ready in 5 or so minutes.  It is one of those sweets that really hit the spot when I am having a rough day or just need my chocolate fix in a bad way.  Really, you can use any cookie recipe & any ice cream combination, but I am a chocoholic, so the more the better.  Probably could have even had chocolate ice cream on top too!


Double Chocolate Chip Pizookies (Pizza/Cookies)
Recipe altered from allrecipes by: Amber (Dessert Now, Dinner Later!)
  • 1/2 cup butter
  • 1/3 cup sugar
  • 1/3 cup brown sugar
  • 1/2 tsp vanilla 
  • 1 egg
  • 1 cup all-purpose flour
  • 1/4 cup plus 2 Tbsp baking cocoa
  • 1/2 tsp baking soda
  • 1/4 tsp salt
  • 3/4 cup chocolate chips
  1. Cream butter with sugars.  Add vanilla & egg.  Combine well.  Scrape bowl.
  2. Sift dry ingredients together: flour, cocoa, baking soda, salt.  Gradually add to wet mixture.
  3. Add chocolate chips at the end unti just incorporated.
  4. Lightly spray a small cast iron skillet or Skookie pan with cooking spray & pat down a layer of cookie dough.  Just enough to cover the bottom.  If you over-fill the pan it will spill over the sides.
  5. Bake at 350*F for 5-7 minutes.  You want it cooked just enough so that it is warm & gooey, not hard & crispy.  Top with ice cream & chocolate/caramel sauce if desired.  
  6. Store extra cookie dough in a closed container in the fridge up to 1 week.  
*You may also bake these on a cookie sheet for the same amount of time.  Sometimes I will make everyone their own small one & put them fresh from the oven in a bowl with ice cream...it's more kid friendly so they don't burn themselves on the hot pan.


reade more... Résuméabuiyad

Lavender & Honey Balsamic Vinaigrette


Well, I'm continuing my experiments in cooking with lavender, and my second experiment did not disappoint.  Just as in the lavender lemonade, I really enjoyed the fragrant, floral notes of the lavender in this Lavender & Honey Balsamic Vinaigrette.  I guess I'm a fan of the flavor of lavender!

And being an assistant beekeeper to my beekeeper hubby, I'm always on the lookout for new recipes in which to use our honey harvest.  So how could I resist trying out the lavender and honey combination of this balsamic vinaigrette?  I couldn't.


I also did a little experiment within my lavender experiment.  I wanted to see just what the dried lavender 'brought to the party,' so to speak, in this dressing ... how much flavor it imparted, etc.  So I decided to make the exact same dressing ~ minus the lavender ~ to see. 

Well, let me just say ... the lavender brings a lot  to this dressing party!  In comparing the two, I actually wasn't a fan of the lavender-less version after tasting the lavender-infused one.  (But you all know me, I'll keep working with the lavender-less version to tweak the ingredient proportions ... 'cause I think a honey-balsamic vinaigrette dressing would be wonderful).

Served with a very simple salad, the lavender in this dressing really shines through! 

Have you experimented with cooking with lavender?  I'd love to hear your favorites.

 I invite you to follow The Kitchen is My Playground with Pinterest, Facebook, Google Friend Connect, Linky Followers, bloglovin', or Feedburner. Buttons are in the right sidebar. I'd love to have you back soon!


Lavender & Honey Balsamic Vinaigrette
Source:  Adapted from A Taste of Lavender: Culinary Delights from Mountain Farm compiled by Linda Thompson & Marilyn Cade
Ingredients
6 T. extra virgin olive oil
2 T. balsamic vinegar
2 T. honey
1 T. fresh lemon juice
1 garlic clove, crushed
1 tsp. coarse grain mustard
1 tsp. dried lavender flowers


Directions
1.  Whisk all ingredients together.  Let stand for 30 minutes to allow the flavors to meld together. 

2.  Whisk again and serve.  Store in a container with a tight lid in the refrigerator for up to a week.

Enjoy!


reade more... Résuméabuiyad

Grilled Chicken & Apple Salad


I got this recipe at least 10 years ago.  It was one they handed out at the grocery store including a sample to try.  I was in home economics in high school at the time & cooking was one of my favorite things, so I loved to collect recipes... & try samples.  Anyway, my husband & I love to eat this for dinner especially in the summer, since it is quick to put together with the help of the grill.  This grilled chicken & apple salad is always a hit at parties as well.  Sweet & savory combinations are my favorite, which is why I like this salad so much.


Grilled Chicken & Apple Salad
Recipe courtesy of Albertson's & Betty Crocker & slightly adapted by: Amber (Dessert Now, Dinner Later!)
  • 1 lb boneless, skinless chicken breasts
  • Your favorite chicken seasoning: I like Jamaican Jerk Rub or Montreal Chicken Seasoning
  • 1 package Betty Crocker Suddenly Salad (Caesar Flavor) pasta salad mix
  • 1/3 cup Miracle Whip Salad Dressing
  • 1/4 cup apple juice
  • 1 large unpeeled apple, cored, thinly sliced, & then diced
  • 1/2 cup chopped pecans, OPTIONAL
  1. Brush grill rack with vegetable oil.  Season chicken with desired seasonings & grill until golden brown & no longer pink in the center.  Cool.
  2. While chicken is grilling, fill a large saucepan 2/3 full of water.  Heat to boiling.  Stir in contents of Pasta-Vegetable pouch.  Gently boil uncovered 12 minutes; stirring occasionally, until tender.  Drain pasta.  Rinse with COLD water.  Shake to drain well.
  3. Stir seasoning mix, miracle whip & apple juice in large bowl.  Cut chicken into chunks.  Stir chicken, pasta, & apples into seasoning mixture.  Just before serving, toss with chopped pecans.  Cover & refrigerate leftovers.
reade more... Résuméabuiyad

Daring Bakers "Crazy for Crackers" cheddar rosemary walnut edition


It's time for another challenge from The Daring Kitchen.

Our July 2012 Daring Bakers' Host was Dana McFarland and she challenged us to make homemade crackers! Dana showed us some techniques for making crackers and encouraged us to use our creativity to  make each cracker our own way my using ingredients we love.

I opted to follow one of the recipes she provided because we had all of the ingredients in house. I've also made crackers in the past like wheat thins, so I wanted to do something I had not done before. Hand rolling my wheat thins did not work out so well, as they were never thin enough. This time, I decided to try slicing the crackers like icebox cookies.

The crackers turned out well and I loved the flavor profile, but I was not a fan of making crackers in this style. My cuts were never quite even, and because I used almonds instead of walnuts, it was more difficult to get even cuts. I would make this recipe again though.

Cheddar Rosemary Walnut Crackers

Ingredients

  • 1/2 cup (1 stick) softened unsalted butter
  • 2 1/4 cup shredded cheddar cheese
  • 1 1/4 cup AP flour
  • 1 tsp salt
  • 1/2 cup chopped walnuts
  • 1 Tbsp chopped rosemary
  • A couple cracks of fresh black pepper
Directions
  1. Mix together softened butter with cheese, flour and salt until uniform paste forms. Add in rosemary and walnuts and mix until uniform.
  2. Roll dough into a cylinder in plastic wrap and freeze at least one hou
  3. Thinly slice crackers (no thicker than 1/5inch) and bake on parchment paper at 325 degrees for about 10-12 minutes
reade more... Résuméabuiyad

Cheesy Potatoes & Ham Casserole


When I was working in a restaurant that also catered, we made a lot of scalloped or funeral type potatoes for the catered events.  We would have bags of diced potatoes already prepped that we would dump into a big bowl, put our sauces & spices in, & with gloves, dig in with our hands & mix it all up.  It was kind of fun actually.  This recipe is basically the same one I made while working in that restaurant, but made into a meal with ham.


Cheesy Potatoes & Ham Casserole
Recipe by: Amber (Dessert Now, Dinner Later!)
  • 3 medium potatoes, scrubbed & rinsed
  • 1/2 cup sour cream
  • 1 can cream of chicken soup
  • 2/3 cup of cheese, plus extra for the top (I use half cheddar, half mozzarella)
  • 2 Tbsp dehydrated onion OR 1/4 cup fresh onion, small diced OR 2 tsp onion powder
  • 1 tsp salt
  • 1/2 tsp pepper
  • 8oz of small diced ham
  1. Using a mandoline, thinly slice the potatoes.  You may also small dice them, if you don't have a mandoline.
  2. In a large bowl, combine sour cream, cream of chicken soup, 2/3 cup of cheese, dehydrated onion, salt & pepper.
  3. Add sliced potatoes & ham to the soup mixture & combine thoroughly.  
  4. Spray the inside of a 4QT(+) crockpot, & scoop in the potatoes.  Top with extra shredded cheese (& even panko bread crumbs if desired.)
  5. Cook on low for 4-6 hours.  
If using an oven cover the casserole with foil & bake at 350*F for 45-60 minutes or until potatoes are cooked.

reade more... Résuméabuiyad

7 Layer Cookies


Merry Christmas in July!  My bloggy friend Yvonne at Stone Gable has a Christmas in July party going on right now, and today she posted the most beautiful white poinsettia stockings.  Impressive.  Truly impressive.

While I choose to live in denial that some local stores already have their Christmas decorations out ... I kid you not ... three weeks ago I saw one store putting them out! ... Yvonne's Christmas in July party inspired me to share one of our family's favorite Christmas-time cookies in honor of the occasion.

Now, I say Christmas-time cookies, not simply Christmas cookies, because the beauty of these sweet layer cookies is ... well ... they're not Christmas cookies!  Which means we can all enjoy their layered deliciousness any  time of the year!!
It just so happens that 7 Layer Cookies are a staple of my Mother-in-Law's Christmas day cookie tray.


I did not have the pleasure of meeting Mark's Dad.  But the story goes that these were one of his favorite cookies.  It's been told that, several years, Mark's Mom had to make more of these right before Christmas day because Mark's dad had eaten them all!  Ummm-hmmmm ... they're that good.

And they're only 7 ingredients.

Layered in a pan.

That's how they got the name 7 Layer Cookies.

You probably hadn't figured that out, had you??

Now, all snug in the baking pan, these cookies look all innocent, don't they?  But ...


... once you cut into them, their layered awesomeness is revealed!  And layered awesomeness it is.  Truly.  Mark's Dad wouldn't steer us wrong! 


I invite you to follow The Kitchen is My Playground with Pinterest, Facebook, Google Friend Connect, Linky Followers, bloglovin', or Feedburner. Buttons are in the right sidebar. I'd love to have you back soon!


7 Layer Cookies
Source:  My Mother-in-Law
Ingredients
1/2 c. butter
1 1/2 c. graham cracker crumbs
1 c. flaked coconut
1 c. (6 oz.) chocolate chips
1 c. (6 oz.) butterscotch chips
1 (14 oz.) can sweetened condensed milk (fat free works just fine)
1 c. chopped pecans


Directions
1.  Lightly spray a 9x13" baking dish with non-stick cooking spray.  Melt butter in the bottom of the baking dish.  Add remaining ingredients in layers, in the order listed, sprinkling each ingredient evenly over the previous layer.

2.  Bake at 325 degrees for about 30 minutes.  Let cool completely in the baking dish.  Cut into small squares.

Enjoy!


reade more... Résuméabuiyad

S'mores Cookie Bars


It's summer & of course that means roasting marshmallows & making s'mores at least a few times these lazy warm nights.  I will admit I have made more s'mores in my college years than I do now that I am a mom with kids, but I think my kids are getting to the age where they can appreciate the ooey gooey chocolatey, fluffy, melty goodness a s'more provides.  These cookie bars are a knock off of s'mores in a less messy kind of way, so if you want the taste, but less mess to clean up (if you have kids), these are perfect.  Plus, they are just as good to make & take to any get together, for kids & adults alike.  


Here's a funny story.  I actually made these for the 3-4 year old kids I teach at church.  I was sick that Sunday, so my husband was substituting my class.  I put the bars on a plate covered with plastic wrap, put a note that they were for my Sunbeams Class, & my husband put them in the fridge in the church's kitchen.  (The Hershey's rectangles on top weren't holding up well in room temperature.)  Unfortunately when he went to get them the third hour of church, someone had found & devoured them.  I was shocked that you can't even leave something with a note in the church & have it kept safe, but it is still kind of funny.  I bet it was the teenage boys, & I hope they got a stomachache, haha.  Luckily, my husband saved six of the bars on a plate that he carried around with him the first two hours of church & since there were only four students in class that day, they all had enough to enjoy.


S'mores Cookie Bars
Recipe from Lovin' From the Oven & lightly adapted by: Amber (Dessert Now, Dinner Later!)
  • 11 Tbsp unsalted butter, softened
  • 1 cup brown sugar, packed
  • 1/2 cup granulated sugar
  • 2 large eggs
  • 1 tsp vanilla
  • 2 1/2 cups flour
  • 1 tsp baking soda
  • 1/2 tsp salt
  • 1 tsp cinnamon
  • 1/2 cup Hershey's semi-sweet chocolate chips (or dark chocolate chips)
  • 1 cup mini marshmallows (I think it could have used half a cup more)
  • 4 regular sized Hershey's bars, broken into squares
  • 1-2 sleeves of graham crackers, broken into squares (I used 1 1/2 sleeves of cinnamon graham crackers)
  1. Cream together the butter & both sugars.  Add eggs & vanilla.  
  2. Gradually mix in the dry ingredients: flour, baking soda, salt, & cinnamon. Fold in chocolate chips & marshmallows.  Chill dough in refrigerator for 1 hour.
  3. While dough is chilling, line jelly-roll pan with parchment paper.  Lay out graham crackers side by side, close together; almost touching.
  4. Preheat oven to 375*F.
  5. Place rounded tablespoons of dough on graham crackers.  Use your fingertips to gently press down.
  6. Bake for 5 minutes, then remove from oven to press Hershey's bar pieces onto the top.
  7. Bake an additional 5-7 minutes more or until dough is beginning to turn golden brown at the edges.  Make sure the cookies are completely cool before cutting, otherwise you'll end up with a doughy mess!
*Mine made 45-46 graham rectangle bars.  My dough didn't spread as much as I thought it would, so if you want a thinner, more evenly spread dough, skip the refrigeration part, or smash the dough more before placing on top of the graham cracker.
reade more... Résuméabuiyad

Banana Apple Baked Oatmeal


Oatmeal is a perfect breakfast food. It's full of fiber, including soluble fiber (which helps lower cholesterol). Yet even though oatmeal is a great breakfast food, it gets boring very quickly.

I found this recipe for a baked oatmeal that makes about 4 servings. You can keep them multiple days and just heat it up in the morning. Its a new, interesting way of doing oatmeal. Best of all, it has a little crunch from the quinoa.


Baked Oatmeal

Ingredients

  • ½ cup rolled oats
  • ¼ cup quinoa
  • ¼ cup wheat bran
  • ½ tsp baking powder
  • ¼ tsp salt
  • 1 tsp cinnamon
  • 1 cup milk
  • 1 egg
  • 1 tsp vanilla
  • 2 bananas
  • 1 cup frozen berries or sliced apples

Directions
  1. Mix together oats, quinoa, bran, baking powder, salt and cinnamon
  2. In a separate bowl, mix together milk, egg, vanilla, and one mashed banana. Mix with the dry ingredients
  3. Great a loaf pan and lay 1 sliced banana along the bottom and half the berries. Pour in oat mixture and top with remaining berries
  4. Bake at 375 for 40 minutes or until golden and slightly puffed.


reade more... Résuméabuiyad

Pineapple-Pecan Chicken Salad


I'm baaaaaack!  I've been unplugged for almost a week now, spending some time at the beach with my Mom.  I had a week of two of my favorite things ... the beach, and hanging out with Mom.  We stayed up way too late, drank way too much wine, and had way too much fun.  Well ... strike that last one ... it's not possible to have too much fun, is it?

And the day after I got back from the beach, I headed out on a day trip with some friends to do one of my other favorite things - wine tasting!  Yes, I love me some wine.  (North Carolina has quite the up-and-coming wine region, by the way, with over 100 wineries across the state.  Check 'em out at visitncwine.com.)

So I guess I've been very spoiled this past week.

Hmmm, so now I'll spoil myself with one of my favorite chicken salads, this Pineapple-Pecan Chicken Salad.

Chicken salad is one of my favorite lunch foods.  Since I eat it so often, I mix it up with lots of different variations ... you've gotta change it up, right?  This version has such a nice, refreshing flavor with all the pineapple in it.  Just perfect for summer.  Whether it be summer time at the beach, or wine tasting, or any of our other favorite summer things.
I invite you to follow The Kitchen is My Playground with Pinterest, Facebook, Google Friend Connect, Linky Followers, bloglovin', or Feedburner. Buttons are in the right sidebar. I'd love to have you back soon!


Pineapple-Pecan Chicken Salad
Source:  Adapted from Seaboard To Sideboard  by The Junior League of Wilmington, NC
Ingredients
3 c. chopped cooked chicken breasts
1 c. finely chopped celery
2 green onions, sliced (about 3 T.)
2 T. finely chopped green pepper
1 tsp. salt
Dash of black pepper
1/2 c. mayonnaise
1/2 c. chopped pecans
1 (20 oz.) can pineapple tidbits, drained
2 T. lemon juice


Directions
1.  Combine chicken, celery, green onion, green pepper, salt, black pepper, and mayonnaise in a bowl; mix well.  Stir in pecans, pineapple, and lemon juice. 

2.  Chill for about 30 minutes before serving.

Enjoy!


This post is linked with Sunday Showcase Party, On the Menu Monday, Mangia Mondays, Tuesday Talent Show, Totally Tasty Tuesdays, Cast Party Wednesday, Whatcha Whipped Up, Full Plate Thursday, Sweet Treats & Swanky Stuff Thursday, Foodie Friday, Foodie Friday with Diane Balch, Inspiration Friday, Weekend Potluck, Weekend Wrap-Up Party, Strut Your Stuff Saturday, Scrumptious Sunday, Nifty Thrifty Sunday, Think Pink Sunday, Sundae Scoop.
reade more... Résuméabuiyad

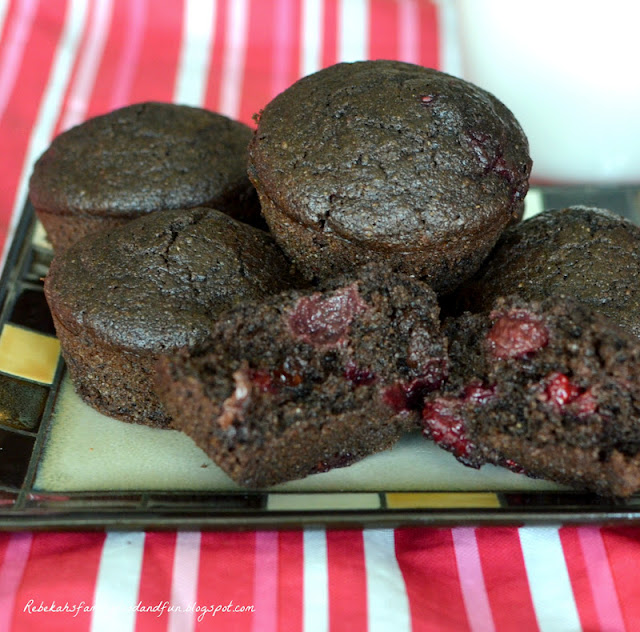
Double Chocolate Raspberry Muffins


Aren't things supposed to slow down in the summer?

I have felt so busy this past week.

Oh wait, maybe it's because I've been hauling all the kids out every.single.day.

The three older ones are in swimming lessons at the YMCA, so we have been headed there M-Thurs. And on Friday, we had a birthday party for a friend at a local park.

Nothing major, that stuff shouldn't wear me out.

But I am such a homebody.  Really, I think it's just the stage of life....constantly with little ones.  It is just so much harder to take care of babies and toddlers somewhere other than your familiar environment. 

And on top of all that, we started school this past week.  Mainly just math and language.....but I wanted to get started on some of the basics before August hits - and my parents are arriving for a 10 day visit tomorrow (hurray!!) so we'll have off then.

We're approaching school a little differently this year.  Our plan is to implement a schedule of 6 weeks on/1 week off, with some modifications taken around the holidays and family visits.  Keeping that schedule will give us regular breaks in which to get appointments done, do deep cleaning, field trips, have play dates, etc. without feeling like we're getting behind.  AND, we'll still have 10 extra weeks to take off whenever we want, like a 6 or 7 week break for summer.

We'd much rather have time off of school during the cooler months when we can actually enjoy being outside and not be puddles of sweat dripping around.

Anyways, thanks to AC, I never let the heat deter me from baking during the summer.

We love eating muffins for breakfast and while these are quite nearly like cupcakes,  I am insistent that if there is no frosting, they can't be cupcakes.
(how else could I justify eating them for breakfast?)

They're not super sweet, but deeply chocolaty and studded with the delicious tartness of juicy raspberries. If you did put a frosting on them, they would make a fabulous dessert - but as are, they're a lovely way to welcome  a new morning.


Double Chocolate Raspberry Muffins  (adapted from Kitchen Simplicity)

1-1/4 cups flour (I use white whole wheat)
1/4 cup cocoa powder (I use Hershey's Dark)
1/2 cup sugar
1/2 tsp. salt
2 tsp. baking powder
1/4 cup ground flaxseed (optional)
1/3 cup oil (I used expeller pressed coconut oil, melted)
1 egg
2/3 cup milk
1 tsp. vanilla
1/2 cup plain yogurt or sour cream (can even use light mayo in a pinch)
1 cup raspberries, fresh or frozen  (if frozen, do not thaw first)
1/2 cup chocolate chips


Preheat oven to 375°.
Sift together flour, cocoa powder, sugar, salt, and baking powder.  Stir in flaxseed. 
In another bowl, whisk together oil, egg, milk, and vanilla.  Stir in yogurt until combined. Pour into dry ingredients and stir just until moistened.  Fold in raspberries and chocolate chips.
Pour batter into 12 paper-lined or greased regular size muffin pans.  (I made 3 mini muffins as well.)
Top with additional chocolate chips and raspberries if desired.
Bake for 12-15 minutes (mini-muffins for 8-10 minutes) or until toothpick inserted in center comes out clean.


Linked to Trick or Treat Tuesday
reade more... Résuméabuiyad

Thai Turkey Burgers with Peanut Sauce


When I found this recipe I was drooling like crazy.  It's not often that I find a healthy recipe that makes me jump from my seat ready to head to the store & buy everything I need to make the meal.  I am not a health nut, although I have lost 43lbs in the last 10 months even eating all the recipes I post here, but this recipe for sure had potential to be amazingly flavorful with the added bonus of being healthy.  These burgers did not disappoint at all!  I am talking a hearty burger with amazing texture from the vegetables, nutty-smooth peanut sauce with a hint of spicy heat from the sriracha.  These burgers are bold & filling.  I didn't even miss the ground beef.  They are that good!
 
Thai Turkey Burgers with Peanut Sauce
Recipe lightly adapted from Iowa Girl Eats by: Amber (Dessert Now, Dinner Later!)
For the Burgers:
  • 1lb lean ground turkey breast (I only used 3/4 lb, but I only made 3 patties)
  • 1/2 cup shredded carrot
  • 1/2 cup finely chopped broccoli
  • 3 Tbsp chopped cilantro
  • 2 green onions, sliced
  • 1/2 tsp salt
  • 1/4 tsp red pepper flakes
  • 1/8 tsp ground black pepper
  • Sandwich Thins
  • Crisp lettuce, or spinach leaves
For the Peanut Sauce:
  • 3 Tbsp smooth peanut butter
  • 1 Tbsp rice vinegar
  • 1 Tbsp reduced-sodium soy sauce
  • 1 Tbsp water
  • 1 clove garlic
  • 1 tsp sesame oil
  • 1/2 tsp hot chili sauce (sriracha)
  • 1 tsp honey
  • 1/4 tsp ground ginger
  1. Create peanut sauce by combining peanut butter, rice vinegar, soy sauce, water, garlic, sesame oil, sriracha, honey & ground ginger in a food processor or blender.  Blend until very smooth.  Reserve 2 Tbsp + 2 tsp & set aside.
  2. Combine remaining peanut sauce with turkey, carrots, broccoli, cilantro, green onions, salt, red pepper flakes, & black pepper in a large bowl.  Mix well & form into 4 patties (if using 1lb of turkey.)  
  3. Heat a large skillet over medium-high heat & spray with non-stick spray.  Cook patties for 3-4 minutes on one side, then spray the top with more non-stick spray, flip & cook 3-4 minutes more or until burgers are no longer pink in the middle.  (*May grill on an outdoor grill, but make sure that grill rack is heavily oiled.)
  4. Place a burger patty on each bun & top with 2 teaspoons of the reserved peanut sauce.  Add lettuce or baby spinach for crunch & serve.
reade more... Résuméabuiyad

Kansas City Rub


My husband & I were experimenting with some steak.  We wanted a dry rub to season it instead of our usual store-bought steak seasoning.  This rub was bold & flavorful we didn't need steak sauce or anything.  My husband couldn't stop talking about how it has been a really long time since he has had a steak good enough that he didn't need steak sauce.  The flavors are sweet & sassy.  It's got that heat from the cayenne with the caramelization of the brown sugar.  If you are grilling steak this summer, this is a recipe worth trying.


Kansas City Rub
Recipe adapted from About.com by: Amber (Dessert Now, Dinner Later!)
  • 2 Tbsp brown sugar
  • 1 Tbsp paprika
  • 3/4 tsp black pepper
  • 3/4 tsp salt
  • 3/4 tsp chili powder
  • 3/4 tsp garlic powder
  • 3/4 tsp onion powder
  • 3/4 tsp cayenne powder
  • 3/4 tsp dry mustard
  1. Combine all ingredients in a food processor & blend until combined.
  2. Rub generously onto steak or ribs & grill until desired doneness.
*Makes just over 1/2 cup.  Store any extra, un-contaminated rub in a closed container.

reade more... Résuméabuiyad