Pages

Spicy Tortilla Lasagna


Funny 1st grade story from this week ... One of our spelling words this past week was 'blog.'  Kind of a strange spelling word for 1st graders if you ask me, ... but ... no one asked me!  So, anyway, since none of my students had any idea what a blog is I decided to show them my blog as an example.  (It just so happened that Neapolitan Cupcakes were showing on the front page, which totally amazed and enthralled my students!  They want me to make some for them ... which I can't ... against school rules.) 

Anyway, as I was scrolling down the front page ... showing them what a blog post is, and how people write to me and I write back in comments, and so forth ... one of my little students hollered out, "Hey, who's that?" ... referring to my childhood picture in the right sidebar.  I said, "That's me when I was 4 years old."  To which he promptly replied, rather exuberantly, "You look like a boy!"

Tact is not the forte of six year olds. 

I don't think I look like a boy in that picture, do I?  Oh, wait.  On second thought, don't answer that.  'Cause if you do think I look like a boy, I don't think I really want to know.  


Well, since school is still C.R.A.Z.Y. busy, I've been turning to some of my super-easy-stand-by recipes for our dinners.  This Spicy Tortilla Lasagna is just one such recipe.  And it's not exactly a recipe, it's more just something I threw together one night and have stuck with it ever since.  I like that it comes together super quick, and it makes a big pan so there's always leftovers for another night.  (No cooking the next night - yay!)

Start this dish by spreading a small amount of salsa (this lasagna's sauce) in the bottom of a baking dish.  This keeps the bottom layer of tortillas from sticking to the bottom of the pan, and provides a tad of moisture for those tortillas to soak up.


Next, layer in two whole tortillas (I use whole wheat) and then tear small pieces from another tortilla to fill in the corners and any other big 'gaps.'


Then spoon in a layer of the lasagna filling ... a mixture of ground turkey (or beef), black beans, corn, and diced tomatoes ... and ...


... top with salsa and cheese.  Layer on up two more times, and you'll have ...


... a tasty tortilla treat!  It's a yummy alternative to traditional lasagna, especially if you're in the mood for a super easy spicy kick.  And now I'm going to go try to get over being called a boy.  Ha!


I invite you to follow The Kitchen is My Playground with Pinterest, Facebook, Google Friend Connect, Linky Followers, bloglovin', or Feedburner. Buttons are in the right sidebar. I'd love to have you back soon!


Spicy Tortilla Lasagna
Source:  A Tracey Original (though I know there are probably 1000's of recipes out there similar to this, I did not refer to any when whipping this up)

Ingredients
1 lb. ground turkey or ground beef
1 large onion, chopped
2 tsp. ground cumin
1 T. chili powder
Dash of crushed red pepper or cayenne pepper
1/8 tsp. black pepper
1/4 tsp. salt
2 (14.5 oz.) cans black beans, drained and rinsed
1 (14.5 oz.) can diced tomatoes, undrained
1/2 of a 10 oz. package frozen corn, thawed
8 tortillas (I use whole wheat)
About 36 oz. salsa (mild, medium, hot, salsa verde, or a combination of any of these)
2 c. shredded cheddar cheese


Directions
1.  Brown ground turkey or beef together with chopped onion; drain.  Season with ground cumin, chili powder, crushed red pepper, salt, and black pepper.  Add black beans, corn, and diced tomatoes.  Stir to combine.

2.  Spray a 9"x13" baking dish lightly with non-stick cooking spray.  Spread a small amount of salsa in the bottom of the dish.  Top with two whole tortillas; tear pieces from a portion of another tortilla to fill the corners and any other gaps around the sides of the pan.  Top the tortillas with 1/3 of the meat/black bean mixture, 1/3 of the salsa, and 1/3 of the shredded cheese.

3.  Repeat to make two more layers.

4.  Bake at 375 degrees for 30-35 minutes, until heated through and bubbly.  Serve with a dollop of sour cream, if desired.

NOTE:  This is a very flexible recipe.  Adjust spices and other ingredients to fit your fancy!

Enjoy!


This post is linked with Sunday Showcase Party, On the Menu Monday, This Week's Cravings, Mix It Up Monday!, Mangia Mondays, Trick or Treat Tuesday, Tuesday Talent Show, Totally Tasty Tuesdays, Whatcha Whipped Up, Cast Party Wednesday, Sweet Treats & Swanky Stuff, Share Your Creations, Full Plate ThursdayInspiration Friday, Foodie Friday, Kitchen Fun & Crafty Friday, Foodie Friday with Diane Balch, Weekend Bloggy Reading, Weekend Potluck, Strut Your Stuff Saturday, Nifty Thrifty Sunday, Think Pink Sunday, Sundae Scoop, Taste & Tell Thursdays.


Funny 1st grade story from this week ... One of our spelling words this past week was 'blog.'  Kind of a strange spelling word for 1st graders if you ask me, ... but ... no one asked me!  So, anyway, since none of my students had any idea what a blog is I decided to show them my blog as an example.  (It just so happened that Neapolitan Cupcakes were showing on the front page, which totally amazed and enthralled my students!  They want me to make some for them ... which I can't ... against school rules.) 

Anyway, as I was scrolling down the front page ... showing them what a blog post is, and how people write to me and I write back in comments, and so forth ... one of my little students hollered out, "Hey, who's that?" ... referring to my childhood picture in the right sidebar.  I said, "That's me when I was 4 years old."  To which he promptly replied, rather exuberantly, "You look like a boy!"

Tact is not the forte of six year olds. 

I don't think I look like a boy in that picture, do I?  Oh, wait.  On second thought, don't answer that.  'Cause if you do think I look like a boy, I don't think I really want to know.  


Well, since school is still C.R.A.Z.Y. busy, I've been turning to some of my super-easy-stand-by recipes for our dinners.  This Spicy Tortilla Lasagna is just one such recipe.  And it's not exactly a recipe, it's more just something I threw together one night and have stuck with it ever since.  I like that it comes together super quick, and it makes a big pan so there's always leftovers for another night.  (No cooking the next night - yay!)

Start this dish by spreading a small amount of salsa (this lasagna's sauce) in the bottom of a baking dish.  This keeps the bottom layer of tortillas from sticking to the bottom of the pan, and provides a tad of moisture for those tortillas to soak up.


Next, layer in two whole tortillas (I use whole wheat) and then tear small pieces from another tortilla to fill in the corners and any other big 'gaps.'


Then spoon in a layer of the lasagna filling ... a mixture of ground turkey (or beef), black beans, corn, and diced tomatoes ... and ...


... top with salsa and cheese.  Layer on up two more times, and you'll have ...


... a tasty tortilla treat!  It's a yummy alternative to traditional lasagna, especially if you're in the mood for a super easy spicy kick.  And now I'm going to go try to get over being called a boy.  Ha!


I invite you to follow The Kitchen is My Playground with Pinterest, Facebook, Google Friend Connect, Linky Followers, bloglovin', or Feedburner. Buttons are in the right sidebar. I'd love to have you back soon!


Spicy Tortilla Lasagna
Source:  A Tracey Original (though I know there are probably 1000's of recipes out there similar to this, I did not refer to any when whipping this up)

Ingredients
1 lb. ground turkey or ground beef
1 large onion, chopped
2 tsp. ground cumin
1 T. chili powder
Dash of crushed red pepper or cayenne pepper
1/8 tsp. black pepper
1/4 tsp. salt
2 (14.5 oz.) cans black beans, drained and rinsed
1 (14.5 oz.) can diced tomatoes, undrained
1/2 of a 10 oz. package frozen corn, thawed
8 tortillas (I use whole wheat)
About 36 oz. salsa (mild, medium, hot, salsa verde, or a combination of any of these)
2 c. shredded cheddar cheese


Directions
1.  Brown ground turkey or beef together with chopped onion; drain.  Season with ground cumin, chili powder, crushed red pepper, salt, and black pepper.  Add black beans, corn, and diced tomatoes.  Stir to combine.

2.  Spray a 9"x13" baking dish lightly with non-stick cooking spray.  Spread a small amount of salsa in the bottom of the dish.  Top with two whole tortillas; tear pieces from a portion of another tortilla to fill the corners and any other gaps around the sides of the pan.  Top the tortillas with 1/3 of the meat/black bean mixture, 1/3 of the salsa, and 1/3 of the shredded cheese.

3.  Repeat to make two more layers.

4.  Bake at 375 degrees for 30-35 minutes, until heated through and bubbly.  Serve with a dollop of sour cream, if desired.

NOTE:  This is a very flexible recipe.  Adjust spices and other ingredients to fit your fancy!

Enjoy!


This post is linked with Sunday Showcase Party, On the Menu Monday, This Week's Cravings, Mix It Up Monday!, Mangia Mondays, Trick or Treat Tuesday, Tuesday Talent Show, Totally Tasty Tuesdays, Whatcha Whipped Up, Cast Party Wednesday, Sweet Treats & Swanky Stuff, Share Your Creations, Full Plate ThursdayInspiration Friday, Foodie Friday, Kitchen Fun & Crafty Friday, Foodie Friday with Diane Balch, Weekend Bloggy Reading, Weekend Potluck, Strut Your Stuff Saturday, Nifty Thrifty Sunday, Think Pink Sunday, Sundae Scoop, Taste & Tell Thursdays.
reade more... Résuméabuiyad

Chili Cheese Chip Dip


This Chili Cheese Dip is such a "duh" recipe, but it is one that my family & I have enjoyed for a few years now.  We actually have it every New Year's Eve.  And it kind of reminds me of Chili's Skillet Queso. If you have never made this, you should try it for your next football game snack or party.  Anything with "chili" is made for Fall & the crisp cool weather.  Enjoy!


Chili Cheese Chip Dip
Recipe from: Amber (Dessert Now, Dinner Later!)
  • 1 can NO BEANS Chili
  • 1 (8oz) pkg cream cheese (I use Neufchatel/lower fat)
  • N'Orleans Cajun or equivalent spices: chili powder, cayenne, etc.
  • Corn Tortilla Chips
  1. Soften cream cheese in microwave, twice, for 30 seconds each time.  Make sure you cover it, b/c it may splatter.  Check the consistency with a spatula between the two 30-second intervals.  It will mix well with the chili when it is very soft/spreadable. (Avoid lumps by doing this step.)
  2. In a small saucepan, heat chili & softened cream cheese.  Flavor with preferred spices until desired heat (be careful if adding salt because the tortilla chips have salt on them & you don't want it to be overly salty.)  Cook on medium heat until bubbly & heated through.
  3. Serve HOT with tortilla chips.  (Stir often because a skin will develop on the top.)
*OPTIONAL:  Keep warm in a crockpot or heat it completely in a crock pot on LOW for 1-2 hours.  Do NOT skip softening the cream cheese in the microwave though, because it may leave chunks of cream cheese.   

reade more... Résuméabuiyad

Morning Glory Muffins


Muffins are one of my favorite things to have for breakfast.

I usually end up making some sort of muffin once or twice a week.....usually featuring bananas, since it's rare that I don't have some languishing on my counter.
Because once a banana has even a hint of a brown spot on it, I'm not very likely to just eat it.  Oh, I might try to feed it to the kids.....but not many of them are willing eaters of plain, unadorned bananas.

These, however, do not have a smidgen of banana in them.

But there's lots of other good things, like applesauce, carrots, coconut, raisins, flaxseed, and whole wheat flour.  And they are delicious.
My children were excited to have something new and these were a definite hit.

My only complaint was that they didn't rise up very tall.....so I suppose I could just make fewer of them next time and they'll be a bit bigger.

Morning Glory Muffins (adapted from Parade magazine)
Yield: 17-18 muffins

2 eggs
1/4 cup coconut oil 
1/2 cup applesauce
1/4 cup milk
1 tsp. vanilla extract
2 cups white whole wheat or all purpose flour
1 cup brown sugar
1/4 cup ground flaxseed
2 tsp. baking soda
2 tsp. cinnamon
1/2 tsp. salt
2 medium carrots, shredded
1/2 cup shredded coconut
1/2 cup raisins
1/4 cup slivered almonds, optional

Preheat oven to 350°.  Place liners in 17 or 18 muffin cups.
In a large bowl, beat eggs, oil, applesauce, milk, and vanilla for one minute.  Add flour, brown sugar, flaxseed, baking soda, cinnamon, and salt.  Stir just until combined.  (Don't overmix!)  Add carrots, coconut,  and raisins.  Mix gently.
Spoon batter into liners. Sprinkle with almonds if desired.
Bake for 15-18 minutes, or until a toothpick comes out clean.  Cool on wire racks.

Linked to Seasonal Inspiration
reade more... Résuméabuiyad

Fruit Salad Cheesecake


Holy cow!  Can you say B.U.S.Y.?????  I feel like I have been running ragged the past few weeks!  And, from what I hear 'around,' it seems to be a trend with lots of folks right now.  I haven't been in the kitchen at all for about the past two weeks ... we've eaten take out three times this week ... and I've resorted to my stash of  'emergency' frozen foods for the remaining nights.  I'm ready for life to settle down a bit.  How 'bout you?

Now, the crazy-busy'ness for me is coming mostly from work.  The start up of the schoolyear is kickin' my pa-tooty this year!  It's always busy for teachers at the start of the schoolyear, but this year is waaaayyyyyy extra busy.  We're implementing a 100% completely new curriculum, our staff of instructional assistants was cut in half due to budget constraints, and I have ... well, shall we say ... the most academically diverse class I've ever had.  But I'm persevering, will get things running smoothly without running myself ragged, and will be back in the kitchen soon.

[DISCLAIMER:  Contrary to my husband's opinion, the prior statements do not constitute 'complaining.'  They are simply statements of fact about the current situation, which absolutely is not complaining  He seems to confuse the two ... silly, silly man.]


So, for today's post I'm turning to a dish I've had in my queue for a while but just haven't shared yet.  I have quite a few of those.  I seem to be able to make stuff and photograph it much more quickly than I can edit all those photos and write posts.  That queue of stuff sure comes in handy for crazy-busy times like now!

I'm excited to finally share this Fruit Salad Cheesecake with you!

Mark is actually the one who found this recipe.  He was reading a magazine while we were visiting his mom one weekend, and it had a page of recipes in it.  Obviously knowing how much I love to cook and try out new recipes, he scanned for anything he thought would be of interest to me ... and landed on this Fruit Salad Cheesecake.  Isn't he sweet?

Well, he was certainly right ... this recipe was indeed of interest to me.  I mean, Fruit Salad Cheesecake??  I had never heard of such a thing!  And, of course, had to give it a try.

Think upscale fruit cocktail wrapped in a creamy, light-and-fluffy cream cheese-and-whipped-topping blanket.  And what a different way to present fruit salad!  I loved it.

I tried it out in two sizes ... full-size cheesecake made in a 9-inch springform pan, and these individual mini cheesecakes made in muffin tins.


Both worked, so size choice is just a matter of what presentation one wants to make.   

So, how do you make this unique fruit salad?  er, cheesecake?

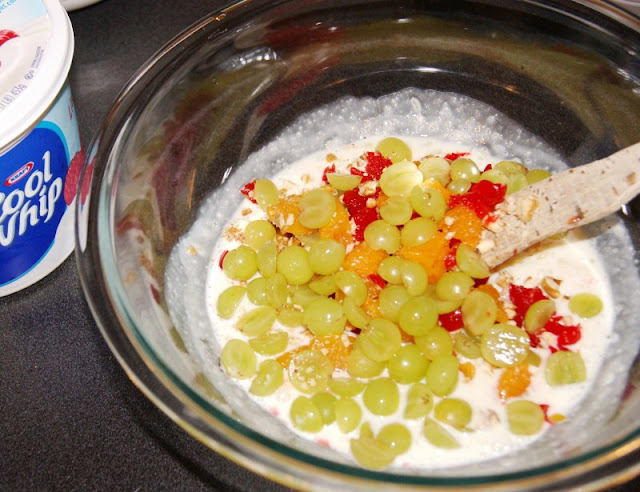
Simply make a crushed pineapple, cream cheese, and gelatin mixture with a little simple simmering on the stovetop.  Then mix in some halved fresh grapes, mandarin orange slices, coarsely chopped maraschino cherries, and chopped pecans.


Fold in some whipped topping, and pour the mixture into a vanilla wafer crust.  Chill ... and you're done!  Pretty easy, huh?


For the individual mini fruit salad cheesecakes, I wasn't quite sure what would work best as a method for them ... so, I tried a few different ways:

1.  Pouring the fruit salad mixture into muffin cups first, topping with three vanilla wafer cookies as the crust, with the plan of then inverting them when I removed them from the pan.
RESULT: Not so great.  The vanilla wafers didn't 'fit' well, and they just looked kind of messy when inverted.

2.  Placing a single vanilla wafer in the bottom of foil cupcake liners, and pouring the fruit salad mixture on top.
RESULT:  Didn't like the look of the ridges from the foil liner, but it wasn't too bad a method.

3. Placing a single vanilla wafer directly in the bottom of muffin tin cups, without any type of cupcake liner, and pouring the fruit salad mixture on top.  My worry with this one was that I wouldn't be able to get the mini cheesecakes out of the pan.
RESULT:  This was my favorite method.  I liked the look of the smoother sides, and ...


... the 'remnants' left in the pan when removing the cheesecakes was minimal.  I simply sprayed the pan very lightly with nonstick cooking spray, and ran a knife around the edge of each mini cheesecake before lifting it out of the pan.


The vanilla wafer cookie doesn't completely fill the bottom of the muffin cup, so the bottom comes out looking like this:


... but I don't think it looks too bad! (Hey, how many people will turn their fruit salad over to check out the bottom anyway?)

I think they look pretty cute served up on a cake stand!

So, whether you make individual minis ... 


... or a full-sized cheesecake, this is one decidedly different way to serve fruit salad!  er, cheesecake.  er, fruit salad cheesecake.  er, whatever! 

  We invite you to follow The Kitchen is My Playground with Google+, PinterestFacebookTwitterGoogle Friend Connectbloglovin', or Feedburner.  We'd love to have you back soon!  Want to promote your website, business, or Etsy shop with us?  Visit our advertise page for details.


Fruit Salad Cheesecake
Source:  Adapted from Taste of Home, as published in Carolina Country magazine, May, 2012

Ingredients
Crust:
1 1/2 c. vanilla wafer crumbs (I give vanilla wafer cookies a quick whirl in the food processor)
2 T. butter, melted

Filling:
1 (20 oz.) can crushed pineapple, drained
3/4 c. sugar
1/2 c. cold water
2 envelopes unflavored gelatin
1 (8 oz.) package cream cheese, cubed
1 1/2 c. halved seedless grapes
1 (11 oz.) can mandarin oranges, drained and cut in half
1 (10 oz.) jar maraschino cherries, drained and roughly chopped
1/2 c. finely chopped pecans
2 c. whipped topping (such as Cool Whip)


Directions
For the Crust:  
1.  In a small bowl, combine vanilla wafer crumbs and melted butter.  Press into the bottom of a 9-inch springform pan coated with nonstick cooking spray; set aside.

For the Filling:  
2.  In a small saucepan, cook crushed pineapple and sugar over medium heat for 5 minutes or until heated through.  

3.  Place cold water in a small bowl and sprinkle with gelatin; let stand for 1 minute.  Stir gelatin mixture into the warm pineapple mixture.  

4.  Reduce heat to low and add cubed cream cheese.  Cook and stir until cream cheese is melted and the mixture is well blended.  Remove from heat and cool completely.

5.  Stir the grapes, mandarin oranges, cherries, and pecans into the cooled cream cheese mixture.  Fold in the whipped topping.  Pour into prepared pan.  Cover and refrigerate overnight.


For Minis:  Instead of making vanilla wafer crumbs and butter mixture, place a single vanilla wafer cookie in the bottom of muffin tin cups that have been very lightly sprayed with nonstick cooking spray.  Fill muffin tin cups full with fruit salad mixture.  Cover and refrigerate overnight.

Enjoy!


reade more... Résuméabuiyad

Chocolate Chip Macaroons


I used to make these in a bakery I worked in.  They really don't need a recipe, per se.  You basically want your mixture to be wet, but moldable.  We never measured when we would make them.  We would always add more sweetened condensed milk, coconut, or flour as needed.  They are so quick to come together & people love them!  The chocolate chips were always the popular ones, obviously, who doesn't like chocolate?  So here is a simple recipe that will make an easy cookie to share during the holidays, or whenever you want a coconut treat.


Chocolate Chip Macaroons
Recipe by: Amber (Dessert Now, Dinner Later!)
  • 2 cups shredded coconut flakes
  • 3 Tbsp flour
  • Dash of salt
  • 1/4 cup + 2 Tbsp MINI semi-sweet chocolate chips (has to be mini's b/c the regular size won't hold shape with the cookies)
  • 1 tsp vanilla
  • Homemade Sweetened Condensed Milk (or half of a 14oz can)
    • 1/2 cup sugar
    • 1/2 cup dry powdered milk
    • 1/4 cup water
    • 1/2 Tbsp butter
      • Heat butter with water in microwave until boiling (30-45 seconds.)
      • In a food processor blend sugar, powdered milk, & heated water mixture until smooth.  Allow to cool in the fridge for 5 minutes.
  1. Combine dry coconut flakes, flour, salt & chocolate chips in a bowl.  Toss together to combine.
  2. Make sweetened condensed milk according to directions.  Allow to cool before using (or you might melt your chocolate chips.)  Pour sweetened condensed milk & vanilla over dry ingredients & stir with a spatula until thoroughly combined.  The mixture should be wet, but come together.
  3. With a #50 cookie scoop, lightly pack the scoop & round any coconut pieces that might be stringy on the edges.  Make sure that when you scoop the cookies, it's solid enough so it doesn't fall apart when it bakes, but don't overpack it so much that is won't bake through.  Place cookies on a PARCHMENT covered baking sheet.  You can place them close together because they don't spread.
  4. Bake at 350*F for 8-12 minutes.  Or until lightly browned on top & bottom.
*Makes 1 1/2 dozen cookies.


reade more... Résuméabuiyad

Chocolate Truffle Pie


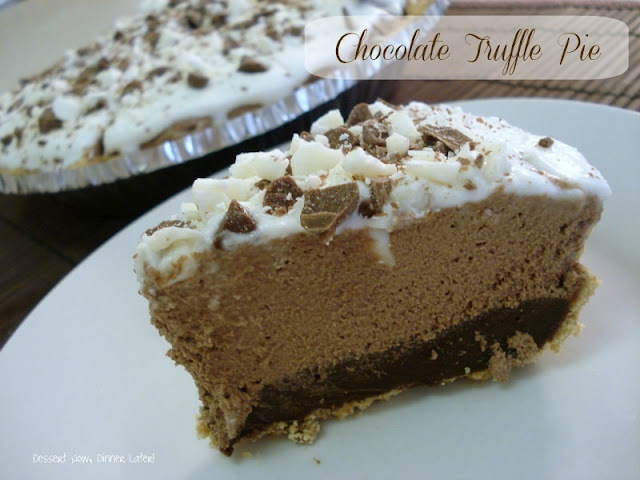
If you are a chocoholic like I am, the word, "truffle" makes your mouth water!  My friend forwarded this recipe to me to try & it is decadent.  Lots of smooth, creamy chocolatey pleasure, & a little goes a long way.  A small slice will curb that chocolate craving of yours & then some.  It was almost too rich for me, but my husband & his co-workers really loved it!  This pie is seriously so simple to put together & will wow your guests for the holidays.  You will not be disappointed! 


Chocolate Truffle Pie
Recipe altered from Paula Deen by: Amber (Dessert Now, Dinner Later!)
Truffle Filling:
  • 2/3 cup heavy cream
  • 6 oz semi-sweet/dark chocolate chips
  • 1 (9-inch) prepared graham cracker crust (I used a 7-inch crust & it was almost overflowing with all the fillings, so if you can find or make a 9" crust, that will be best.)
Whipped Chocolate Filling:
  • 6 oz semi-sweet/dark chocolate chips
  • 1 1/2 cups heavy cream
  • 1/2 tsp vanilla
Whipped Cream Topping (double this if using a 9" pie crust):
  • 1/2 cup heavy cream
  • 2 Tbsp powdered sugar
Garnish:
  • 1/4 cup white chocolate chips, roughly chopped
  • 1/4 cup milk chocolate chips, roughly chopped
  1. For truffle filling, in a saucepan, bring 2/3 cup heavy cream to a simmer.  Place the 6oz chocolate chips in a bowl & pour the hot cream over the chocolate.  Let stand for 1 minute, then gently whisk until smooth.  Spread truffle filling over the bottom of the prepared pie crust.  Freeze 20 minutes.
  2. Meanwhile, for the whipped chocolate filling, in a bowl in the microwave on half power, heat the 6oz chocolate chips with 1/2 cup of the heavy cream for 30 seconds at a time, until just melted, stirring often.  Let cool to room temperature (or place in fridge for 5-10 minutes.)  
  3. In a chilled bowl, beat the chocolate mixture with the remaining 1 cup of cream & the vanilla until soft peaks form (tips curl.)  Spread the whipped chocolate mixture over the truffle filling in the crust.  Refrigerate 6+hours or overnight.
  4. For the topping, just before serving, beat 1/2 cup heavy cream on medium speed until it begins to thicken.  Add powdered sugar & whip until stiff peaks form (tips stand straight.)  Spread the whipped cream over the top of the pie.  Garnish with chopped white & milk chocolate chips.  Serve immediately.

*Serves 8-16 (depending on how thin you slice it)


If you are a chocoholic like I am, the word, "truffle" makes your mouth water!  My friend forwarded this recipe to me to try & it is decadent.  Lots of smooth, creamy chocolatey pleasure, & a little goes a long way.  A small slice will curb that chocolate craving of yours & then some.  It was almost too rich for me, but my husband & his co-workers really loved it!  This pie is seriously so simple to put together & will wow your guests for the holidays.  You will not be disappointed! 


Chocolate Truffle Pie
Recipe altered from Paula Deen by: Amber (Dessert Now, Dinner Later!)
Truffle Filling:
  • 2/3 cup heavy cream
  • 6 oz semi-sweet/dark chocolate chips
  • 1 (9-inch) prepared graham cracker crust (I used a 7-inch crust & it was almost overflowing with all the fillings, so if you can find or make a 9" crust, that will be best.)
Whipped Chocolate Filling:
  • 6 oz semi-sweet/dark chocolate chips
  • 1 1/2 cups heavy cream
  • 1/2 tsp vanilla
Whipped Cream Topping (double this if using a 9" pie crust):
  • 1/2 cup heavy cream
  • 2 Tbsp powdered sugar
Garnish:
  • 1/4 cup white chocolate chips, roughly chopped
  • 1/4 cup milk chocolate chips, roughly chopped
  1. For truffle filling, in a saucepan, bring 2/3 cup heavy cream to a simmer.  Place the 6oz chocolate chips in a bowl & pour the hot cream over the chocolate.  Let stand for 1 minute, then gently whisk until smooth.  Spread truffle filling over the bottom of the prepared pie crust.  Freeze 20 minutes.
  2. Meanwhile, for the whipped chocolate filling, in a bowl in the microwave on half power, heat the 6oz chocolate chips with 1/2 cup of the heavy cream for 30 seconds at a time, until just melted, stirring often.  Let cool to room temperature (or place in fridge for 5-10 minutes.)  
  3. In a chilled bowl, beat the chocolate mixture with the remaining 1 cup of cream & the vanilla until soft peaks form (tips curl.)  Spread the whipped chocolate mixture over the truffle filling in the crust.  Refrigerate 6+hours or overnight.
  4. For the topping, just before serving, beat 1/2 cup heavy cream on medium speed until it begins to thicken.  Add powdered sugar & whip until stiff peaks form (tips stand straight.)  Spread the whipped cream over the top of the pie.  Garnish with chopped white & milk chocolate chips.  Serve immediately.

*Serves 8-16 (depending on how thin you slice it)


reade more... Résuméabuiyad

Caramel Apple Cider Cookies


When the weather starts to cool down & I feel fall on it's way I get a hankering for baking.  Two of my many favorite fall flavors are caramel & apples.  I actually heard of this recipe a year ago, & looked it up just so I could try it.  I am in love with these cookies.  I slightly altered the recipe, but wow!  If you are looking for a cookie that tastes like apple cider & caramel, these are fantastic! One of my friends even said it tastes a lot like apple crisp too, so either way, you get that yummy apple fall flavor.  
 
Caramel Apple Cider Cookies
Recipe altered from Studio5 by Amber (Dessert Now, Dinner Later!)
  • 1 1/2 cups all-purpose flour
  • 1/2 tsp baking soda
  • 1/4 tsp baking powder
  • 1/2 tsp ground cinnamon
  • 1/4 tsp salt
  • 1/2 cup (1 stick) butter, room temperature
  • 1/2 cup sugar
  • 5 packets (or half of a 7.4oz box) Alpine Spiced Apple Cider Instant Original Drink Mix (NOT sugar free- found near the hot chocolate/coffee aisle)
  • 1 medium egg
  • 1/2 tsp vanilla
  • 1 cup Kraft Caramel Bits (as much or as little as you like, they don't melt too crazy, kind of like a chocolate chip in a cookie)
  1. Preheat oven to 350*F.  In a small bowl, combine flour, baking soda, baking powder, cinnamon, & salt.  Set aside.
  2. In a stand mixer cream butter, sugar, & apple cider packets.  Add egg & vanilla & mix thoroughly.  Scrape bowl.
  3. Gradually add dry ingredients until combined.  Add caramel bits last, just until incorporated.
  4. Using a cookie scoop or tablespoon, scoop balls of cookie dough & place on a PARCHMENT lined baking sheet.  (Best for the caramel to not stick.)  
  5. Bake for 12 minutes, do not over-bake.  
*Makes 2 dozen cookies.


reade more... Résuméabuiyad

Ugly Buttermilk Baked Chicken


This is one of those dishes that just isn't pretty.  In fact, I'd say this dish is downright ugly.  Come on, we all have them ... ugly favorites that sure taste good! 

Right?

Well, this is certainly one of those.
 

And Mark and I love it.  It's one of our comfort-food-go-to-recipes ... and it never disappoints.  Buttermilk makes the chicken super moist and tender.  As most Southern cooks know, buttermilk makes things better!


Since this recipe has a pretty short list of ingredients, makes use of convenience products, and comes together in a single baking pan, it's a very easy throw-together-on-a-weeknight meal.  Bake up the chicken for about 45 minutes, serve it over some rice or couscous (I use couscous because it's ... you guessed it ... faster!), and you've got yourself one very tasty ugly-duckling dinner.

While this ugly duckling won't grow up to be a beautiful swan, once you taste the flavor, I don't think you'll mind.


I invite you to follow The Kitchen is My Playground with Pinterest, Facebook, Google Friend Connect, Linky Followers, bloglovin', or Feedburner. Buttons are in the right sidebar. I'd love to have you back soon!


Buttermilk Baked Chicken
Source:  A family friend
Ingredients
4 boneless, skinless chicken breasts
2 T. butter
1/2 tsp. salt
1/2 tsp. pepper
3/4 c. flour
1 1/2 c. buttermilk, divided
1 (10.5 oz.) can cream of mushroom soup
1 (4 oz.) can sliced mushrooms, drained

Directions
1.  Heat oven to 425 degrees.  Place butter in a lightly greased 9"x13" baking dish; place in the oven until butter is melted.

2.  Sprinkle chicken breasts with salt and pepper.  Place 1/2 cup of the buttermilk in a shallow bowl.  Place flour in another shallow bowl.  Dip chicken in the buttermilk, then dredge in the flour. 

3.  Place dredged chicken in the baking dish.  Bake, uncovered, for 25 minutes.

4.  Turn chicken pieces over in the baking dish, and bake for 10 minutes more. 

5.  Meanwhile, stir together the remaining 1 cup buttermilk, cream of mushroom soup, and mushrooms; pour over the chicken and bake for an additional 10 minutes, shielding with aluminum foil if necessary to prevent excessive browning.

6.  Serve over rice or couscous.

Enjoy!


This post is linked with Sundae Scoop, Think Pink Sunday, Nifty Thrifty Sunday, On the Menu Monday, Mix It Up Monday, Mangia Mondays, Totally Tasty Tuesdays, Tuesday Talent Show, Trick or Treat Tuesday, Whatcha Whipped Up Wednesday, Cast Party Wednesday, Weekend Potluck.
reade more... Résuméabuiyad

Mallow Brownie Bars


Can you ever have too many brownie variations?

Some of our favorites are Raspberry Cheesecake Brownies,  Triple Layer Fudgy Mint Cookie Brownies, and Peanut Butter Fudge Brownies, to name a few.

I'm adding these to the list.

After I made these for a pot-luck sort of thing, we were so enamored with them that I ended up keeping about a third of them home.  We just couldn't bear to share the whole batch.

The top layer was my favorite - creamy chocolate and peanut butter with the crunch of crispy rice cereal.  Add in the gooey marshmallow layer and the fudgy brownie on the bottom....well, let's just say they're really rich and you don't need a lot of them, but chances are you'll want to just keep taking one more little square.

'Cause they are such little squares, after all.  

Mallow Brownie Bars (from The Mandatory Mooch)

1 brownie mix (for 13 x 9" pan, plus eggs, oil, and water called for on box)
1 (10.5 oz) package miniature marshmallows
2 cups semi-sweet chocolate chips
1 cup peanut butter
1 T. butter
1-1/2 cups crispy rice cereal

Prepare brownie mix according to package directions. Pour into a greased 13 x 9" pan.  Bake at 350° for a couple minutes less than the recommended minimum time on the package (for my package, this was 22 minutes).
Top with marshmallows - bake 3 minutes longer.  Marshmallows will not be completely melted.
In a saucepan, combine the chocolate chips, peanut butter, and butter.  Melt over medium-low heat until smooth.  Remove from heat and stir in crispy rice cereal.
Spread over marshmallow layer.  Refrigerate at least 2 hours before cutting into small bars.


Linked to Trick or Treat TuesdayCrazy Sweet Tuesday and  Crumbs and Chaos - Seasonal Inspiration
reade more... Résuméabuiyad

Cookies & Cream Rice Krispies


Cookies & cream anything has my name written all over it.  I saw these, & ran to the store to get the ingredients.  I already had rice cereal from my last batch of rice krispies, so I was halfway prepared for rice krispy treat heaven.  I think I am beginning to believe rice krispies taste that much better with chocolate melted on top too.  Again, these are quick to come together, like most rice krispies, so if you are in a hurry, these are perfect!  And these are probably the best rice krispy treats ever!  Yum!


Cookies & Cream Rice Krispies
Recipe adapted from Stylish Cuisine by: Amber (Dessert Now, Dinner Later!)
  • 1/4 cup butter
  • 1 (10.5oz) bag mini marshmallows
  • 6 cups rice cereal
  • 16 oreos, chopped, & divided
  • 1 (12oz) bag white chocolate chips (about 2 cups)
  1. Chop or break up oreos in a ziplock bag before you begin.
  2. Melt butter in a large non-stick pan.  Add marshmallows & stir until everything is melted. 
  3. Remove from heat & add rice cereal.  Add 3/4 of the cookie crumb mixture.  Stir well & spread into a greased 9x13" pan.  Pat down with hands or spatula.
  4. Put chocolate chips in a glass dish & heat in the microwave on 50% power for 30 seconds at a time, stirring before each additional 30 seconds.  Continue until melted.  Spread over the top of the rice krispy treats & immediately press the remaining chopped oreos over the top.
  5. Allow to cool.  Cut & serve!  Makes 24 squares.


reade more... Résuméabuiyad