Pages

Sweet & Savory Saturdays #15


Last week I was totally going to talk about my fun weekend meeting some of my blog besties.  We have been chatting online for a while & we had a blogger meet-up & finally got to meet in person.  It is so fun to chat with other bloggers b/c they totally get what you are talking about, since we tend to have a different lingo in blog world.  It was great meeting up with these girls & I hope it's not the last time we get together.


Ignore the fact that I am totally not photogenic, but this picture is of me, Alli from Cupcake Diaries, & Aimee from Like Mother Like Daughter.  (We are all A's...Amber, Alli, Aimee...we are destined to be best buddies!  Haha.) 

Memorial Day weekend was lovely too.  We had a fun get-together with our friends from college, & then we came home to let the kids splash around in their tiny pool.  They sure loved it!


Now onto the features for the week (based on clicks):


Coconut Lime Scone from Everyday Insanity (Double feature! Go Cindy!)


I will be pinning the features to my favorite collaborative board on Pinterest.

*Grab a Button if you were featured today!*

Dessert Now, Dinner Later!


Party Guidelines:
  1. PLEASE Follow Dessert Now, Dinner Later! on Facebook or any social media.
  2. PLEASE Grab a Sweet & Savory Saturdays Button from my "Grab a Button" page at the top & post it to your Link Parties page or link back to my blog within the recipe post.
  3. PLEASE Only link up to specific recipes.  Also, NO giveaways, sales/promotions, etsy, or link parties.
  4. PLEASE Visit the 2 links before yours & leave some comment LOVE.  Have fun! 
**By the way, I have a Shirley J product giveaway going on & today is the last day to enter.  You have until midnight MST.  There will be 3 winners, so your chances of winning are much better!  Here is the link to the rafflecopter

    Last week I was totally going to talk about my fun weekend meeting some of my blog besties.  We have been chatting online for a while & we had a blogger meet-up & finally got to meet in person.  It is so fun to chat with other bloggers b/c they totally get what you are talking about, since we tend to have a different lingo in blog world.  It was great meeting up with these girls & I hope it's not the last time we get together.


    Ignore the fact that I am totally not photogenic, but this picture is of me, Alli from Cupcake Diaries, & Aimee from Like Mother Like Daughter.  (We are all A's...Amber, Alli, Aimee...we are destined to be best buddies!  Haha.) 

    Memorial Day weekend was lovely too.  We had a fun get-together with our friends from college, & then we came home to let the kids splash around in their tiny pool.  They sure loved it!


    Now onto the features for the week (based on clicks):


    Coconut Lime Scone from Everyday Insanity (Double feature! Go Cindy!)


    I will be pinning the features to my favorite collaborative board on Pinterest.

    *Grab a Button if you were featured today!*

    Dessert Now, Dinner Later!


    Party Guidelines:
    1. PLEASE Follow Dessert Now, Dinner Later! on Facebook or any social media.
    2. PLEASE Grab a Sweet & Savory Saturdays Button from my "Grab a Button" page at the top & post it to your Link Parties page or link back to my blog within the recipe post.
    3. PLEASE Only link up to specific recipes.  Also, NO giveaways, sales/promotions, etsy, or link parties.
    4. PLEASE Visit the 2 links before yours & leave some comment LOVE.  Have fun! 
    **By the way, I have a Shirley J product giveaway going on & today is the last day to enter.  You have until midnight MST.  There will be 3 winners, so your chances of winning are much better!  Here is the link to the rafflecopter
      reade more... Résuméabuiyad

      How Baking Can Be Summer Reading, Writing, & Math Practice!

      I'll say good-bye to my this year's group of little 1st graders this coming week. {Sniff, sniff.} Have you got kids or grand-kids out of school for the summer? If your child's teacher is at all like me, she or he probably said something about keeping your child reading, writing, and doing a little math over the summer, right? {And if she or he didn't ... consider this to be me saying it for them now!}

      Well, did you know you can keep your child practicing reading, writing, and math through simply baking and cooking with them? That's right! ...

      Continue Reading >>
      reade more... Résuméabuiyad

      Mini Corn Dog Muffins


      *Disclaimer:  I received free product from Shirley J as inspiration for this post.  This post is written by me.  All opinions are 100% mine.  You can read my advertising & disclosure policy HERE.


      I saw this idea on Pinterest to make these Mini Corn Dog Muffins, & I actually tried them with Jiffy Corn Bread Mix & they turned out awful.  The muffins were dense & the hot dogs sunk to the bottom.  I was so bummed because my kids eat mini corn dogs all the time.  I buy the big box at Sam's Club & they just inhale them.  I really would like to be able to make them at home & now I can!  My inspiration for these came from Iowa Girl Eats.  I just don't keep corn meal at my house that often, but I know if I have this mix in my house, they will be perfect every time!

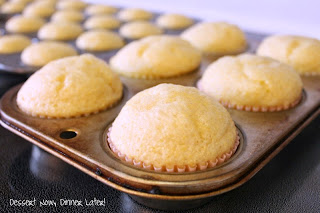
      I cannot say enough good things about this Shirley J Corn Bread Mix!  It's sweet, light, & fluffy, yet not dry & mealy like other corn bread can be.  It's got the perfect corn meal texture with a puffy quality.  Plus the rise on these muffins are insane!  Like for real; they peak beautifully!  Check out the extra regular sized muffins I made; TALL MUFFINS!
      Today is the last day to enter to win a package of all the Shirley J products that I have been blogging about all week.  Their line of products are incredible & are top quality.  You will want to win this stuff!  You can drool over my pictures in the meantime or check out Shirley J's website.  There products are also sold in several states.  I am grateful for this chance I have had to work with them!


      Mini Corn Bread Muffins
      Recipe inspired by Iowa Girl Eats & altered by: Amber (Dessert Now, Dinner Later!)
      1. Preheat oven to 375*F.  Grease mini muffin tins.
      2. Combine corn bread mix with water.  Blend on low for 30 seconds, scrape bowl, & beat on high for 1 minute.  Do not overmix.
      3. Scoop about 1 1/2 Tbsp of mix into each mini muffin tin.
      4. Cut hot dogs into 1" pieces (for bun length hot dogs, that's 8 pieces per hot dog) & place directly in the center of the batter of each corn muffin.
      5. Bake for 10-12 minutes or until muffins are browning on the edges & the center pops back when gently pressed down.
      *Makes 3 dozen mini muffins or 2 dozen mini muffins plus 6 regular sized muffins.


      Image Map
      reade more... Résuméabuiyad

      Roasted Cauliflower Au Gratin


      *Disclaimer:  I received free product from Shirley J as inspiration for this post.  This post is written by me.  All opinions are 100% mine.  You can read my advertising & disclosure policy HERE.

      I have a confession to make...I might have made this confession before, but I will say it again.  We rarely eat vegetables.  You would think since I am a mom, I would make sure we eat them, but I just hardly ever make them.  My kids do like raw vegetables, like carrots & broccoli dipped in ranch or hummus.  We occasionally have vegetables like that for lunch with our sandwiches, but vegetables every night with dinner hardly ever happens.  I need to get better at it.  I really do like vegetables, way more than I did growing up, so I don't know why I skip it.  

      Anyway, we made this Roasted Cauliflower Au Gratin for dinner one night with some grilled chicken & they were absolutely incredible.  I think roasting them paired with the cheese sauce made them extra desirable.  This is another recipe made easy with Shirley J Whisk Bliss.  I love it!  Whisk Bliss dissolves easily in water & all you have to do is boil it to thicken it up.  I over guessed how much sauce we would need for this recipe so it's quite saucy in the pictures, but I adjusted the recipe for you all.

      Don't forget to enter the giveaway.  It ends at midnight tomorrow, so you better get to entered.  You could win some Whisk Bliss to make this with your dinner!

      Roasted Cauliflower Au Gratin
      Recipe altered from The Shiksa in the Kitchen by: Amber (Dessert Now, Dinner Later!)
      • 2 1/2 lbs fresh cauliflower
      • 3 Tbsp unsalted butter, melted
      • 1 tsp minced garlic (I prefer to use Gourmet Garden Chunky Garlic)
      • 3/4 tsp kosher salt
      • 1/4 tsp ground black pepper
      • 1 1/2 cups water
      • 6 Tbsp Shirley J Whisk Bliss
      • 2/3 cup mild cheddar cheese plus 3 Tbsp for the topping
      • 3 Tbsp panko bread crumbs
      1. Wash & cut florets off the stem of the cauliflower.  Combine melted butter, minced garlic, salt & pepper in a bowl.  Toss florets in the butter mixture & spread out on a foil lined baking sheet.  
      2. Bake at 425*F for 10 minutes.  Stir/toss cauliflower & cook 15 minutes more until browned & roasted.
      3. In a saucepan on the stove top whisk water & Shirley J Whisk Bliss.  Bring to a boil & add 2/3 cup mild cheddar cheese.  Stir until melted.
      4. Spray a 8" or 9" square baking dish with pan spray.  Add roasted cauliflower & top with cheese sauce.  Then sprinkle with 3 Tbsp each of mild cheddar cheese & panko bread crumbs.  
      5. Place in the oven & BROIL for 3-4 minutes until browned & bubbling on top.

      Image Map
      reade more... Résuméabuiyad

      Creamy Pesto & Peas Bowtie Pasta with Chicken


      *Disclaimer:  I received free product from Shirley J as inspiration for this post.  This post is written by me.  All opinions are 100% mine.  You can read my advertising & disclosure policy HERE.

      This has been a wonderful week of recipe experimentation, but I must say, this is one that we absolutely over the top scarfed down.  My kids ate everything, pasta, peas, chicken & all & asked for MORE!  That means it was a huge success!  But I have a little secret about this dish, well a secret ingredient.  Want to know what it is?
      Shirley J Whisk Bliss is a universal cooking base similar to the bechamel mother sauce.  So think: sauces, soups, gravies, etc.  It's so creamy & amazingly easy to make.  1 part whisk bliss to 4 parts water!  Heat to a boil & that is it!  I have got another recipe using whisk bliss posting later, so stay tuned for that.  And we have even used this as the base sauce for Hawaiian Haystacks with the addition of some chicken bouillon & spices.  I think it would be great in my Chicken Pot Pie Crumble too!  See, very versatile!  

      This Creamy Pesto & Peas Bowtie Pasta with Chicken was superb!  Al dente pasta, creamy pesto sauce, crunchy peas & tender chicken combined into one amazing dish.  It's amazing as leftovers the next day as well & we are totally making this again next week because it's that good.  Try it!  (Don't forget to enter the Shirley J giveaway going on this week!)

      Creamy Pesto & Peas Bowtie Pasta with Chicken
      Recipe by: Amber (Dessert Now, Dinner Later!)

      • 1 Tbsp olive oil
      • 2 chicken breasts
      • favorite chicken seasoning blend (I used montreal chicken seasoning)
      • 6-8oz bowtie pasta 
      • 1 cup frozen peas
      • 2 cups water
      • 1/2 cup Shirley J Whisk Bliss
      • 1/3 cup parmesan cheese shredded
      • 2 Tbsp store-bought pesto
      1. Heat olive oil in a skillet.  Season chicken breasts & cook on medium-high heat, covered with a lid for 4 minutes on each side.  Check doneness with a thermometer or cook until juices run clear.  Keep warm.
      2. Meanwhile, boil water & cook bowtie pasta according to directions on the package, adding the frozen peas the last minute of cooking.  (I boiled mine for 8 minutes & then added the peas for an additional minute.)  Drain & set aside.
      3. In a saucepan combine Shirley J Whisk Bliss & water.  Whisk until boiling, add cheese & pesto; stir until combined & thick.  This doesn't take longer than 5 minutes.
      4. Pour sauce over pasta/pea mixture.  Stir to coat.  Top pasta with slices of chicken & a sprinkle of parmesan cheese.
      *Makes 4-5 servings.

      Image Map
      reade more... Résuméabuiyad

      Hot Onion Dip


      *Disclaimer:  I received free product from Shirley J as inspiration for this post.  This post is written by me.  All opinions are 100% mine.  You can read my advertising & disclosure policy HERE.

      So I kind of have a funny story about this dip.  The day I made it we were kind of full from our dinner already so we took a few bites & put it in the fridge for later.  Well, I told my husband to go ahead & take it to work the next morning to share with his co-workers, as he usually tends to do with our leftovers anyway.  He brought it in a little crockpot & was heating it up on his desk.  He also brought some crackers to eat with the dip & so he started munching on it while he was working at his desk.  I got a phone call about 9:30 or 10:00am & he told me he "accidentally" ate ALL the dip.  Haha!  My husband said it was so good that he just couldn't stop & he felt bad because he wanted his friends at work to try it.  I guess he had enough for like 3 other people to try a bite.  Anyway, this dip is that good.

      I am a huge fan of onion, which is funny because I never used to be.  Growing up, I hated onions.  I would pick them out of anything my mom would make.  Now, I can't get enough!  Caramelized onions are my favorite & this recipe caramelizes vidalia (sweet) onions which are the absolute best, in my opinion.  

      I also had the chance to try out this Shirley J Onion Seasoning with it, & I think it took it a step farther, giving it an even deeper onion flavor.  We have also tried this onion seasoning in homemade burgers, along with Shirley J Barbeque Sauce Mix, which is why it is almost half gone (as you can see in the picture.)  We like it a lot.  I bet it would even work great in my Onion & Cream Sauced Pork Chops.  (Don't forget to enter the Shirley J giveaway going on this week!)
      Anyway, you could probably caramelize your onions on the stovetop, then add the other ingredients & heat it in the crockpot for an hour or so since it is warming up & not really pleasant to have the oven on in your house.  Or, just finish it in the oven like the recipe says.  Either way, it would be a great party dip for sure!


      Hot Onion Dip
      Recipe lightly altered from Closet Cooking by: Amber (Dessert Now, Dinner Later!)
      • 1 Tbsp vegetable oil
      • 2 1/2 lbs vidalia sweet onions, sliced (about 2 LARGE onions, weigh them at the store)
      • 1/4 to 1/2 cup water
      • 4 oz cream cheese
      • 1/2 cup light mayonnaise
      • 1/2 cup parmesan cheese, shredded
      • 1 Tbsp Shirley J Onion Seasoning
      • Salt & Pepper to taste
      1. In a large skillet, heat oil on medium-high heat & add onions.  Season with a little salt & pepper (1/4 tsp each).  Stir occasionally & add water as necessary to keep onions from burning.  Cover with a lid in between stirring (maybe every 5 minutes.)  Cook until onions have reduced & turn a deep caramel color, about 30-40 minutes.
      2. In a stand mixer with the paddle attachment, combine cream cheese, mayonnaise, parmesan cheese, & Shirley J Onion Seasoning.  Add hot onions & mix on low until combined.  Scrape into a 8"-9" round or square baking dish.  
      3. Bake at 425*F until the edges bubble & the top browns a little bit, about 10 minutes.  Serve hot with bread, crackers, or chips.
      Image Map
      reade more... Résuméabuiyad

      Grilled Barbeque Chicken Pizza

      *Disclaimer:  I received free product from Shirley J as inspiration for this post.  This post is written by me.  All opinions are 100% mine.  You can read my advertising & disclosure policy HERE.

      If you haven't tried grilled pizza yet since the last time I blogged about it, then put it on your summer bucket list & get to grilling!  BBQ Chicken Pizza is one of my absolute favorite pizzas of all time.  That and pepperoni, hawaiian (I like fruit on my pizza), & chicken cordon bleu, but let's not get distracted right?
      I made this pizza to test out some Shirley J Barbeque Sauce Mix.  You combine 1 part of the mix with 3 parts of water, heat it up to boiling & it thickens super fast.  My husband & I were surprised with how much we actually liked the barbeque sauce.  It was thick, sweet & tangy.  Perfect for basting the chicken & using for our pizza sauce.  We have even put the mix in some homemade burger patties which gives it a great caramelized BBQ flavor as well.  This sauce mix is fabulous!

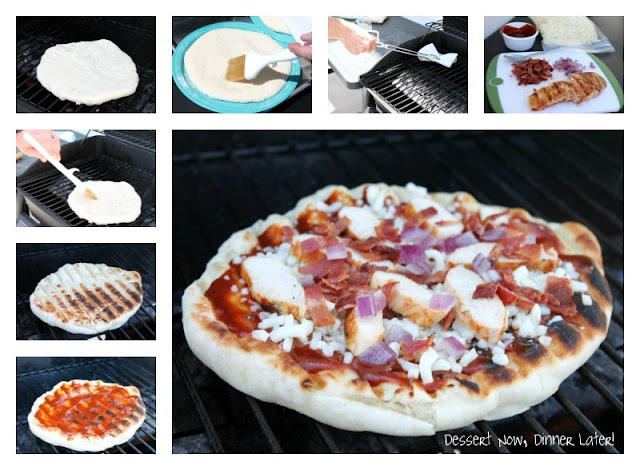
      Grilling pizza is LIFE. CHANGING.  Seriously!  If you haven't done it, you have no idea what you are missing out on.  The crust gets a crispy exterior with a fluffy interior.  It's puffy, crusty perfection!  I've got some step by step photos via a collage for you along with the directions.  Seriously grill some pizza & try this Shirley J Barbeque Sauce Mix.  You won't regret it!  (Don't forget to enter the giveaway to win some Shirley J products!!!)


      Grilled Barbeque Chicken Pizza
      Recipe by: Amber (Dessert Now, Dinner Later!)
      1. Prepare dough, divide into thirds, allow to rest, covered.  Roll into 3-individual sized personal pizza rounds, using flour as needed to help with sticking.  Keep covered with plastic wrap or a towel until ready to grill.
      2. Whisk Shirley J Barbeque Sauce Mix with water in a small saucepan over medium-high heat until it comes to a boil & thickens up.  Remove from heat.
      3. Pre-heat grill, baste chicken breasts, & grill both sides for about 4 minutes each side, basting as desired.  Grill until chicken is cooked thoroughly.  Remove chicken from grill & allow to rest for a few minutes (to keep juices in), then slice into thin strips.
      4. Scrape the grill down & oil grates with a paper towel or pastry brush & oil. Be careful not to burn yourself.
      5. Brush one side of the prepared pizza crust & carefully place the oiled side down onto the grates.  Lower heat just a bit and close the lid.  Cook for a few minutes, checking for the dough to look puffed, and golden brown on the bottom.  Lightly brush the top side of the dough and flip it over. 
      6. Spread barbeque sauce over the cooked side of the pizza crust.  Add cheese, chicken, crumbled bacon, & diced red onion.  Close lid & allow cheese to melt & the bottom of the crust to cook for a couple minutes.  Keep a close eye on it.  Remove from grill, slice pizza into pieces & devour!  Repeat with other two crusts (You may do more than one at a time if you are diligent in keeping your eye on them, so they don't burn.)
      *Makes 3 small (6") individual sized pizzas.

      Image Map
      reade more... Résuméabuiyad

      Scrumptious Strawberry Cobbler

      I treated myself this weekend. Yes, I treated myself to one of my absolute, absolute favorite treats ... fresh-picked strawberries. Not strawberries from the grocery store ~ strawberries fresh from the local fields! When it comes to berries, there's just nothing better.

      And then I came home and treated myself some more ... with scrumptious strawberry cobbler. Made with those sweet, juicy, fresh-from-the-field strawberries. Sooooo good ... and soooooooo easy.
      Continue Reading >>
      reade more... Résuméabuiyad