Pages

Fudgy Mint Squares


Chocolate and mint and cheesecake - hard to beat that!  This is very rich, no doubt about it.  Even I can be satisfied with a couple of small squares of this stuff....no huge pieces here!  Great for serving a crowd, fantastic for making ahead and freezing (and even eating straight from the freezer, they don't get too solid) and lovely for holidays or just anytime.  

This time, however, I made a major goof.  I was making them for a friend who just had a baby and was just a little embarrassed to discover just before delivering them that I forgot to put in the mint extract!  It wouldn't have made much difference, if I hadn't put the green food coloring in there making it look like it was mint. It tastes really good without the mint.  But there it was, nice and green.  And no mint flavor.  Sorry Jenny!  
I can always use my very valid excuse that I was distracted by a screaming baby....which was the truth, but still.  
Anyways, these are a favorite with my family, mint or no mint, apparently. 

Recipe: (from Taste of Home)

10 T. butter (no substitutes), divided
3 squares (1 ounce each) unsweetened chocolate, chopped
3 eggs, divided
1-1/2 c. sugar
2 t. vanilla extract
1 c. all-purpose flour
1 (8 oz package) cream cheese, softened
1 T. cornstarch
1 can (14 oz) sweetened condensed milk
1 t. peppermint extract
4 drops green food coloring (optional)
1 c. (6 oz) semi-sweet chocolate chips
1/2 c. whipping cream

Preheat oven to 350°. In a microwave safe bowl, melt 8 T. butter and unsweetened chocolate; cool slightly.  In a mixing bowl, beat 2 eggs, sugar and vanilla.  Add the chocolate mixture; mix until blended.  Gradually beat in the flour. Spread in a greased 13 x 9" baking pan.  Bake for 15-20 minutes or until top is set. 

In a mixing bowl, beat cream cheese and remaining butter.  Add cornstarch; beat until smooth. Gradually beat in milk and remaining egg.  Add extract and food coloring if desired.  Pour over crust. Bake for 15-20 minutes or until center is almost set.  Cool on a wire rack.

In a heavy saucepan (or in microwave-safe bowl), combine chocolate chips and cream.  Heat and stir until melted.  Cool for 30 minutes or until lukewarm, stirring occasionally.  Pour over cream cheese layer.  Chill for 2 hours or until set before cutting.   


Chocolate and mint and cheesecake - hard to beat that!  This is very rich, no doubt about it.  Even I can be satisfied with a couple of small squares of this stuff....no huge pieces here!  Great for serving a crowd, fantastic for making ahead and freezing (and even eating straight from the freezer, they don't get too solid) and lovely for holidays or just anytime.  

This time, however, I made a major goof.  I was making them for a friend who just had a baby and was just a little embarrassed to discover just before delivering them that I forgot to put in the mint extract!  It wouldn't have made much difference, if I hadn't put the green food coloring in there making it look like it was mint. It tastes really good without the mint.  But there it was, nice and green.  And no mint flavor.  Sorry Jenny!  
I can always use my very valid excuse that I was distracted by a screaming baby....which was the truth, but still.  
Anyways, these are a favorite with my family, mint or no mint, apparently. 

Recipe: (from Taste of Home)

10 T. butter (no substitutes), divided
3 squares (1 ounce each) unsweetened chocolate, chopped
3 eggs, divided
1-1/2 c. sugar
2 t. vanilla extract
1 c. all-purpose flour
1 (8 oz package) cream cheese, softened
1 T. cornstarch
1 can (14 oz) sweetened condensed milk
1 t. peppermint extract
4 drops green food coloring (optional)
1 c. (6 oz) semi-sweet chocolate chips
1/2 c. whipping cream

Preheat oven to 350°. In a microwave safe bowl, melt 8 T. butter and unsweetened chocolate; cool slightly.  In a mixing bowl, beat 2 eggs, sugar and vanilla.  Add the chocolate mixture; mix until blended.  Gradually beat in the flour. Spread in a greased 13 x 9" baking pan.  Bake for 15-20 minutes or until top is set. 

In a mixing bowl, beat cream cheese and remaining butter.  Add cornstarch; beat until smooth. Gradually beat in milk and remaining egg.  Add extract and food coloring if desired.  Pour over crust. Bake for 15-20 minutes or until center is almost set.  Cool on a wire rack.

In a heavy saucepan (or in microwave-safe bowl), combine chocolate chips and cream.  Heat and stir until melted.  Cool for 30 minutes or until lukewarm, stirring occasionally.  Pour over cream cheese layer.  Chill for 2 hours or until set before cutting.   

reade more... Résuméabuiyad

Cookies and Cream Cheesecake Cupcakes


Cheesecake Cupcakes.  I was intrigued.  The biggest draw for me was the easy crust - just drop a cookie in a cupcake liner and there you go!  The cheesecake part is delicious; you just can't go wrong with oreos and cream cheese together.  However, the original recipe didn't have the topping and after our first sample, both Grant and I decided they needed a bit more ooomph, which in this case translates... more chocolate.  The addition made a significant improvement in our minds....but feel free to leave it off if you so desire.  (but why would you?)

Grant also commented that it felt weird eating cheesecake like a cupcake..... he preferred eating it with a fork.   Me...I'm not so prim and proper.  Didn't bother me eating it straight from the liner one bit! 
I thought it was a fun and portable way to eat cheesecake, not to mention helps you limit portion size (assuming you only eat one).   

Recipe: (adapted from Handle the Heat) Yields 30-31 cupcakes

42 cream-filled cookies (such as Oreos), 30 left whole and 12 coarsely chopped
2 lb. cream cheese, room temperature
1 c. sugar
1 t. vanilla
4 eggs (room temperature), lightly beaten
1 c. sour cream
pinch of salt

Topping:
1/2 c. semi-sweet chocolate chips
1 T. butter
1 T. milk

1. Preheat oven to 275 degrees. Line standard muffin tins with paper liners. Place 1 whole cookie in the bottom of each lined cup.

2. With an electric mixer on medium high speed, beat cream cheese until smooth, scraping down sides of bowl as needed. Gradually add sugar and beat until combined. Beat in vanilla.

3. Drizzle in eggs, a bit at a time, beating to combine and scraping down the sides of the bowl as needed. Beat in sour cream and salt. Stir in chopped cookies by hand.

4. Divide batter evenly among cookie-lined cups, filling each almost to the top. Bake, rotating pan halfway through, until filling is set, about 22 minutes. Transfer to wire racks to cool completely. Refrigerate at least 4 hours (or up to overnight).

5. In a microwavable bowl, melt the chocolate chips, butter, and milk.  Spread about a teaspoon on top of each cheesecake cupcake and chill until set.


Cheesecake Cupcakes.  I was intrigued.  The biggest draw for me was the easy crust - just drop a cookie in a cupcake liner and there you go!  The cheesecake part is delicious; you just can't go wrong with oreos and cream cheese together.  However, the original recipe didn't have the topping and after our first sample, both Grant and I decided they needed a bit more ooomph, which in this case translates... more chocolate.  The addition made a significant improvement in our minds....but feel free to leave it off if you so desire.  (but why would you?)

Grant also commented that it felt weird eating cheesecake like a cupcake..... he preferred eating it with a fork.   Me...I'm not so prim and proper.  Didn't bother me eating it straight from the liner one bit! 
I thought it was a fun and portable way to eat cheesecake, not to mention helps you limit portion size (assuming you only eat one).   

Recipe: (adapted from Handle the Heat) Yields 30-31 cupcakes

42 cream-filled cookies (such as Oreos), 30 left whole and 12 coarsely chopped
2 lb. cream cheese, room temperature
1 c. sugar
1 t. vanilla
4 eggs (room temperature), lightly beaten
1 c. sour cream
pinch of salt

Topping:
1/2 c. semi-sweet chocolate chips
1 T. butter
1 T. milk

1. Preheat oven to 275 degrees. Line standard muffin tins with paper liners. Place 1 whole cookie in the bottom of each lined cup.

2. With an electric mixer on medium high speed, beat cream cheese until smooth, scraping down sides of bowl as needed. Gradually add sugar and beat until combined. Beat in vanilla.

3. Drizzle in eggs, a bit at a time, beating to combine and scraping down the sides of the bowl as needed. Beat in sour cream and salt. Stir in chopped cookies by hand.

4. Divide batter evenly among cookie-lined cups, filling each almost to the top. Bake, rotating pan halfway through, until filling is set, about 22 minutes. Transfer to wire racks to cool completely. Refrigerate at least 4 hours (or up to overnight).

5. In a microwavable bowl, melt the chocolate chips, butter, and milk.  Spread about a teaspoon on top of each cheesecake cupcake and chill until set.
reade more... Résuméabuiyad

Chicken Smothered with Onions


I made this recently when Grant was out of town and after the first bite, I had a feeling it would make regular
appearances in our house.  The kids ate around the onions a little, but overall they loved it and when Grant got to have the leftovers for lunch, he thought it was great as well. 

And me? 

Well, let's just say I was reluctant to give up the leftovers to Grant.  I almost didn't, if you want to know the truth.  But my conscience got the best of me. He was very grateful. 

The original recipe called for leaving the chicken breasts whole, but I figured I have to cut up chicken for my kids anyways, so I might as well cut it up before cooking to speed things up and hopefully stretch the dish a little further.  It worked just fine, so you can really do it however it suits you.

I like that it's fast, doesn't heat up the oven, and only dirties up one pan.  Oh, and I also like that it tastes REALLY good.  And don't forget the mashed potatoes - or even baked if you want to be a little healthier.  The gravy is just made for potatoes. 

Recipe: (from Good Cheap Eats)

4 chicken breasts, cut into chunks
paprika
salt and pepper
1-1/2 T. butter
2 large onions, sliced
3 T. flour
2 cups chicken broth
1/4 cup whipping cream
1/4 teaspoon nutmeg
dried or fresh parsley for garnish

Sprinkle chicken breasts generously with paprika, salt, and pepper. Melt butter in heavy skillet. Add chicken to skillet and brown on each side. Move to plate.
Place onions in the pan and stir into butter and drippings, scraping up any browned bits from pan. Cook until tender, stirring frequently. Add flour and stir for one minute.  Add chicken broth slowly and bring to boil. Put chicken back in pan, reduce heat and simmer until chicken is cooked through, stirring occasionally. Add cream and nutmeg. Boil until gravy is thickened, stirring often.

Serve with mashed potatoes and a sprinkling of parsley for garnish.

I made this recently when Grant was out of town and after the first bite, I had a feeling it would make regular
appearances in our house.  The kids ate around the onions a little, but overall they loved it and when Grant got to have the leftovers for lunch, he thought it was great as well. 

And me? 

Well, let's just say I was reluctant to give up the leftovers to Grant.  I almost didn't, if you want to know the truth.  But my conscience got the best of me. He was very grateful. 

The original recipe called for leaving the chicken breasts whole, but I figured I have to cut up chicken for my kids anyways, so I might as well cut it up before cooking to speed things up and hopefully stretch the dish a little further.  It worked just fine, so you can really do it however it suits you.

I like that it's fast, doesn't heat up the oven, and only dirties up one pan.  Oh, and I also like that it tastes REALLY good.  And don't forget the mashed potatoes - or even baked if you want to be a little healthier.  The gravy is just made for potatoes. 

Recipe: (from Good Cheap Eats)

4 chicken breasts, cut into chunks
paprika
salt and pepper
1-1/2 T. butter
2 large onions, sliced
3 T. flour
2 cups chicken broth
1/4 cup whipping cream
1/4 teaspoon nutmeg
dried or fresh parsley for garnish

Sprinkle chicken breasts generously with paprika, salt, and pepper. Melt butter in heavy skillet. Add chicken to skillet and brown on each side. Move to plate.
Place onions in the pan and stir into butter and drippings, scraping up any browned bits from pan. Cook until tender, stirring frequently. Add flour and stir for one minute.  Add chicken broth slowly and bring to boil. Put chicken back in pan, reduce heat and simmer until chicken is cooked through, stirring occasionally. Add cream and nutmeg. Boil until gravy is thickened, stirring often.

Serve with mashed potatoes and a sprinkling of parsley for garnish.
reade more... Résuméabuiyad

Annika's Birthday Party

The preparations for the party began long before party day, as you might well imagine.  I created a couple of games that I had read about online and spent considerable time working on them in the evenings prior to last Saturday. Here I was copying a picture of the Siamese Cats from the movie onto a poster board to put as decoration on the wall.....for the following game:

I drew a picture of a fish bowl on a box and made "goldfish" out of felt, beans, and hot glue ('cause I don't sew.....maybe I'll learn someday).  The kids were supposed to "rescue" the goldfish from the Siamese Cats by tossing them into the fish bowl. 

You can see a bit of the picture I drew in the background.  The kids really loved this game!


Marissa with two of her very best friends.

For the next game, we pretended that I was the dogcatcher and the kids were playing Hot Potato with a package (which had many wrapped layers, each with a piece of candy in it).
When the music stopped, whomever had the package first got "caught" with the net, then they got to open one layer of the package and get the candy before they left the circle and the game continued.

One of the guests getting caught!  The kids thought this was hilarious!

It came down to Corban and his buddy Cort to determine the winner - Cort got the final prize of extra candy in the middle. 

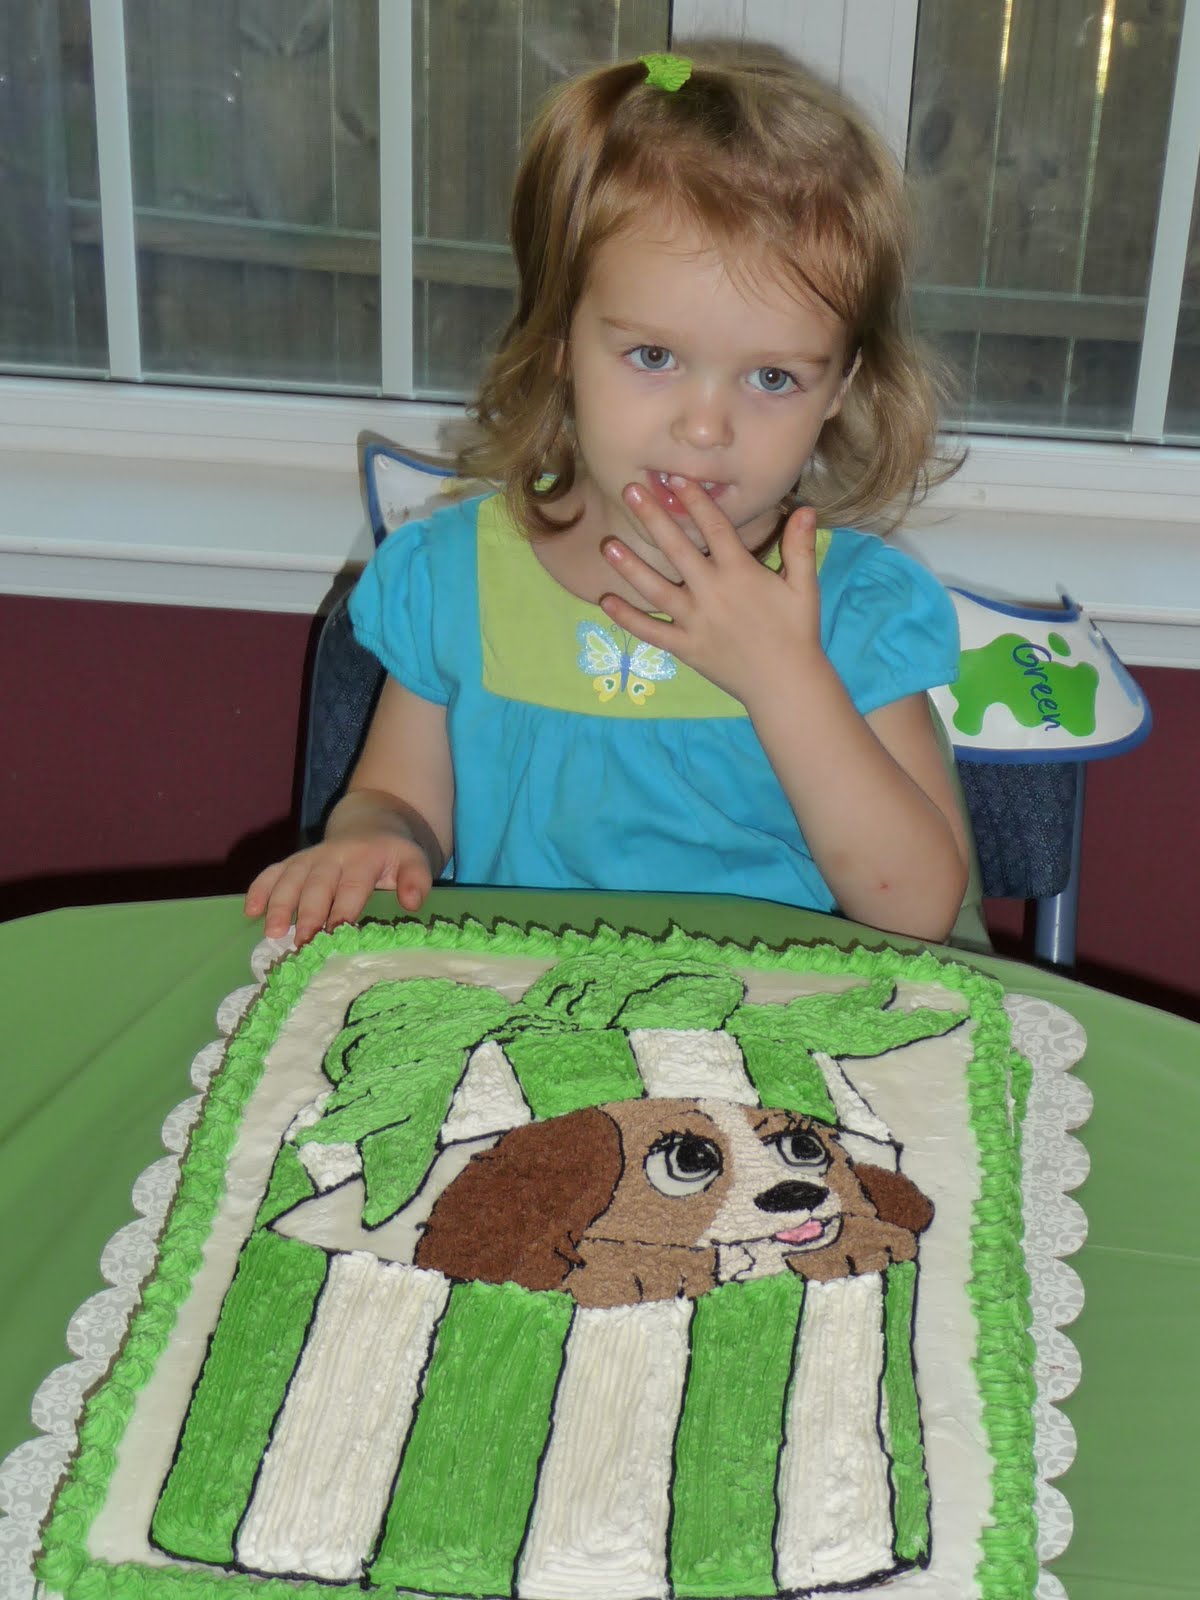
Annika could not resist sticking her finger in the frosting before we sang to her. 

3-Years Old!  And proud of it!

She got some lovely gifts....

and had some help inspecting things!

Ellia got some special attention from a friend, who's own baby sister was just born yesterday!


We had lots of cake....still eating on the leftovers, actually.


And we had little bone cookies that the Marissa helped me ice and decorate.  Those were a big hit. 

The party was a great success and Annika had a wonderful time....Thanks to everyone who came and to my wonderful husband who cleaned up nearly everything singlehandedly to let me rest! 

The preparations for the party began long before party day, as you might well imagine.  I created a couple of games that I had read about online and spent considerable time working on them in the evenings prior to last Saturday. Here I was copying a picture of the Siamese Cats from the movie onto a poster board to put as decoration on the wall.....for the following game:

I drew a picture of a fish bowl on a box and made "goldfish" out of felt, beans, and hot glue ('cause I don't sew.....maybe I'll learn someday).  The kids were supposed to "rescue" the goldfish from the Siamese Cats by tossing them into the fish bowl. 

You can see a bit of the picture I drew in the background.  The kids really loved this game!


Marissa with two of her very best friends.

For the next game, we pretended that I was the dogcatcher and the kids were playing Hot Potato with a package (which had many wrapped layers, each with a piece of candy in it).
When the music stopped, whomever had the package first got "caught" with the net, then they got to open one layer of the package and get the candy before they left the circle and the game continued.

One of the guests getting caught!  The kids thought this was hilarious!

It came down to Corban and his buddy Cort to determine the winner - Cort got the final prize of extra candy in the middle. 

Annika could not resist sticking her finger in the frosting before we sang to her. 

3-Years Old!  And proud of it!

She got some lovely gifts....

and had some help inspecting things!

Ellia got some special attention from a friend, who's own baby sister was just born yesterday!


We had lots of cake....still eating on the leftovers, actually.


And we had little bone cookies that the Marissa helped me ice and decorate.  Those were a big hit. 

The party was a great success and Annika had a wonderful time....Thanks to everyone who came and to my wonderful husband who cleaned up nearly everything singlehandedly to let me rest! 

reade more... Résuméabuiyad

Lady and the Tramp Cake


Annika loves dogs and the color green - so I came up with the idea for this cake.  I found the picture online and Grant enlarged it for me to approximately 11 x 15", the size of my pan. 

I cut out the picture, frosted my yellow cake with white buttercream, traced around the outline of the picture on the cake with a toothpick, then filled in the details freehand.
I used storebought Wilton black piping frosting with my smallest tip for the outlines and used my buttercream for the rest.
For Lady, I tinted about a cup of frosting very light brown with cocoa powder.  I filled in the area between her eyes and muzzle with that.  I didn't use it all, so I just added more cocoa powder to make the area surrounding her eyes and paws a bit darker.  Then I added even more cocoa powder and a touch of red food coloring for her ears.
All of those I piped with the smallest star tip.
Then I used a larger star tip for the stripes on the box and bow, using a toothpick to help out in the tight spots.  I used the #17 tip for piping shells on the bottom and rosettes on the top edge. 
 Pretty easy - just a little time consuming - I'm glad I didn't pick a photo with Tramp also!


This is one happy girl!


This recipe is linked to the Ultimate Recipe Swap: Birthday Cakes.


Annika loves dogs and the color green - so I came up with the idea for this cake.  I found the picture online and Grant enlarged it for me to approximately 11 x 15", the size of my pan. 

I cut out the picture, frosted my yellow cake with white buttercream, traced around the outline of the picture on the cake with a toothpick, then filled in the details freehand.
I used storebought Wilton black piping frosting with my smallest tip for the outlines and used my buttercream for the rest.
For Lady, I tinted about a cup of frosting very light brown with cocoa powder.  I filled in the area between her eyes and muzzle with that.  I didn't use it all, so I just added more cocoa powder to make the area surrounding her eyes and paws a bit darker.  Then I added even more cocoa powder and a touch of red food coloring for her ears.
All of those I piped with the smallest star tip.
Then I used a larger star tip for the stripes on the box and bow, using a toothpick to help out in the tight spots.  I used the #17 tip for piping shells on the bottom and rosettes on the top edge. 
 Pretty easy - just a little time consuming - I'm glad I didn't pick a photo with Tramp also!


This is one happy girl!


This recipe is linked to the Ultimate Recipe Swap: Birthday Cakes.

reade more... Résuméabuiyad

It's the Weekend!

Today is a busy day.....Annika's birthday is on Monday, and we're having a party this afternoon with a few friends.  I've got a Lady and the Tramp Cake to decorate, more balloons to hang, and tons of other food preparations to make.

AND, my younger brother, Joseph is arriving for his first visit here in over 5 years around lunch time!   We haven't seen him in 21 months, since Christmas 2008 in Arkansas at my parents' house.  The kids are beside themselves with excitement - and I'm right up there with them.

My parents will be arriving on Monday, so the whole weekend is sure to be exciting!

Better get busy.
Today is a busy day.....Annika's birthday is on Monday, and we're having a party this afternoon with a few friends.  I've got a Lady and the Tramp Cake to decorate, more balloons to hang, and tons of other food preparations to make.

AND, my younger brother, Joseph is arriving for his first visit here in over 5 years around lunch time!   We haven't seen him in 21 months, since Christmas 2008 in Arkansas at my parents' house.  The kids are beside themselves with excitement - and I'm right up there with them.

My parents will be arriving on Monday, so the whole weekend is sure to be exciting!

Better get busy.
reade more... Résuméabuiyad

"E" is for Elephant Ears


We tried a new recipe this week, making Elephant Ears for my friend Ellen, her daughters Elizabeth and Esther, and Everyone Else in their family.  

Anyone else never heard of Elephant Ears?

Basically, it's a flaky dough rolled up and sliced like a cinnamon roll and then flattened into circles and baked like cookies.  So it's a cinnamon roll cookie.  Sort of.  

Anyways.  Apparently these are treats found at county fairs....(I think it's been about 20 years since I went to a fair, so I cannot confirm that) but often times they're deep fried. I wanted to avoid that......so this recipe fit the bill.  I found it on my good old standby, Allrecipes.  

I did make some changes, because things were NOT working according to the original directions.  For example, if you don't knead enough flour into the dough before rolling it out, it will be too sticky to do anything.  Also, parchment paper is your friend for baking these.....and don't forget it!  
Be sure to plan ahead because the dough has to chill for a couple of hours.  

The result: my kids LOVED them and are begging me to make more.  I thought they were really good too, despite the mess I made in the kitchen.  It's fun to try new things.  I did double this recipe to make enough for both families.

Recipe: (yield - 14 to 18 rolls)

1 (.25 oz) package active dry yeast (or 2-1/4 t. bulk yeast)
1/4 cup warm water
1/2 t. sugar
1/2 cup warm milk
1 egg yolk
2 cups all-purpose flour (or whole wheat)
1-1/2 T. sugar
1/2 t. salt
1/2 cup butter, cold
2 T. butter, softened
2 cups sugar, divided
3-1/2 t. cinnamon, divided
4 T. melted butter (optional)
1/4 c. chopped nuts (optional)

Dissolve yeast in water with 1/2 t. sugar.  Combine with milk and egg yolk and set aside. 

In a large mixing bowl, combine flour, 1-1/2 T. sugar, and salt.  Cut in butter until pea-sized or smaller.  Add the yeast mixture and stir well.  Cover and refrigerate for at least 2 hours.  

Preheat oven to 400°.
Turn dough out onto a heavily floured surface - (read at least 1/2 cup, maybe more of flour).
Knead lightly, then roll out into a rectangle 10"x18". 
Spread with softened butter.  
Combine 1/2 c. sugar and 2 t. cinnamon and sprinkle over the dough.
Roll up like a jelly roll, sealing the edge.  The roll should be 18" long. Cut into 1 to 1-1/2 inch slices.
Combine remaining sugar and cinnamon.  Pour some onto your pastry board.  Take one slice of dough at a time, flatten into a large circle on top of the cinnamon sugar, and sprinkle with nuts if using.  
Place on a cookie sheet lined with parchment paper (seriously, don't skip this....you'll be sorry if you do). 
Brush with melted butter (if desired) and sprinkle with more cinnamon sugar.
Bake for 10-12 minutes (10 was perfect in my oven).
Cool on wire racks. 

Sorry if these seems confusing....I kind of had to wing a few things as I went so writing it down can be a little hard to explain.  Just ask me if you have any questions!


We tried a new recipe this week, making Elephant Ears for my friend Ellen, her daughters Elizabeth and Esther, and Everyone Else in their family.  

Anyone else never heard of Elephant Ears?

Basically, it's a flaky dough rolled up and sliced like a cinnamon roll and then flattened into circles and baked like cookies.  So it's a cinnamon roll cookie.  Sort of.  

Anyways.  Apparently these are treats found at county fairs....(I think it's been about 20 years since I went to a fair, so I cannot confirm that) but often times they're deep fried. I wanted to avoid that......so this recipe fit the bill.  I found it on my good old standby, Allrecipes.  

I did make some changes, because things were NOT working according to the original directions.  For example, if you don't knead enough flour into the dough before rolling it out, it will be too sticky to do anything.  Also, parchment paper is your friend for baking these.....and don't forget it!  
Be sure to plan ahead because the dough has to chill for a couple of hours.  

The result: my kids LOVED them and are begging me to make more.  I thought they were really good too, despite the mess I made in the kitchen.  It's fun to try new things.  I did double this recipe to make enough for both families.

Recipe: (yield - 14 to 18 rolls)

1 (.25 oz) package active dry yeast (or 2-1/4 t. bulk yeast)
1/4 cup warm water
1/2 t. sugar
1/2 cup warm milk
1 egg yolk
2 cups all-purpose flour (or whole wheat)
1-1/2 T. sugar
1/2 t. salt
1/2 cup butter, cold
2 T. butter, softened
2 cups sugar, divided
3-1/2 t. cinnamon, divided
4 T. melted butter (optional)
1/4 c. chopped nuts (optional)

Dissolve yeast in water with 1/2 t. sugar.  Combine with milk and egg yolk and set aside. 

In a large mixing bowl, combine flour, 1-1/2 T. sugar, and salt.  Cut in butter until pea-sized or smaller.  Add the yeast mixture and stir well.  Cover and refrigerate for at least 2 hours.  

Preheat oven to 400°.
Turn dough out onto a heavily floured surface - (read at least 1/2 cup, maybe more of flour).
Knead lightly, then roll out into a rectangle 10"x18". 
Spread with softened butter.  
Combine 1/2 c. sugar and 2 t. cinnamon and sprinkle over the dough.
Roll up like a jelly roll, sealing the edge.  The roll should be 18" long. Cut into 1 to 1-1/2 inch slices.
Combine remaining sugar and cinnamon.  Pour some onto your pastry board.  Take one slice of dough at a time, flatten into a large circle on top of the cinnamon sugar, and sprinkle with nuts if using.  
Place on a cookie sheet lined with parchment paper (seriously, don't skip this....you'll be sorry if you do). 
Brush with melted butter (if desired) and sprinkle with more cinnamon sugar.
Bake for 10-12 minutes (10 was perfect in my oven).
Cool on wire racks. 

Sorry if these seems confusing....I kind of had to wing a few things as I went so writing it down can be a little hard to explain.  Just ask me if you have any questions!

  
reade more... Résuméabuiyad