Pages

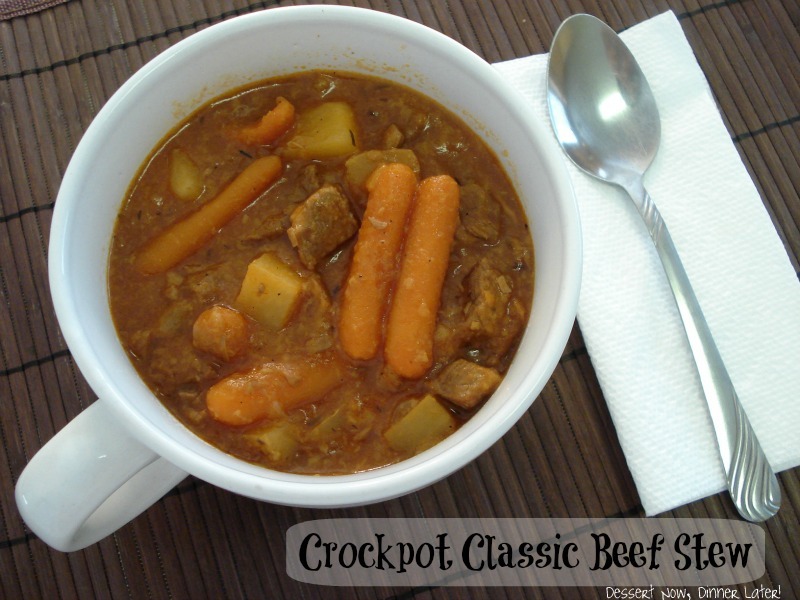
Crockpot Classic Beef Stew


I was craving some beef stew now that Fall is here, & it has been such a long time since I have actually made beef stew that I decided to look up some recipes.  I remembered I wanted to try boeuf bourguignon, but decided not to because I don't like mushrooms, even though this recipe is pretty darn near a boeuf bourguignon.  I was intrigued by the tomato paste & red wine, so I decided to give it a go, tweaking it just a tad.  This recipe was pretty robust!  The beef is supremely tender, the gravy was nice & thick, & the potatoes & carrots make it nice & hearty.  The tomato paste, wine & thyme make it really flavorful.  The more bites I took, the more I decided I really liked it!  If you don't have a great stew recipe, give this a try.  I think it's quite unique, even though it's a classic dish.
 
Crockpot Classic Beef Stew
Recipe altered from MyRecipes by: Amber (Dessert Now, Dinner Later!)
  • 2lbs top round beef/steak, cubed (or bottom round if it's cheaper, but for some reason the stew meat was ridiculously expensive & this nicer cut was on sale.)
  • 1/2 cup all-purpose flour
  • 1/4 cup olive oil (more if needed)
  • 2 medium onions, diced
  • 2-3 cloves garlic, minced
  • 1 (6oz) can tomato paste
  • 1 cup red cooking wine
  • 2-3 small/medium potatoes, large diced
  • 1/2 lb baby carrots
  • 2 cups beef broth
  • 1 Tbsp kosher salt
  • 1 tsp dried thyme leaves
  • Kosher salt & black pepper, as needed
  1. Coat cubed beef in flour.  Heat half of olive oil in a large skillet.  Brown half of the meat mixture, seasoning with kosher salt & black pepper as it is in the pan.  Transfer to a 6-qt slow cooker.  Repeat with remaining oil & beef, seasoning well.  (I had to split my stew up in two crockpots because I don't have a 6-qt slow cooker, just 4-qt & 2-qt.)
  2. Add onions to the same skillet, season with kosher salt & pepper, & cook over medium heat until tender, about 10 minutes.  Stir in the tomato paste & coat the onions; transfer to the crockpot.
  3. Pour wine into the skillet & scrape up any browned bits; add to the crockpot.  
  4. Stir in the potatoes, carrots, broth, salt, & thyme.  Cover & cook on low heat for 7 1/2 hours, or on high for 4 hours.  Serve with fresh rolls, or crusty bread to soak up the gravy.  


    I was craving some beef stew now that Fall is here, & it has been such a long time since I have actually made beef stew that I decided to look up some recipes.  I remembered I wanted to try boeuf bourguignon, but decided not to because I don't like mushrooms, even though this recipe is pretty darn near a boeuf bourguignon.  I was intrigued by the tomato paste & red wine, so I decided to give it a go, tweaking it just a tad.  This recipe was pretty robust!  The beef is supremely tender, the gravy was nice & thick, & the potatoes & carrots make it nice & hearty.  The tomato paste, wine & thyme make it really flavorful.  The more bites I took, the more I decided I really liked it!  If you don't have a great stew recipe, give this a try.  I think it's quite unique, even though it's a classic dish.
     
    Crockpot Classic Beef Stew
    Recipe altered from MyRecipes by: Amber (Dessert Now, Dinner Later!)
    • 2lbs top round beef/steak, cubed (or bottom round if it's cheaper, but for some reason the stew meat was ridiculously expensive & this nicer cut was on sale.)
    • 1/2 cup all-purpose flour
    • 1/4 cup olive oil (more if needed)
    • 2 medium onions, diced
    • 2-3 cloves garlic, minced
    • 1 (6oz) can tomato paste
    • 1 cup red cooking wine
    • 2-3 small/medium potatoes, large diced
    • 1/2 lb baby carrots
    • 2 cups beef broth
    • 1 Tbsp kosher salt
    • 1 tsp dried thyme leaves
    • Kosher salt & black pepper, as needed
    1. Coat cubed beef in flour.  Heat half of olive oil in a large skillet.  Brown half of the meat mixture, seasoning with kosher salt & black pepper as it is in the pan.  Transfer to a 6-qt slow cooker.  Repeat with remaining oil & beef, seasoning well.  (I had to split my stew up in two crockpots because I don't have a 6-qt slow cooker, just 4-qt & 2-qt.)
    2. Add onions to the same skillet, season with kosher salt & pepper, & cook over medium heat until tender, about 10 minutes.  Stir in the tomato paste & coat the onions; transfer to the crockpot.
    3. Pour wine into the skillet & scrape up any browned bits; add to the crockpot.  
    4. Stir in the potatoes, carrots, broth, salt, & thyme.  Cover & cook on low heat for 7 1/2 hours, or on high for 4 hours.  Serve with fresh rolls, or crusty bread to soak up the gravy.  


      reade more... Résuméabuiyad

      Gingersnap Pumpkin Cheesecake

      My mouth waters just looking at these pictures because this pumpkin cheesecake is absolutely amazing with the gingersnap crust & all.  I almost cried when it was gone.  Not only do I have this fantastic pumpkin cheesecake recipe to share with you, I also have the tricks to the perfectly smooth cheesecake top that has NO CRACKS!  Many people shy away from cheesecakes because they are worried about the presentation when it comes out of the oven split down the center.  So are you ready to hear the secrets to the perfect cheesecake?  Okay I will tell you.


      • First you want to wrap the outside of your springform pan with foil.  Then after you have baked the crust, you want to put your springform pan in the center of a large rimmed baking sheet.  


      • Make sure all of your ingredients are at room temperature.  Whip the cream cheese & sugar until smooth & light, scraping the bowl well before adding additional ingredients.  If you beat the mixture after you add the other ingredients, it can over-work the batter, leaving you with air bubbles that rise to the surface & look bad.


      • Pour your cheesecake filling on top of the cooked crust.  Do NOT scrape the bowl like crazy b/c some of the filling won't be completely mixed, but this is a bad time to scrape & re-mix the batter.  Remember, too much mixing will create air bubbles.  Place the rimmed baking sheet that's holding the cheesecake into the center of the oven.  


      • Ok, here's the special trick: Next, pour water into rimmed baking sheet around the cheesecake about 1 inch high.  Close the oven & bake.  The foil acts to keep the water out of the cheesecake & the water forms a bain-marie, or water bath, which helps the cheesecake cook slowly & evenly without browning the top. The water bath also prevents the edges from cooking faster than the center.  Low & slow is the way to go for cheesecakes.


      • Now, DO NOT OPEN THE OVEN, EVER!  That is a huge mistake people make.  I know it's tempting to look at that beautiful dessert you are baking, but just watch it from the oven window.  A 9-inch cheesecake will take about 45-55 minutes to bake.  It will no longer look shiny on the top or center, but will be dull/matte when cooked, even if it is slightly jiggly, but you should not be jiggling your pretty cheesecake!  No need to open the oven to jiggle, or stick a knife or toothpick in your work of art.  Be patient!  It will be done, or get done with the last step, I promise.


      • Lastly, turn the oven off & leave that cheesecake alone, INSIDE the oven, for at least 2-3 hours.  While working in a bakery, we would even leave our cheesecakes in the oven overnight until we came in the next morning.  By gradually cooling off in the closed oven, & with the help of carry-over cooking, the cheesecake will be fully-cooked & this process will continue to prevent cracks from forming.  This also keeps the top of the cheesecake from sinking in the center.  
      • Finally, remove the cheesecake from the oven (yay!) and let it refrigerate for 4+hours.  Chilling the cheesecake will also solidify any remaining jiggles.  
      Hooray!  Now that you know the secrets to the perfect cheesecake, here is the recipe to impress your families with this Thanksgiving or for any fall event you may happen to go to.  Some say it's so good, you can make this instead of pumpkin pie.

      Gingersnap Pumpkin Cheesecake
      Recipe adapted from Martha Stewart by: Amber (Dessert Now, Dinner Later!)

      For the Crust
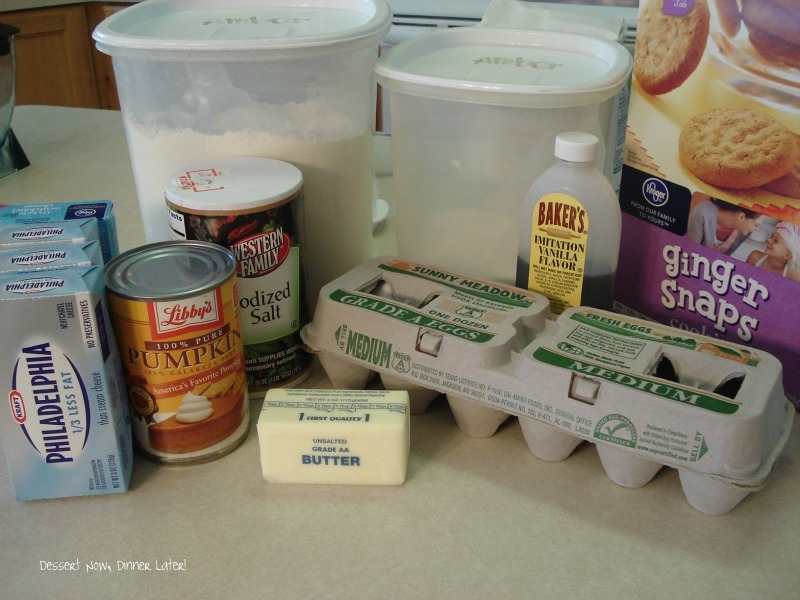
      • 1 1/2 cups gingersnap crumbs (about 30 store-bought cookies, crushed with a food processor)
      • 1/4 cup sugar
      • 4 Tbsp unsalted butter, melted
      For the Filling (all ingredients at ROOM TEMPERATURE)
      • 4 (8oz) packages cream cheese, room temperature (I totally used Neufchatel, but use Philadelphia, not the cheap store brand.)
      • 1 1/4 cups sugar
      • 3 Tbsp all-purpose flour
      • 1 cup canned pumpkin puree, room temperature (I am a Libby's only snob on this ingredient)
      • 2 Tbsp Homemade Pumpkin Pie Spice or McCormick/Store-Bought
      • 1 Tbsp vanilla extract
      • 1/2 tsp salt
      • 4 large eggs, cracked open into a bowl, room temperature
      1. Preheat oven to 350*F.  Assemble a 9-inch nonstick springform pan, with the raised side of the bottom part facing up.  Wrap outside of springform pan with foil.
      2. Make crust:  In a medium bowl, mix cracker crumbs, sugar, & butter until moistened; press firmly into bottom of pan.  Bake 10-12 minutes until golden around edges.
      3. Make the filling:  With a stand mixer, beat cream cheese & sugar on low speed until smooth, scraping bowl well occasionally.  Add flour until just incorporated.  Add pumpkin puree, pie spice, vanilla & salt; mix just until smooth.  Scrape bowl one last time.  Add eggs, one at a time, mixing until each is incorporated before adding the next.  (DO NOT SCRAPE BOWL ANYMORE, or overmix filling.)
      4. Place springform pan on a rimmed baking sheet.  Pour filling into springform pan over the prepared crust, & gently smooth top.  Transfer to oven; reduce heat to 300*F.  Bake for 45-55 minutes or until top is dull/matte.  DO NOT OPEN OVEN, EVER!  After it's baked, turn off oven; let cheesecake stay in closed oven 2-3 hours more (without opening.)
      5. Remove cheesecake from oven; cool completely.  Cover cheesecake pan with plastic wrap; refrigerate until firm, at least 4 hours.  Un-mold before serving.  Use a HOT knife to slice pieces, rinsing & drying the knife between each pass.  Top with a dollop of whipped cream & a dash of cinnamon.  Enjoy!  Yields: 12-16 slices.

      My mouth waters just looking at these pictures because this pumpkin cheesecake is absolutely amazing with the gingersnap crust & all.  I almost cried when it was gone.  Not only do I have this fantastic pumpkin cheesecake recipe to share with you, I also have the tricks to the perfectly smooth cheesecake top that has NO CRACKS!  Many people shy away from cheesecakes because they are worried about the presentation when it comes out of the oven split down the center.  So are you ready to hear the secrets to the perfect cheesecake?  Okay I will tell you.


      • First you want to wrap the outside of your springform pan with foil.  Then after you have baked the crust, you want to put your springform pan in the center of a large rimmed baking sheet.  


      • Make sure all of your ingredients are at room temperature.  Whip the cream cheese & sugar until smooth & light, scraping the bowl well before adding additional ingredients.  If you beat the mixture after you add the other ingredients, it can over-work the batter, leaving you with air bubbles that rise to the surface & look bad.


      • Pour your cheesecake filling on top of the cooked crust.  Do NOT scrape the bowl like crazy b/c some of the filling won't be completely mixed, but this is a bad time to scrape & re-mix the batter.  Remember, too much mixing will create air bubbles.  Place the rimmed baking sheet that's holding the cheesecake into the center of the oven.  


      • Ok, here's the special trick: Next, pour water into rimmed baking sheet around the cheesecake about 1 inch high.  Close the oven & bake.  The foil acts to keep the water out of the cheesecake & the water forms a bain-marie, or water bath, which helps the cheesecake cook slowly & evenly without browning the top. The water bath also prevents the edges from cooking faster than the center.  Low & slow is the way to go for cheesecakes.


      • Now, DO NOT OPEN THE OVEN, EVER!  That is a huge mistake people make.  I know it's tempting to look at that beautiful dessert you are baking, but just watch it from the oven window.  A 9-inch cheesecake will take about 45-55 minutes to bake.  It will no longer look shiny on the top or center, but will be dull/matte when cooked, even if it is slightly jiggly, but you should not be jiggling your pretty cheesecake!  No need to open the oven to jiggle, or stick a knife or toothpick in your work of art.  Be patient!  It will be done, or get done with the last step, I promise.


      • Lastly, turn the oven off & leave that cheesecake alone, INSIDE the oven, for at least 2-3 hours.  While working in a bakery, we would even leave our cheesecakes in the oven overnight until we came in the next morning.  By gradually cooling off in the closed oven, & with the help of carry-over cooking, the cheesecake will be fully-cooked & this process will continue to prevent cracks from forming.  This also keeps the top of the cheesecake from sinking in the center.  
      • Finally, remove the cheesecake from the oven (yay!) and let it refrigerate for 4+hours.  Chilling the cheesecake will also solidify any remaining jiggles.  
      Hooray!  Now that you know the secrets to the perfect cheesecake, here is the recipe to impress your families with this Thanksgiving or for any fall event you may happen to go to.  Some say it's so good, you can make this instead of pumpkin pie.

      Gingersnap Pumpkin Cheesecake
      Recipe adapted from Martha Stewart by: Amber (Dessert Now, Dinner Later!)

      For the Crust
      • 1 1/2 cups gingersnap crumbs (about 30 store-bought cookies, crushed with a food processor)
      • 1/4 cup sugar
      • 4 Tbsp unsalted butter, melted
      For the Filling (all ingredients at ROOM TEMPERATURE)
      • 4 (8oz) packages cream cheese, room temperature (I totally used Neufchatel, but use Philadelphia, not the cheap store brand.)
      • 1 1/4 cups sugar
      • 3 Tbsp all-purpose flour
      • 1 cup canned pumpkin puree, room temperature (I am a Libby's only snob on this ingredient)
      • 2 Tbsp Homemade Pumpkin Pie Spice or McCormick/Store-Bought
      • 1 Tbsp vanilla extract
      • 1/2 tsp salt
      • 4 large eggs, cracked open into a bowl, room temperature
      1. Preheat oven to 350*F.  Assemble a 9-inch nonstick springform pan, with the raised side of the bottom part facing up.  Wrap outside of springform pan with foil.
      2. Make crust:  In a medium bowl, mix cracker crumbs, sugar, & butter until moistened; press firmly into bottom of pan.  Bake 10-12 minutes until golden around edges.
      3. Make the filling:  With a stand mixer, beat cream cheese & sugar on low speed until smooth, scraping bowl well occasionally.  Add flour until just incorporated.  Add pumpkin puree, pie spice, vanilla & salt; mix just until smooth.  Scrape bowl one last time.  Add eggs, one at a time, mixing until each is incorporated before adding the next.  (DO NOT SCRAPE BOWL ANYMORE, or overmix filling.)
      4. Place springform pan on a rimmed baking sheet.  Pour filling into springform pan over the prepared crust, & gently smooth top.  Transfer to oven; reduce heat to 300*F.  Bake for 45-55 minutes or until top is dull/matte.  DO NOT OPEN OVEN, EVER!  After it's baked, turn off oven; let cheesecake stay in closed oven 2-3 hours more (without opening.)
      5. Remove cheesecake from oven; cool completely.  Cover cheesecake pan with plastic wrap; refrigerate until firm, at least 4 hours.  Un-mold before serving.  Use a HOT knife to slice pieces, rinsing & drying the knife between each pass.  Top with a dollop of whipped cream & a dash of cinnamon.  Enjoy!  Yields: 12-16 slices.

      reade more... Résuméabuiyad

      4-Bite Apple Pies - aka Apple Pie Cookies {Crazy Cooking Challenge}


      It's Crazy Cooking Challenge time! This month's challenge assignment? - APPLE PIE. And what perfect timing for an apple challenge. ...
      Continue Reading >>


      It's Crazy Cooking Challenge time! This month's challenge assignment? - APPLE PIE. And what perfect timing for an apple challenge. ...
      Continue Reading >>
      reade more... Résuméabuiyad

      Super Easy Tootsie Pop Ghosts


      To be honest ... I'm not a Halloween fan. I think it may have something to do with the fact that I broke my nose on Halloween when I was five years old. Falling down the stairs wearing my costume we'd made in Kindergarten class. 'Cause I couldn't see the steps over the top of the costume. 'Cause the costume was made out a big cardboard box.

      Yep, missed the top step. ...
      Continue Reading >>


      To be honest ... I'm not a Halloween fan. I think it may have something to do with the fact that I broke my nose on Halloween when I was five years old. Falling down the stairs wearing my costume we'd made in Kindergarten class. 'Cause I couldn't see the steps over the top of the costume. 'Cause the costume was made out a big cardboard box.

      Yep, missed the top step. ...
      Continue Reading >>
      reade more... Résuméabuiyad

      Homemade Pumpkin Pie Spice


      Sometimes I wonder why I have spent so much money buying the tiny little containers of pumpkin pie spice when I usually have all the ingredients on hand to make my own.  Save yourselves some money, & possibly even a trip to the store if you have everything at home, & make your own pumpkin pie spice.  It's as easy as stirring or blending a few ingredient together.  The small McCormick jar from the store has about 3 TBSP in it & I almost always use 2 TBSP in the recipes I use so I am spending like $5-$6(+) or so each time I make a recipe.  Well, not anymore!  I am so glad I am over that stupidity & on to making my own blend.  The only difference between McCormick Pumpkin Pie Spice & mine, is that I add cloves.  If you don't like cloves, then leave it out, but it really adds more flavor that you love from fall spices.

      As usual, a simple post like this is usually a pre-cursor to another fantastic post.  So stay tuned for a delicious dessert you might want to trade out your pumpkin pie with this Thanksgiving.  Coming up on Sunday's post.  You won't want to miss it!
       
      Homemade Pumpkin Pie Spice
      Recipe adapted from My Baking Addiction by: Amber (Dessert Now, Dinner Later!)
      • 3 Tbsp ground cinnamon
      • 1 Tbsp ground ginger
      • 2 tsp ground nutmeg
      • 1 tsp ground cloves
      • 1 tsp ground allspice
      1. Combine ingredients & whisk together OR pulse in a small food processor until combined. (Food processor wakes up those spices if they have been sitting in the cupboard for a while.)  Store in a small jar or airtight container.
      Makes about 5+ TBSP

      Sometimes I wonder why I have spent so much money buying the tiny little containers of pumpkin pie spice when I usually have all the ingredients on hand to make my own.  Save yourselves some money, & possibly even a trip to the store if you have everything at home, & make your own pumpkin pie spice.  It's as easy as stirring or blending a few ingredient together.  The small McCormick jar from the store has about 3 TBSP in it & I almost always use 2 TBSP in the recipes I use so I am spending like $5-$6(+) or so each time I make a recipe.  Well, not anymore!  I am so glad I am over that stupidity & on to making my own blend.  The only difference between McCormick Pumpkin Pie Spice & mine, is that I add cloves.  If you don't like cloves, then leave it out, but it really adds more flavor that you love from fall spices.

      As usual, a simple post like this is usually a pre-cursor to another fantastic post.  So stay tuned for a delicious dessert you might want to trade out your pumpkin pie with this Thanksgiving.  Coming up on Sunday's post.  You won't want to miss it!
       
      Homemade Pumpkin Pie Spice
      Recipe adapted from My Baking Addiction by: Amber (Dessert Now, Dinner Later!)
      • 3 Tbsp ground cinnamon
      • 1 Tbsp ground ginger
      • 2 tsp ground nutmeg
      • 1 tsp ground cloves
      • 1 tsp ground allspice
      1. Combine ingredients & whisk together OR pulse in a small food processor until combined. (Food processor wakes up those spices if they have been sitting in the cupboard for a while.)  Store in a small jar or airtight container.
      Makes about 5+ TBSP
      reade more... Résuméabuiyad

      Plum Jam


      Don't just skip over this post because it's homemade jam, & canning is hard or whatever.  Seriously, until you have had homemade plum jam, you have not lived!  Growing up we had a plum tree in our yard & my mom would make plum jam every year until we cut the tree down.  I loved it then, & I forgot how good it was until now.  One of my husband's classmates brought us some plums from his tree & so I made some jam.  My kids are already scarfing it down.  They can't get enough PB&J sandwiches or toast with jam.  

      Plums have this sweet yet tangy flavor to them that really pops on your taste buds.  So even though I saw this huge bag of plums that my husband brought home, & wondered, "What in the heck am I going to do with all these before they go bad?"  I am so glad I decided to make them into jam.  Now all I need is fresh bread out of the oven to spread my jam on!  Yum!


      Plum Jam
      Recipe slightly adapted from Ball by: Amber (Dessert Now, Dinner Later!)

      Makes 3 1/2 - 4 half pint jars
      • 2 2/3 - 3 cups plums, peeled, pitted, & pureed
      • 2 Tbsp lime juice
      • 2 cups sugar
      • 2 (0.4oz) packets Ball Classic Pectin
      1. PREPARE & measure ingredients for recipe. Prepare water-bath canner, jars & lids according to manufacturer's instructions.
      2. COMBINE prepared fruit with lime juice in a large saucepan.  (I actually pureed my fruit with the lime juice.)  Gradually stir in two packet of fruit pectin.  Bring mixture to a full rolling boil that cannot be stirred down, over high heat, stirring constantly.
      3. ADD entire measure of sugar, stirring to dissolve.  Return mixture to a full rolling boil.  Boil hard for 1 minute, stirring constantly.  Remove from heat.  Skim foam if necessary.
      4. LADLE hot jam into hot jars, one at a time, leaving 1/4 inch headspace.  Wipe rims.  Center lids on jars.  Apply bands & adjust to fingertip tight.
      5. PLACE filled jars in canner ensuring jars are covered by 1 to 2 inches of water.  Place lid on canner.  Bring water to gentle, steady boil.
      6. PROCESS jars for 10 minutes, adjusting for altitude*.  Turn off heat, remove lid & let jars stand for 5 minutes.
      7. REMOVE jars & cool.  Check lids for seal after 24 hours.  Lid should not flex up & down when center is pressed.  Clean & store jars according to manufacturer's instructions.
      *INCREASE processing time:
      • 5 minutes for 1,001 to 3,000 ft
      • 10 minutes for 3,001 to 6,000 ft
      • 15 minutes for 6,001 to 8,000 ft
      • 20 minutes for 8,001 to 10,000 ft
      **To enjoy now:
      1. LADLE hot jam into hot jars.  Cool to room temperature, about 30 minutes.  
      2. REFRIGERATE jam or serve immediately.  Refrigerate for up to 3 weeks.

      Don't just skip over this post because it's homemade jam, & canning is hard or whatever.  Seriously, until you have had homemade plum jam, you have not lived!  Growing up we had a plum tree in our yard & my mom would make plum jam every year until we cut the tree down.  I loved it then, & I forgot how good it was until now.  One of my husband's classmates brought us some plums from his tree & so I made some jam.  My kids are already scarfing it down.  They can't get enough PB&J sandwiches or toast with jam.  

      Plums have this sweet yet tangy flavor to them that really pops on your taste buds.  So even though I saw this huge bag of plums that my husband brought home, & wondered, "What in the heck am I going to do with all these before they go bad?"  I am so glad I decided to make them into jam.  Now all I need is fresh bread out of the oven to spread my jam on!  Yum!


      Plum Jam
      Recipe slightly adapted from Ball by: Amber (Dessert Now, Dinner Later!)

      Makes 3 1/2 - 4 half pint jars
      • 2 2/3 - 3 cups plums, peeled, pitted, & pureed
      • 2 Tbsp lime juice
      • 2 cups sugar
      • 2 (0.4oz) packets Ball Classic Pectin
      1. PREPARE & measure ingredients for recipe. Prepare water-bath canner, jars & lids according to manufacturer's instructions.
      2. COMBINE prepared fruit with lime juice in a large saucepan.  (I actually pureed my fruit with the lime juice.)  Gradually stir in two packet of fruit pectin.  Bring mixture to a full rolling boil that cannot be stirred down, over high heat, stirring constantly.
      3. ADD entire measure of sugar, stirring to dissolve.  Return mixture to a full rolling boil.  Boil hard for 1 minute, stirring constantly.  Remove from heat.  Skim foam if necessary.
      4. LADLE hot jam into hot jars, one at a time, leaving 1/4 inch headspace.  Wipe rims.  Center lids on jars.  Apply bands & adjust to fingertip tight.
      5. PLACE filled jars in canner ensuring jars are covered by 1 to 2 inches of water.  Place lid on canner.  Bring water to gentle, steady boil.
      6. PROCESS jars for 10 minutes, adjusting for altitude*.  Turn off heat, remove lid & let jars stand for 5 minutes.
      7. REMOVE jars & cool.  Check lids for seal after 24 hours.  Lid should not flex up & down when center is pressed.  Clean & store jars according to manufacturer's instructions.
      *INCREASE processing time:
      • 5 minutes for 1,001 to 3,000 ft
      • 10 minutes for 3,001 to 6,000 ft
      • 15 minutes for 6,001 to 8,000 ft
      • 20 minutes for 8,001 to 10,000 ft
      **To enjoy now:
      1. LADLE hot jam into hot jars.  Cool to room temperature, about 30 minutes.  
      2. REFRIGERATE jam or serve immediately.  Refrigerate for up to 3 weeks.
      reade more... Résuméabuiyad
      Double Chocolate Beet Cake


      First there was Prune Cake.  That was a huge hit, and no-one was the wiser for it having a undeservedly unpopular fruit in it.

      Then there was the Black Bean Brownies - even my discerning husband had no clue what those were hiding.

      But these took me into a whole new territory.  I'm not sure if I've ever even tasted beets before, but I've been convinced for as long as I can remember that "I don't like beets", so I've never bought them, cooked them, sampled them, or anything.

      I can't really say why a recipe for chocolate beet cake jumped out at me....but I just couldn't resist the urge to give it a try. Living on the wild side, watch out. 

      It was kind of funny - when I was checking out at Wal-Mart, the cashier looked at the beets and said, "So how do you cook these, anyways?"  My reply: "I have no idea. (I hadn't read the recipe fully yet).  I guess I'll figure it out!"

      My family saw me cooking the beets, so there was no surprise element this time, and we were all amazed at the vibrant color of the cooking water....it looked just like deep red grape juice or wine.  Almost made you wanna grab a glass and down a cup full.....but it most certainly does not taste like grape juice.

      I actually had only bought 3 beets, so my puree amount was a little short - I made up the difference with applesauce.  The cake batter was a dark purplish color - but the finished cake just looked the normal chocolaty brown.

      The taste - Amazing.
      Now, Grant said it wasn't his favorite chocolate cake, and I guess I agree....but it is wonderfully moist and rich, has a nice texture and lots of chocolate flavor and you can't taste the beets at all.  The children kept begging for more pieces - they were huge fans.  I LOVE that we're getting a nutritious vegetable that I don't think any of us would eat otherwise.....I love the gorgeous color of the beet drizzle.....I love chocolate cake.....and I will totally make this again.

      Note: The ganache isn't necessary  - you could just dust the cake with powdered sugar or use the beet glaze - but I couldn't pass up a chance to make ganache.  It is so good.   

      Double Chocolate Beet Cake (adapted from Straight from the Farm)

      1/2 cup (1 stick) butter, softened
      1-1/2 cups packed dark brown sugar
      3 eggs, room temperature
      3 oz. unsweetened chocolate
      1/2 cup expeller pressed coconut oil (or 1/2 cup butter)
      2 cups pureed beets (from 5 medium beets)**
      1 tsp. vanilla extract
      2 cups all-purpose flour
      2 tsp. baking soda
      1/4 tsp. salt
      1/2 tsp. cinnamon
      1/4 tsp. ground nutmeg

      Glaze:
      2/3 cup heavy cream
      1 cup semi sweet chocolate chips

      Optional Beet Glaze
      1 tsp. beet puree
      3/4 cup powdered sugar
      1 tsp. milk
      1/4 tsp. vanilla

      **To make beet puree, trim stems and roots off beets and quarter them. Place in a heavy saucepan and cover with water.  Bring to a boil and reduce to a simmer for 50 minutes or until the beets are tender.  Drain off the remaining liquid and rinse beets in cold water, as they'll be too hot to handle otherwise.  Slide skins off and place beets in blender. Process until a smooth puree forms.  Let cool slightly before using in cake.  You can make the puree ahead of time and store in the fridge for several days if necessary.

      Preheat oven to 325°.
      In a mixing bowl, cream 1/2 cup butter and brown sugar. Add eggs one at a time, mixing well after each addition.  Melt chocolate with coconut oil on the stove top or in microwave until completely smooth.  Cool slightly. Blend chocolate mixture, beets, and vanilla into the creamed mixture.  The batter will appear separated or curdled, this is normal!!

      In a separate bowl, combine flour, baking soda, salt, cinnamon, and nutmeg.  Add to creamed mixture and mix well. Pour into a greased and floured bundt pan and bake for 50-55 minutes, or until a toothpick inserted near the center comes out clean.  Cool in pan 15 minutes before removing to a wire rack.

      To make glaze, place chocolate chips in a bowl. Heat cream to a simmer (but not a boil) and then pour over chocolate.  Let sit for a few minutes, then stir to melt completely.  Allow to cool to room temperature (stick in the fridge to speed it up if necessary) before drizzling/pouring over the cake.  If topping with beet glaze, I recommend refrigerating the cake to firm up the ganache first.

      To make beet glaze, combine beet puree with powdered sugar, milk, and vanilla.  Stir well.  Add a few drops more of milk to desired consistency.  You don't want it thin and runny, but it needs to be drizzleable.
      Spoon into the corner of a sandwich bag and snip off a tiny corner.  Drizzle glaze over top of cake.


      Linked to Trick or Treat Tuesday and Crazy Sweet Tuesday and Finding Joy in my Kitchen

      First there was Prune Cake.  That was a huge hit, and no-one was the wiser for it having a undeservedly unpopular fruit in it.

      Then there was the Black Bean Brownies - even my discerning husband had no clue what those were hiding.

      But these took me into a whole new territory.  I'm not sure if I've ever even tasted beets before, but I've been convinced for as long as I can remember that "I don't like beets", so I've never bought them, cooked them, sampled them, or anything.

      I can't really say why a recipe for chocolate beet cake jumped out at me....but I just couldn't resist the urge to give it a try. Living on the wild side, watch out. 

      It was kind of funny - when I was checking out at Wal-Mart, the cashier looked at the beets and said, "So how do you cook these, anyways?"  My reply: "I have no idea. (I hadn't read the recipe fully yet).  I guess I'll figure it out!"

      My family saw me cooking the beets, so there was no surprise element this time, and we were all amazed at the vibrant color of the cooking water....it looked just like deep red grape juice or wine.  Almost made you wanna grab a glass and down a cup full.....but it most certainly does not taste like grape juice.

      I actually had only bought 3 beets, so my puree amount was a little short - I made up the difference with applesauce.  The cake batter was a dark purplish color - but the finished cake just looked the normal chocolaty brown.

      The taste - Amazing.
      Now, Grant said it wasn't his favorite chocolate cake, and I guess I agree....but it is wonderfully moist and rich, has a nice texture and lots of chocolate flavor and you can't taste the beets at all.  The children kept begging for more pieces - they were huge fans.  I LOVE that we're getting a nutritious vegetable that I don't think any of us would eat otherwise.....I love the gorgeous color of the beet drizzle.....I love chocolate cake.....and I will totally make this again.

      Note: The ganache isn't necessary  - you could just dust the cake with powdered sugar or use the beet glaze - but I couldn't pass up a chance to make ganache.  It is so good.   

      Double Chocolate Beet Cake (adapted from Straight from the Farm)

      1/2 cup (1 stick) butter, softened
      1-1/2 cups packed dark brown sugar
      3 eggs, room temperature
      3 oz. unsweetened chocolate
      1/2 cup expeller pressed coconut oil (or 1/2 cup butter)
      2 cups pureed beets (from 5 medium beets)**
      1 tsp. vanilla extract
      2 cups all-purpose flour
      2 tsp. baking soda
      1/4 tsp. salt
      1/2 tsp. cinnamon
      1/4 tsp. ground nutmeg

      Glaze:
      2/3 cup heavy cream
      1 cup semi sweet chocolate chips

      Optional Beet Glaze
      1 tsp. beet puree
      3/4 cup powdered sugar
      1 tsp. milk
      1/4 tsp. vanilla

      **To make beet puree, trim stems and roots off beets and quarter them. Place in a heavy saucepan and cover with water.  Bring to a boil and reduce to a simmer for 50 minutes or until the beets are tender.  Drain off the remaining liquid and rinse beets in cold water, as they'll be too hot to handle otherwise.  Slide skins off and place beets in blender. Process until a smooth puree forms.  Let cool slightly before using in cake.  You can make the puree ahead of time and store in the fridge for several days if necessary.

      Preheat oven to 325°.
      In a mixing bowl, cream 1/2 cup butter and brown sugar. Add eggs one at a time, mixing well after each addition.  Melt chocolate with coconut oil on the stove top or in microwave until completely smooth.  Cool slightly. Blend chocolate mixture, beets, and vanilla into the creamed mixture.  The batter will appear separated or curdled, this is normal!!

      In a separate bowl, combine flour, baking soda, salt, cinnamon, and nutmeg.  Add to creamed mixture and mix well. Pour into a greased and floured bundt pan and bake for 50-55 minutes, or until a toothpick inserted near the center comes out clean.  Cool in pan 15 minutes before removing to a wire rack.

      To make glaze, place chocolate chips in a bowl. Heat cream to a simmer (but not a boil) and then pour over chocolate.  Let sit for a few minutes, then stir to melt completely.  Allow to cool to room temperature (stick in the fridge to speed it up if necessary) before drizzling/pouring over the cake.  If topping with beet glaze, I recommend refrigerating the cake to firm up the ganache first.

      To make beet glaze, combine beet puree with powdered sugar, milk, and vanilla.  Stir well.  Add a few drops more of milk to desired consistency.  You don't want it thin and runny, but it needs to be drizzleable.
      Spoon into the corner of a sandwich bag and snip off a tiny corner.  Drizzle glaze over top of cake.


      Linked to Trick or Treat Tuesday and Crazy Sweet Tuesday and Finding Joy in my Kitchen
      reade more... Résuméabuiyad