Pages

Spicy Pulled Pork


We don't eat pork very often.....as you might have noticed from browsing my recipe index.....but while my in-laws were here, I decided to give this recipe from the Pioneer Woman's Cookbook a try. It just sounded so good....not to mention easy.  
She recommends serving it with warm flour tortillas, lime wedges, guacamole, pico de gallo, and sour cream. Leftovers can be used for soups, enchiladas, tostadas, sandwiches, whatever you want. 
So I did what she said.  Served it with tortillas, lime wedges (give one a squeeze over your serving - it really was delicious!), slices of avocado, and sour cream.  We all thought it was pretty fantastic. 
Leftovers were eaten pretty much the same way, or on whole wheat buns.  Either way, it makes a tasty meal that pleased just about everybody. 

I did alter her cooking method, by using the crock pot instead of the oven (and eliminating the extra cooking liquid) so we could be out and about all day and not have to worry about it. 

Recipe:

4 lbs (up to 7 lbs) pork shoulder
1 t. dried oregano
1 t. ground cumin
1 t. chili powder
1 T (to 2 T) salt
pepper to taste
3-4 cloves garlic
2 T. white vinegar
1-2 T. olive oil
1/4 c. brown sugar
1 onion (cut into quarters)

For Serving: tortillas, sour cream, avocados, salsa, lime wedges, etc.

Rinse pork and pat dry. Place in crock pot.
Combine all the remaining ingredients in a blender or food processor and blend into a nice paste.  Pour over the pork and rub all over, getting into every nook and cranny.
Cook on low for 8-10 hours, until pork shreds easily with a fork.  Remove from crock pot and cut off any fat (if desired) and shred meat well.  Pour some of the juices over the meat to keep it moist.  Serve as desired!

We don't eat pork very often.....as you might have noticed from browsing my recipe index.....but while my in-laws were here, I decided to give this recipe from the Pioneer Woman's Cookbook a try. It just sounded so good....not to mention easy.  
She recommends serving it with warm flour tortillas, lime wedges, guacamole, pico de gallo, and sour cream. Leftovers can be used for soups, enchiladas, tostadas, sandwiches, whatever you want. 
So I did what she said.  Served it with tortillas, lime wedges (give one a squeeze over your serving - it really was delicious!), slices of avocado, and sour cream.  We all thought it was pretty fantastic. 
Leftovers were eaten pretty much the same way, or on whole wheat buns.  Either way, it makes a tasty meal that pleased just about everybody. 

I did alter her cooking method, by using the crock pot instead of the oven (and eliminating the extra cooking liquid) so we could be out and about all day and not have to worry about it. 

Recipe:

4 lbs (up to 7 lbs) pork shoulder
1 t. dried oregano
1 t. ground cumin
1 t. chili powder
1 T (to 2 T) salt
pepper to taste
3-4 cloves garlic
2 T. white vinegar
1-2 T. olive oil
1/4 c. brown sugar
1 onion (cut into quarters)

For Serving: tortillas, sour cream, avocados, salsa, lime wedges, etc.

Rinse pork and pat dry. Place in crock pot.
Combine all the remaining ingredients in a blender or food processor and blend into a nice paste.  Pour over the pork and rub all over, getting into every nook and cranny.
Cook on low for 8-10 hours, until pork shreds easily with a fork.  Remove from crock pot and cut off any fat (if desired) and shred meat well.  Pour some of the juices over the meat to keep it moist.  Serve as desired!
reade more... Résuméabuiyad

Antipasto Platter with Grape Tomato & Caper Salad {Party Series 3}

An antipasto platter is one of my go-to entertaining items.  Especially when guys are involved in the party.  For some reason, guys seem to really love an antipasto platter.  Can't say that I blame them ... I really love an antipasto platter, too.  And I especially love an antipasto platter when it has a beautiful, flavorful Grape Tomato & Caper Salad in the middle of it.


The truly beautiful thing about an antipasto platter (aside from all the wonderful colors on the plate!) is its versatility.  Include some cured meats, Italian cheeses, olives, artichoke hearts ... whatever combination you want!  Garnish the platter with fresh herbs, place it in the center of your serving table, and you have colorful and tasty, easily-assembled party fare.

Here are my usual suspects:  Hard salami, Genoa salami, turkey pepperoni, or cappicola for meats.  I typically include two meats.  For cheeses - fresh mozzarella, smoked mozzarella, and provolone are great choices.  Then a selection of olives, marinated artichokes, marinated mushrooms, peppadew sweet-hot peppers, roasted red peppers, or roasted cipollini onions.

This is portable, too.  Going to the park for a picnic?  Out to watch an outdoor concert?  No problem!  Put your antipasto items in zip-top bags, toss them in a cooler, and assemble them on a plate (it can even be a paper one!) to serve it up!

For my arrangement, I like to put a small bowl in the center of my platter and fill it with Grape Tomato & Caper Salad.  I love having the bright red of the tomatoes right in the middle.  I then place my other antipasto items around the tomato salad, working in sections and doing my best to make a nice arrangement of colors. Serve it with baguette slices ... yummy.  You know though, if you simply make sure to include tasty good-quality items, you really can't go wrong with your arrangement!


So would you like to know how to make the Grape Tomato & Capers Salad?  I thought you might.  This is soooooo good!  We often enjoy this as a side dish salad ... no antipasto platter involved.

Start by slicing some ripe, juicy grape tomatoes in half.


Put in lots of chopped fresh basil.


Then mix up a dressing of olive oil, balsamic vinegar, and capers.


Pour the dressing over the tomatoes, and top it all off with freshly grated Parmesan cheese.  Dish it up just as it is, or show it off in the center of a gorgeous antipasto platter and entertain away!  Either way, I think you'll enjoy it.

We invite you to follow The Kitchen is My Playground with Google+, PinterestFacebookTwitterGoogle Friend Connectbloglovin', or Feedburner.  We'd love to have you back soon!  


Grape Tomato & Caper Salad
Source:  My Mom, as adapted from Cooking Light magazine


Ingredients
2 pints grape tomatoes, halved
6 to 8 fresh basil leaves, torn
3 T. drained small capers
2 T. olive oil
3 T. balsamic vinegar
1/2 tsp. salt
1/2 tsp. pepper
3 T. grated fresh Parmesan cheese

Directions
1.  Place halved tomatoes and basil in a bowl.  

2.  Combine capers, olive oil, balsamic vinegar, salt, and pepper.  Pour over tomatoes, tossing to coat.  Top with grated Parmesan cheese.  

3.  Let stand at least 15 minutes before serving. 

Enjoy!


The {Party Series} Posts:
My Mom Throws a Great Party! {Party Series 1}
Grand Marnier & Spiced Rum Fruit Dip {Party Series 2}
Antipasto Platter with Grape Tomato & Caper Salad {Party Series 3}
Marinated Cheese {Party Series 4}
Mini Mocha-Toffee Crunch Cheesecakes {Party Series 5}
Raspberry Chocolate Truffles & Drunken Cherries {Party Series 6}
Raspberry-Almond, Caramel-Walnut, & Lemon-Coconut Bars {Party Series 7}
Toasted Pesto Rounds {Party Series 8}


This post is linked with This Week's Cravings hosted by Mom's Crazy Cooking, These Chicks Cooked hosted by This Chick Cooks, It's a Keeper Thursday hosted by It's a Keeper!, This Week's Cravings hosted by Delightful Country Cookin' and Sharing Sundays hosted by Everyday Sisters, Strut Your Stuff SaturdayCreativity Linky PartySaturday Show & TellMake the Scene MondayMonday FundayMarvelous Mondays.
An antipasto platter is one of my go-to entertaining items.  Especially when guys are involved in the party.  For some reason, guys seem to really love an antipasto platter.  Can't say that I blame them ... I really love an antipasto platter, too.  And I especially love an antipasto platter when it has a beautiful, flavorful Grape Tomato & Caper Salad in the middle of it.


The truly beautiful thing about an antipasto platter (aside from all the wonderful colors on the plate!) is its versatility.  Include some cured meats, Italian cheeses, olives, artichoke hearts ... whatever combination you want!  Garnish the platter with fresh herbs, place it in the center of your serving table, and you have colorful and tasty, easily-assembled party fare.

Here are my usual suspects:  Hard salami, Genoa salami, turkey pepperoni, or cappicola for meats.  I typically include two meats.  For cheeses - fresh mozzarella, smoked mozzarella, and provolone are great choices.  Then a selection of olives, marinated artichokes, marinated mushrooms, peppadew sweet-hot peppers, roasted red peppers, or roasted cipollini onions.

This is portable, too.  Going to the park for a picnic?  Out to watch an outdoor concert?  No problem!  Put your antipasto items in zip-top bags, toss them in a cooler, and assemble them on a plate (it can even be a paper one!) to serve it up!

For my arrangement, I like to put a small bowl in the center of my platter and fill it with Grape Tomato & Caper Salad.  I love having the bright red of the tomatoes right in the middle.  I then place my other antipasto items around the tomato salad, working in sections and doing my best to make a nice arrangement of colors. Serve it with baguette slices ... yummy.  You know though, if you simply make sure to include tasty good-quality items, you really can't go wrong with your arrangement!


So would you like to know how to make the Grape Tomato & Capers Salad?  I thought you might.  This is soooooo good!  We often enjoy this as a side dish salad ... no antipasto platter involved.

Start by slicing some ripe, juicy grape tomatoes in half.


Put in lots of chopped fresh basil.


Then mix up a dressing of olive oil, balsamic vinegar, and capers.


Pour the dressing over the tomatoes, and top it all off with freshly grated Parmesan cheese.  Dish it up just as it is, or show it off in the center of a gorgeous antipasto platter and entertain away!  Either way, I think you'll enjoy it.

We invite you to follow The Kitchen is My Playground with Google+, PinterestFacebookTwitterGoogle Friend Connectbloglovin', or Feedburner.  We'd love to have you back soon!  


Grape Tomato & Caper Salad
Source:  My Mom, as adapted from Cooking Light magazine


Ingredients
2 pints grape tomatoes, halved
6 to 8 fresh basil leaves, torn
3 T. drained small capers
2 T. olive oil
3 T. balsamic vinegar
1/2 tsp. salt
1/2 tsp. pepper
3 T. grated fresh Parmesan cheese

Directions
1.  Place halved tomatoes and basil in a bowl.  

2.  Combine capers, olive oil, balsamic vinegar, salt, and pepper.  Pour over tomatoes, tossing to coat.  Top with grated Parmesan cheese.  

3.  Let stand at least 15 minutes before serving. 

Enjoy!


The {Party Series} Posts:
My Mom Throws a Great Party! {Party Series 1}
Grand Marnier & Spiced Rum Fruit Dip {Party Series 2}
Antipasto Platter with Grape Tomato & Caper Salad {Party Series 3}
Marinated Cheese {Party Series 4}
Mini Mocha-Toffee Crunch Cheesecakes {Party Series 5}
Raspberry Chocolate Truffles & Drunken Cherries {Party Series 6}
Raspberry-Almond, Caramel-Walnut, & Lemon-Coconut Bars {Party Series 7}
Toasted Pesto Rounds {Party Series 8}


This post is linked with This Week's Cravings hosted by Mom's Crazy Cooking, These Chicks Cooked hosted by This Chick Cooks, It's a Keeper Thursday hosted by It's a Keeper!, This Week's Cravings hosted by Delightful Country Cookin' and Sharing Sundays hosted by Everyday Sisters, Strut Your Stuff SaturdayCreativity Linky PartySaturday Show & TellMake the Scene MondayMonday FundayMarvelous Mondays.
reade more... Résuméabuiyad

Rice Krispies Dipper Treats


Last Wednesday night was Annika's (3) turn to take snack to her Rainbows class at church.  She had originally just told me she wanted to take fruit snacks, but I talked her into helping me make something more fun than that.  I had seen this recipe in both my Taste of Home and Parents magazines and thought it would be a great treat for kids.  Annika agreed and was more than happy to help me make them.

Two notes:  Some of the bars may not want to stay on the sticks too well...you just have to smush them around the stick as well as you can.
Also, I thought there was a tad too much oil for the chocolate - it set up okay but was quick to get soft and melty again at room temperature, so next time I'll just use about a teaspoon of oil.

Unfortunately, I don't know how the treats were received by the children, as Annika had to leave class before snack was served due to an accident I'll detail below.

Recipe: (from Rice Krispies)

3 T. butter or margarine
1 (10 oz) package regular marshmallows
6 cups crispy rice cereal
18 wooden ice cream sticks
1-1/2 cups semi-sweet or white chocolate morsels
1 T. canola oil (can and will use less next time)
Multi-colored sprinkles (optional)


In a large saucepan, melt butter over low heat.  Add marshmallows and stir until completely melted.  Remove from heat.  Add cereal.  Stir until well coated.
Using buttered spatula or wax paper, press mixture into a greased 13 x 9" pan. Cool.  Cut into 18 3x2 inch bars.  Push one stick into the bottom of each bar.
In a small microwave safe bowl, combine chocolate and oil.  Microwave on high for 1 to 1-1/2 minutes, stirring every 30 seconds.  Dip bars into chocolate (or drizzle over each bar) and decorate as you like.  Place on wax paper. Refrigerate until chocolate is set.

SO.  What happened to Annika?

Apparently she thought it would be fun to climb on top of a bookcase in her classroom (have no idea what got into her, she normally doesn't behave like that.....really.) and when her teacher caught sight of her and told her to get down, she turned around and jumped off, catching her lip on the bookcase somehow and ripping her frenulum in the process (the piece of tissue that connects the upper lip to the gum).


  Ouch.

Grant had to bring her and the other kids home and decided to take her to an urgent care clinic to see if she needed stitches.  (I'm just glad he didn't even suggest stitching her up himself, like he did with his own injury a couple of years ago.)  Two and a half hours later they returned home....no stitches, no shots, as she was proud to tell me, just some saline solution to rinse with several times a day and a prescription for an antibiotic as a precaution, along with instructions to follow up with her pediatrician in a couple of days. 

Would you believe that in 7-1/2 years with four children, this is the FIRST time any of my kids has been on antibiotics?  It's true!  We have been blessed with very healthy kids.  Plus the fact that we home school and they're not around other kids all day every day probably helps.  And breastfeeding for a year each certainly doesn't hurt.  

Anyways, poor Annika's biggest regret about all of this is not the terrible tasting liquid antibiotic she has to take twice a day or the discomfort of her injury - it's that she missed getting one of her Rice Krispy Dipper Treats at class.  I promised her we'll make another batch soon.  
And at her follow-up appointment today, the doctor said she's healing great and will be as good as new in a few days.  I'm really glad mouths heal quickly.  
And I'm really glad she couldn't really see her injury, because then she would have reacted MUCH more dramatically.  

Last Wednesday night was Annika's (3) turn to take snack to her Rainbows class at church.  She had originally just told me she wanted to take fruit snacks, but I talked her into helping me make something more fun than that.  I had seen this recipe in both my Taste of Home and Parents magazines and thought it would be a great treat for kids.  Annika agreed and was more than happy to help me make them.

Two notes:  Some of the bars may not want to stay on the sticks too well...you just have to smush them around the stick as well as you can.
Also, I thought there was a tad too much oil for the chocolate - it set up okay but was quick to get soft and melty again at room temperature, so next time I'll just use about a teaspoon of oil.

Unfortunately, I don't know how the treats were received by the children, as Annika had to leave class before snack was served due to an accident I'll detail below.

Recipe: (from Rice Krispies)

3 T. butter or margarine
1 (10 oz) package regular marshmallows
6 cups crispy rice cereal
18 wooden ice cream sticks
1-1/2 cups semi-sweet or white chocolate morsels
1 T. canola oil (can and will use less next time)
Multi-colored sprinkles (optional)


In a large saucepan, melt butter over low heat.  Add marshmallows and stir until completely melted.  Remove from heat.  Add cereal.  Stir until well coated.
Using buttered spatula or wax paper, press mixture into a greased 13 x 9" pan. Cool.  Cut into 18 3x2 inch bars.  Push one stick into the bottom of each bar.
In a small microwave safe bowl, combine chocolate and oil.  Microwave on high for 1 to 1-1/2 minutes, stirring every 30 seconds.  Dip bars into chocolate (or drizzle over each bar) and decorate as you like.  Place on wax paper. Refrigerate until chocolate is set.

SO.  What happened to Annika?

Apparently she thought it would be fun to climb on top of a bookcase in her classroom (have no idea what got into her, she normally doesn't behave like that.....really.) and when her teacher caught sight of her and told her to get down, she turned around and jumped off, catching her lip on the bookcase somehow and ripping her frenulum in the process (the piece of tissue that connects the upper lip to the gum).


  Ouch.

Grant had to bring her and the other kids home and decided to take her to an urgent care clinic to see if she needed stitches.  (I'm just glad he didn't even suggest stitching her up himself, like he did with his own injury a couple of years ago.)  Two and a half hours later they returned home....no stitches, no shots, as she was proud to tell me, just some saline solution to rinse with several times a day and a prescription for an antibiotic as a precaution, along with instructions to follow up with her pediatrician in a couple of days. 

Would you believe that in 7-1/2 years with four children, this is the FIRST time any of my kids has been on antibiotics?  It's true!  We have been blessed with very healthy kids.  Plus the fact that we home school and they're not around other kids all day every day probably helps.  And breastfeeding for a year each certainly doesn't hurt.  

Anyways, poor Annika's biggest regret about all of this is not the terrible tasting liquid antibiotic she has to take twice a day or the discomfort of her injury - it's that she missed getting one of her Rice Krispy Dipper Treats at class.  I promised her we'll make another batch soon.  
And at her follow-up appointment today, the doctor said she's healing great and will be as good as new in a few days.  I'm really glad mouths heal quickly.  
And I'm really glad she couldn't really see her injury, because then she would have reacted MUCH more dramatically.  
reade more... Résuméabuiyad

Grand Marnier & Spiced Rum Fruit Dip {Party Series 2}

Grand Marnier & Spiced Rum Fruit Dip


This is one of my all-time absolute favorite recipes for entertaining.  No joke.

Try this.

And I'm not usually even a fruit dip fan.  But this is not your ordinary fruit dip.  It's light, fluffy, and oh-so-flavorful.

I've had this recipe for so long that, at this point, I have no idea where I got it.  I just know it's fabulous.  Mom decided to "borrow" it for her wine tasting party, and this was one of the menu items I was responsible for during our preparation.  On most of the dishes, I played the role of sous-chef - but on this one I got to take the lead!

This wonderfully flavorful fluffiness starts with sour cream (isn't that the base of almost all dips??), Cool Whip, and a pretty good helping of brown sugar.  Sounding good already, isn't it?  Ohhhh, trust me ... it gets much better.


Then we add the friends - Grand Marnier, dark spiced rum, and Triple Sec.  All I have to say is ... yum.


Mix that all together and then let it chill for a few hours.  The brown sugar will really soften up and kind of melt into the dip.  Give it a really good stir when you get it out of the refrig, and then serve it up with a selection of assorted fruits.  Divine!


Remember how I told you my Mom is really creative?  Well, here's another one of her amazing creations.  Check out these hors d' oeuvre picks my Mom made.  They're perfect for placing alongside a fruit platter.  A little fancier than toothpicks, don't ya think?  And she's so sweet she even made me a set.

We invite you to follow The Kitchen is My Playground with Google+, PinterestFacebookTwitterGoogle Friend Connectbloglovin', or Feedburner.  We'd love to have you back soon!  Want to promote your website, business, or Etsy shop with us?  Visit our advertise page for details.


Grand Marnier & Spiced Rum Fruit Dip
Source:  A Friend

Ingredients
1/2 c. sour cream
1 c. Cool Whip
4 T. brown sugar
1 1/2 T. Grand Marnier
1 T. dark spiced rum
1 T. Triple Sec

Directions
1.  Combine sour cream, Cool Whip, and brown sugar.  Add liquors and whisk.

2.  Refrigerate for several hours.  Stir well before serving.  If the liquors "settle out," don't worry - just whisk or stir them back in.  Serve with an assortment of berries and fruit.

P.S. - Mark likes this with bananas the best!  Sometimes we spoon the leftovers over sliced bananas and eat it as a dessert.  Tasty.


The {Party Series} Posts:
My Mom Throws a Great Party! {Party Series 1}
Grand Marnier & Spiced Rum Fruit Dip {Party Series 2}
Antipasto Platter with Grape Tomato & Caper Salad {Party Series 3}
Marinated Cheese {Party Series 4}
Mini Mocha-Toffee Crunch Cheesecakes {Party Series 5}
Raspberry Chocolate Truffles & Drunken Cherries {Party Series 6}
Raspberry-Almond, Caramel-Walnut, & Lemon-Coconut Bars {Party Series 7}
Toasted Pesto Rounds {Party Series 8}


 This post is linked with These Chicks Cooked hosted by This Chick Cooks, Sweet Tooth Friday hosted by Alli-n-Son, Sweets for a Saturday hosted by Sweet as Sugar Cookies,  A Themed Bakers Sunday hosted by Cupcake Apothecary, and Sweet Indulgences Sunday hosted by A Well-Seasoned Life, Sundae Scoop, Nifty Thrifty Sunday.
Grand Marnier & Spiced Rum Fruit Dip


This is one of my all-time absolute favorite recipes for entertaining.  No joke.

Try this.

And I'm not usually even a fruit dip fan.  But this is not your ordinary fruit dip.  It's light, fluffy, and oh-so-flavorful.

I've had this recipe for so long that, at this point, I have no idea where I got it.  I just know it's fabulous.  Mom decided to "borrow" it for her wine tasting party, and this was one of the menu items I was responsible for during our preparation.  On most of the dishes, I played the role of sous-chef - but on this one I got to take the lead!

This wonderfully flavorful fluffiness starts with sour cream (isn't that the base of almost all dips??), Cool Whip, and a pretty good helping of brown sugar.  Sounding good already, isn't it?  Ohhhh, trust me ... it gets much better.


Then we add the friends - Grand Marnier, dark spiced rum, and Triple Sec.  All I have to say is ... yum.


Mix that all together and then let it chill for a few hours.  The brown sugar will really soften up and kind of melt into the dip.  Give it a really good stir when you get it out of the refrig, and then serve it up with a selection of assorted fruits.  Divine!


Remember how I told you my Mom is really creative?  Well, here's another one of her amazing creations.  Check out these hors d' oeuvre picks my Mom made.  They're perfect for placing alongside a fruit platter.  A little fancier than toothpicks, don't ya think?  And she's so sweet she even made me a set.

We invite you to follow The Kitchen is My Playground with Google+, PinterestFacebookTwitterGoogle Friend Connectbloglovin', or Feedburner.  We'd love to have you back soon!  Want to promote your website, business, or Etsy shop with us?  Visit our advertise page for details.


Grand Marnier & Spiced Rum Fruit Dip
Source:  A Friend

Ingredients
1/2 c. sour cream
1 c. Cool Whip
4 T. brown sugar
1 1/2 T. Grand Marnier
1 T. dark spiced rum
1 T. Triple Sec

Directions
1.  Combine sour cream, Cool Whip, and brown sugar.  Add liquors and whisk.

2.  Refrigerate for several hours.  Stir well before serving.  If the liquors "settle out," don't worry - just whisk or stir them back in.  Serve with an assortment of berries and fruit.

P.S. - Mark likes this with bananas the best!  Sometimes we spoon the leftovers over sliced bananas and eat it as a dessert.  Tasty.


The {Party Series} Posts:
My Mom Throws a Great Party! {Party Series 1}
Grand Marnier & Spiced Rum Fruit Dip {Party Series 2}
Antipasto Platter with Grape Tomato & Caper Salad {Party Series 3}
Marinated Cheese {Party Series 4}
Mini Mocha-Toffee Crunch Cheesecakes {Party Series 5}
Raspberry Chocolate Truffles & Drunken Cherries {Party Series 6}
Raspberry-Almond, Caramel-Walnut, & Lemon-Coconut Bars {Party Series 7}
Toasted Pesto Rounds {Party Series 8}


 This post is linked with These Chicks Cooked hosted by This Chick Cooks, Sweet Tooth Friday hosted by Alli-n-Son, Sweets for a Saturday hosted by Sweet as Sugar Cookies,  A Themed Bakers Sunday hosted by Cupcake Apothecary, and Sweet Indulgences Sunday hosted by A Well-Seasoned Life, Sundae Scoop, Nifty Thrifty Sunday.
reade more... Résuméabuiyad

My Mom Throw's a Great Party! {Party Series Part 1}

I have such a wonderful Mom!  Not only is she a fabulous friend with whom I love to hang out, she's a fantastic hostess too.  She knows how to throw a great party! 


This past week she hosted a wine tasting party for a group of her girlfriends.  They get together about once a month for fellowship and fun, rotating the hosting role, and typically partaking in some grape-based beverages along the way.  Want to know what they call themselves?  This is such a sweet and fun name ... they call themselves Thirsty Girls.  That's so clever!  It's even more clever when you know that what brought them all together to begin with was their love for shag dancing, and they dance at a place called Thirsty's II.  Yup, just about every Sunday night (and possibly Saturday, too) you can find most of this group dancin' the night away at Thirsty's  II.  And that's how Thirsty Girls was born.

I was fortunate enough to be able to take part in this Thirsty Girls party, both as a guest and as my Mom's sous-chef.  I'm not sure which part was more fun - actually attending the party and getting to know my Mom's friends, or hanging out in the kitchen with Mom for two days as we prepared all the food together (well, a good portion of the food - my Mom is super organized and already had quite a bit of it done!).  Both were a blast. 

We had the camera going the whole time we were in the kitchen, snapping pictures all along the way.  That means I get to share a whole bunch of super-tasty recipes with you that are just perfect for entertaining.  So get ready!! ... Here comes the "Party Series!"

Let's start this first post of the series with a look at some of Mom's nice little touches.  She's quite creative, and came up with some elegant wine-themed decorating ideas.  Then I'll share her Garlic & Dill Marinated Shrimp recipe, and a list of her full party menu so you'll know what to look forward to.  Sound good?

Nice Touch #1:  Cork Table Cards

Table labels
Or, table labels, you might say!  Aren't those cute?  We started with business card-sized cards that I embossed.  That's one of my other hobbies ... making cards and miscellaneous things (like these) using a dry-embossing technique.  Look closely at the lower right corner of the cards and you'll see an embossed wine bottle, wine glass, or grape bunch.  I know - it's really hard to see in this picture.  Hopefully I'll be getting a better camera real soon.

Next Mom used a serrated knife to cut a sliver off the bottom of some corks.  This made a flat base so the corks would sit up on the table.  Then she made a slit in the top of each cork ...

Preparing the corks
... and slid in the label card.

The table label line-up

Nice Touch #2:  "Elevated" Centerpiece
Check it out!  Mom made her light fixture into an "elevated" centerpiece by tying wine glasses to it with pretty ribbons!  How absolutely clever!!  Other than it being creative and beautiful, there was a functional reason for this, too ...

"Elevated" centerpiece
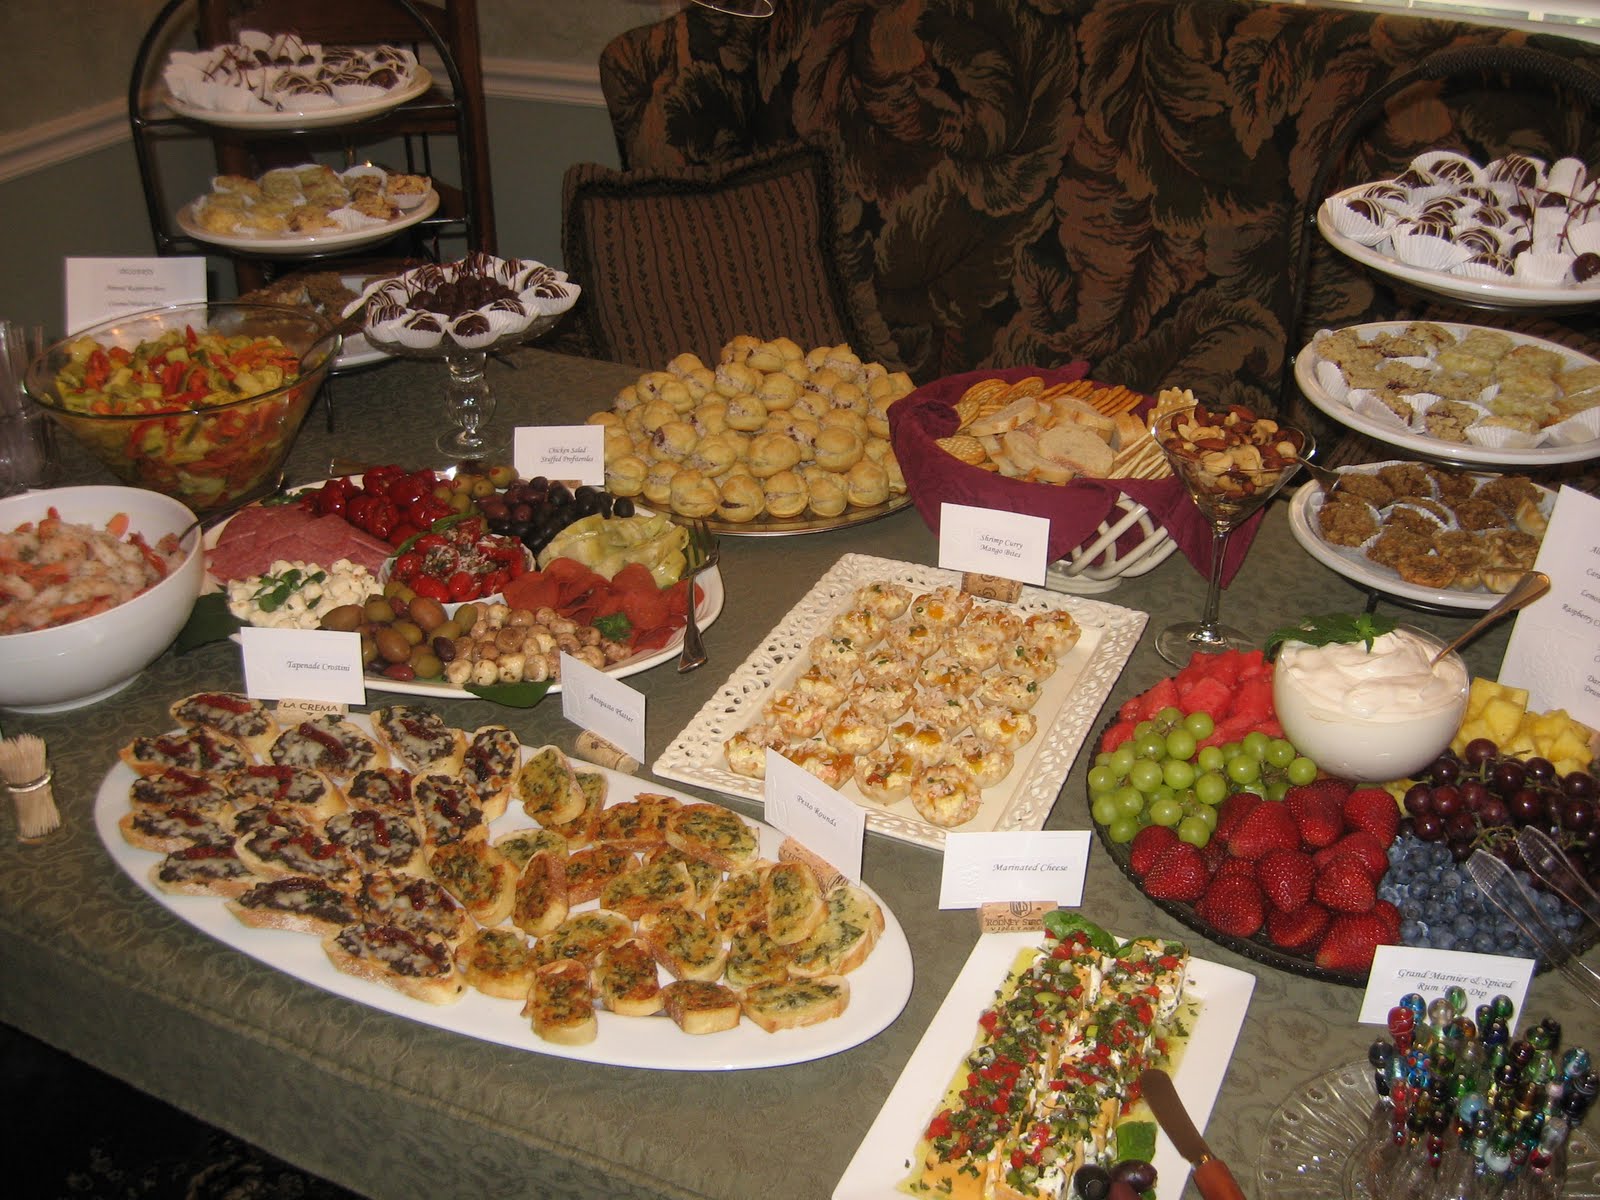
... her table was completely full with her tasty treats!  This "elevated" centerpiece is certainly one way to solve a serving space problem.

"The Spread"
Nice Touch #3:  Herb Bouquets
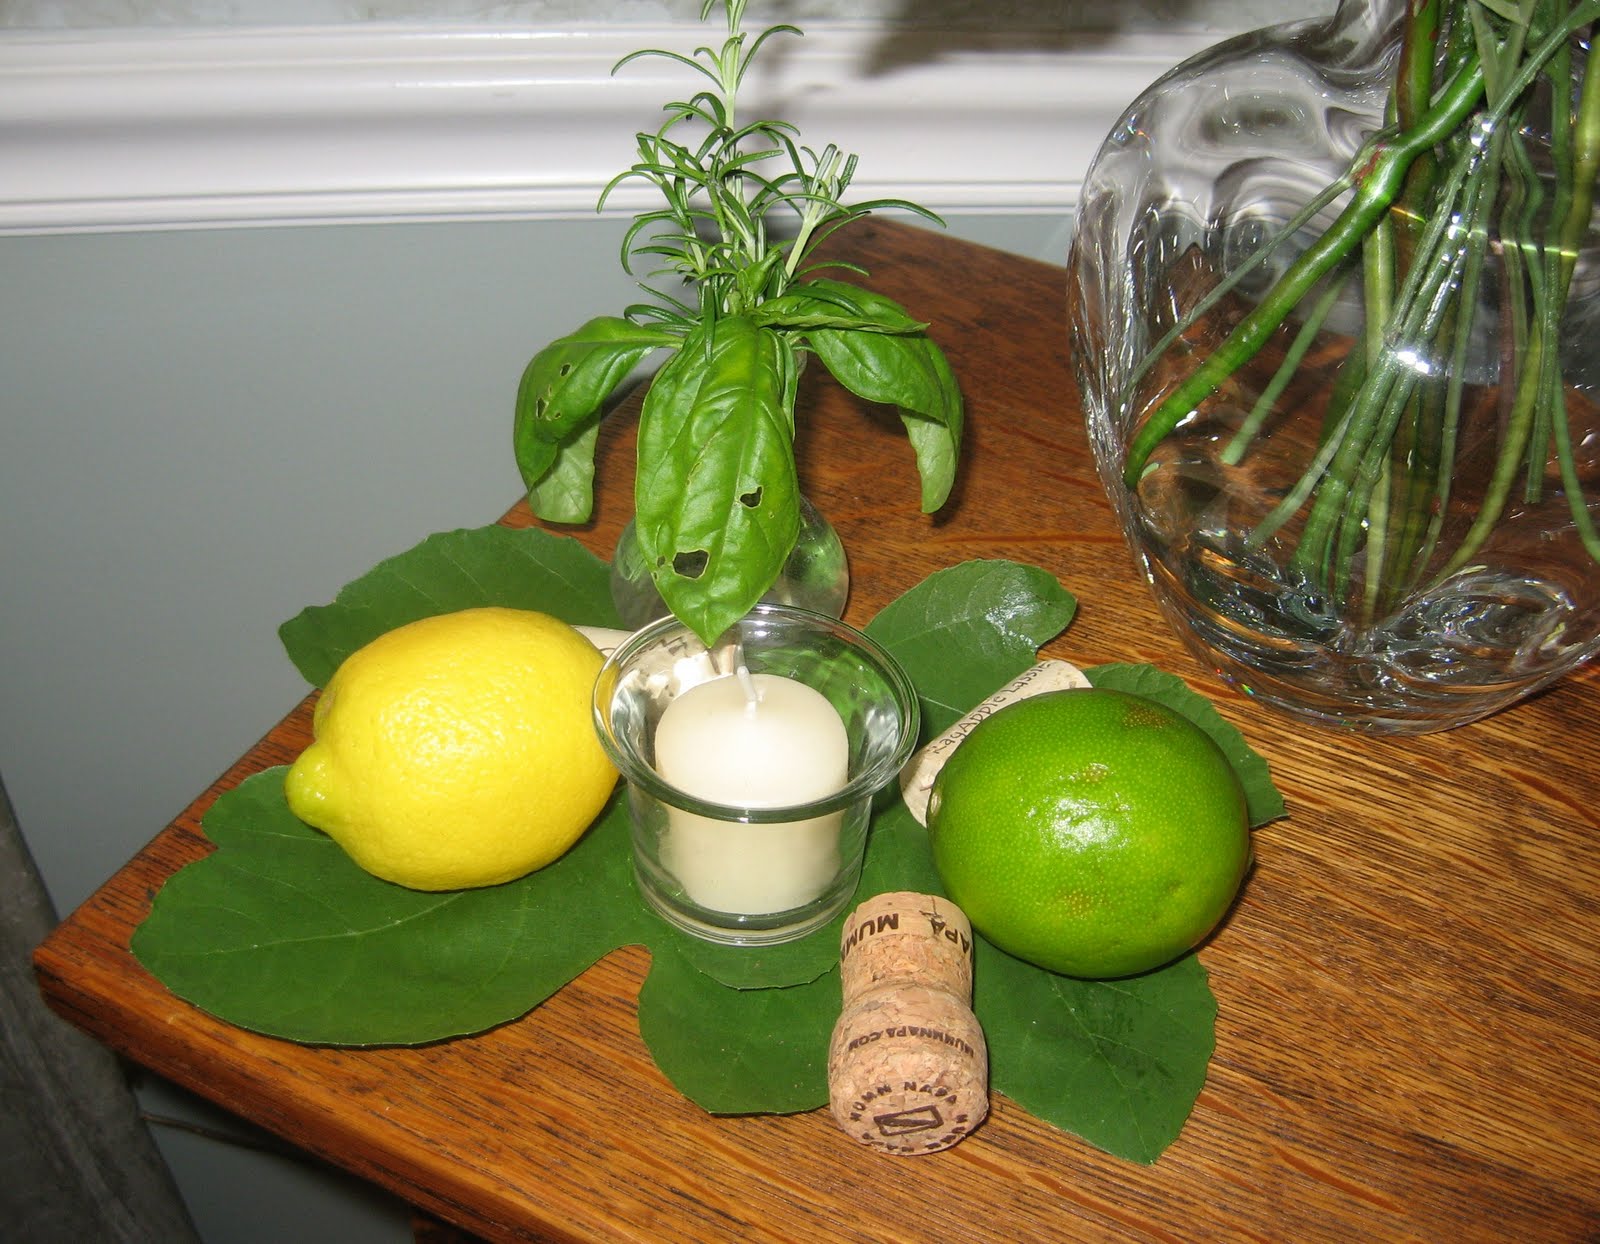
Mom made little herb bouquets in bud vases to place around the house.  They looked great, and were a very simple way to add a festive touch.  Though it looks like a bug or two may have been having a party out in the garden on this basil leaf!  I guess everyone ... or everything? ... loves fresh basil.

Herb bud vase bouquet
Now for the menu. 

On the savory side:
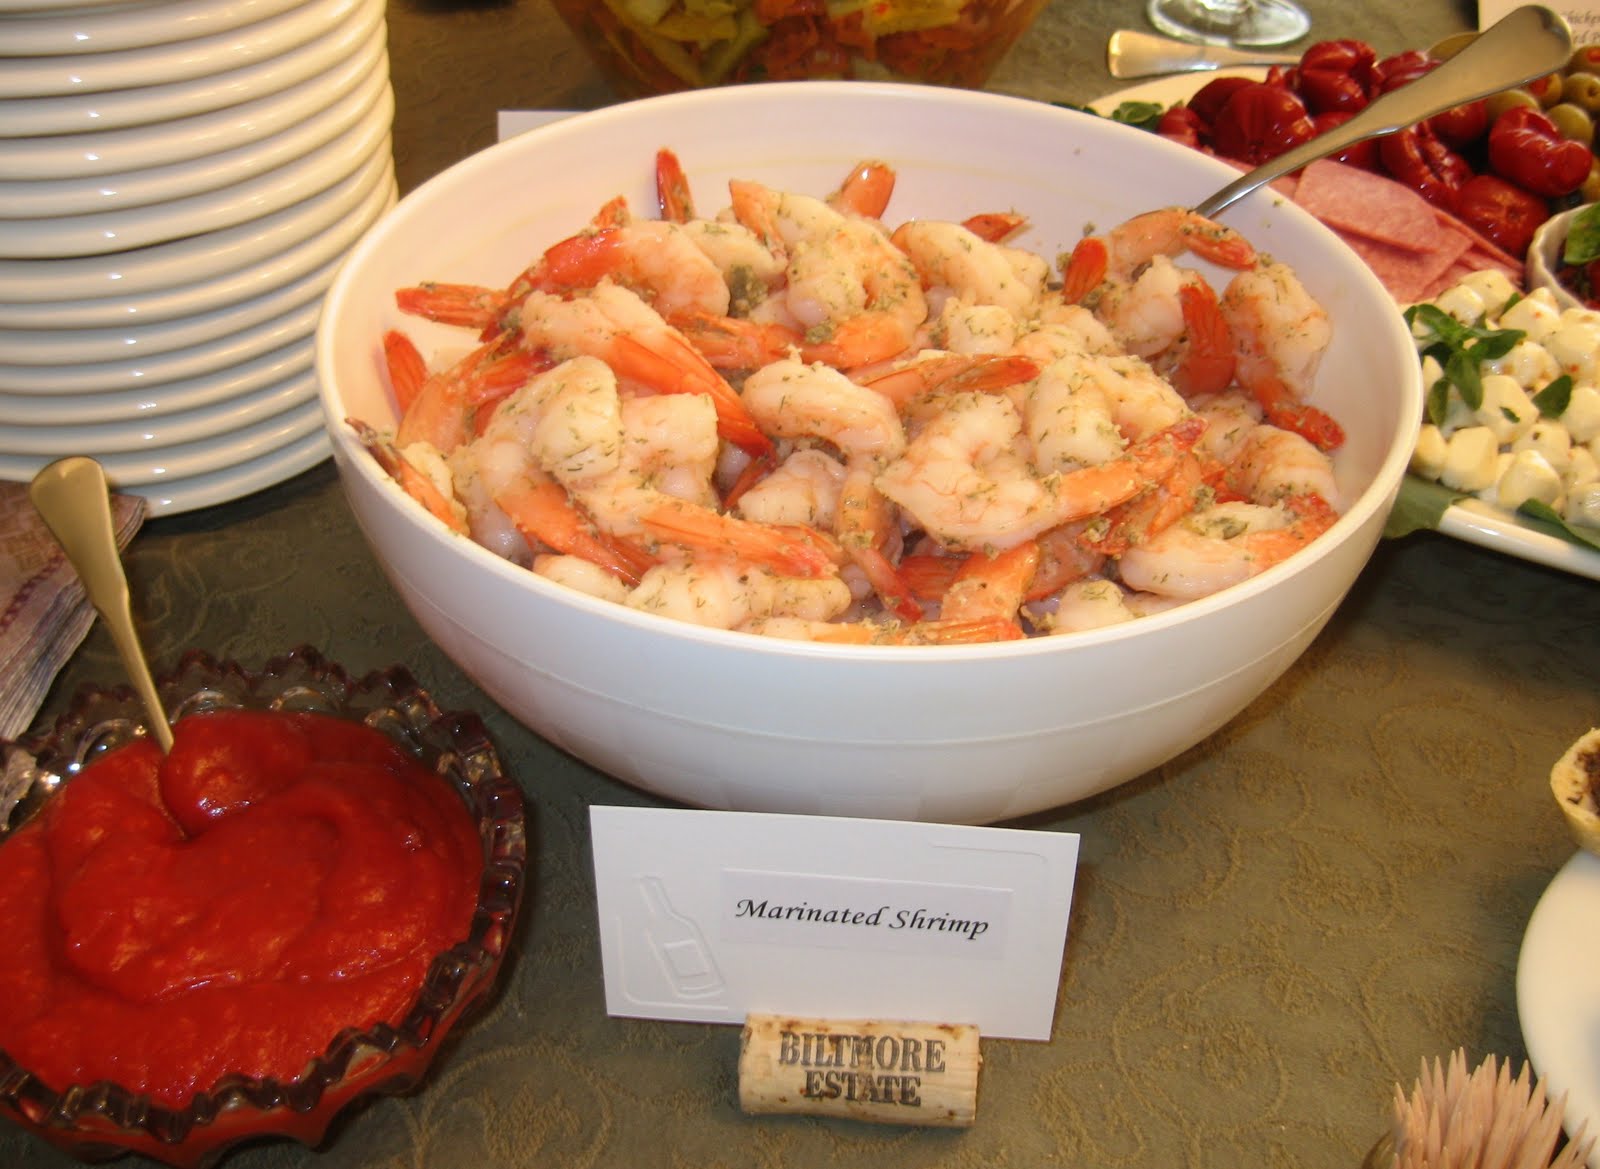
Garlic & Dill Marinated Shrimp (recipe below)
Tortellini Salad
Antipasto Platter with Grape Tomato & Caper Salad
Tarragon Chicken Salad-Stuffed Profiteroles
Marinated Cheese
Grand Marnier & Spiced Rum Fruit Dip
Shrimp Curry Mango Bites
Tapenade Crostini
Toasted Pesto Rounds

The savories
For dessert:
Almond-Raspberry Bars
Caramel-Walnut Bars
Lemon-Coconut Bars
Raspberry Chocolate Truffles
Mini Mocha-Toffee Crunch Cheesecakes
Dark Chocolate Drunken Cherries


I told you Mom throws a great party!
The desserts


Garlic & Dill Marinated Shrimp
Source:  A Family Friend

Ingredients
2 T. butter, melted
1 T. olive oil
1 T. minced garlic
2 T. minced dill weed
2 T. minced shallots (or grated mild onion)
2 T. fresh lemon juice
Dash cayenne pepper
Salt & pepper, to taste
2 lbs. peeled & deveined cooked shrimp

Directions
1.  Mix all ingredients, except shrimp, to make the marinade.  Pour marinade over shrimp.  

2.  Refrigerate for several hours before serving.

Enjoy!

Garlic & Dill Marinated Shrimp
I have such a wonderful Mom!  Not only is she a fabulous friend with whom I love to hang out, she's a fantastic hostess too.  She knows how to throw a great party! 


This past week she hosted a wine tasting party for a group of her girlfriends.  They get together about once a month for fellowship and fun, rotating the hosting role, and typically partaking in some grape-based beverages along the way.  Want to know what they call themselves?  This is such a sweet and fun name ... they call themselves Thirsty Girls.  That's so clever!  It's even more clever when you know that what brought them all together to begin with was their love for shag dancing, and they dance at a place called Thirsty's II.  Yup, just about every Sunday night (and possibly Saturday, too) you can find most of this group dancin' the night away at Thirsty's  II.  And that's how Thirsty Girls was born.

I was fortunate enough to be able to take part in this Thirsty Girls party, both as a guest and as my Mom's sous-chef.  I'm not sure which part was more fun - actually attending the party and getting to know my Mom's friends, or hanging out in the kitchen with Mom for two days as we prepared all the food together (well, a good portion of the food - my Mom is super organized and already had quite a bit of it done!).  Both were a blast. 

We had the camera going the whole time we were in the kitchen, snapping pictures all along the way.  That means I get to share a whole bunch of super-tasty recipes with you that are just perfect for entertaining.  So get ready!! ... Here comes the "Party Series!"

Let's start this first post of the series with a look at some of Mom's nice little touches.  She's quite creative, and came up with some elegant wine-themed decorating ideas.  Then I'll share her Garlic & Dill Marinated Shrimp recipe, and a list of her full party menu so you'll know what to look forward to.  Sound good?

Nice Touch #1:  Cork Table Cards

Table labels
Or, table labels, you might say!  Aren't those cute?  We started with business card-sized cards that I embossed.  That's one of my other hobbies ... making cards and miscellaneous things (like these) using a dry-embossing technique.  Look closely at the lower right corner of the cards and you'll see an embossed wine bottle, wine glass, or grape bunch.  I know - it's really hard to see in this picture.  Hopefully I'll be getting a better camera real soon.

Next Mom used a serrated knife to cut a sliver off the bottom of some corks.  This made a flat base so the corks would sit up on the table.  Then she made a slit in the top of each cork ...

Preparing the corks
... and slid in the label card.

The table label line-up

Nice Touch #2:  "Elevated" Centerpiece
Check it out!  Mom made her light fixture into an "elevated" centerpiece by tying wine glasses to it with pretty ribbons!  How absolutely clever!!  Other than it being creative and beautiful, there was a functional reason for this, too ...

"Elevated" centerpiece
... her table was completely full with her tasty treats!  This "elevated" centerpiece is certainly one way to solve a serving space problem.

"The Spread"
Nice Touch #3:  Herb Bouquets
Mom made little herb bouquets in bud vases to place around the house.  They looked great, and were a very simple way to add a festive touch.  Though it looks like a bug or two may have been having a party out in the garden on this basil leaf!  I guess everyone ... or everything? ... loves fresh basil.

Herb bud vase bouquet
Now for the menu. 

On the savory side:
Garlic & Dill Marinated Shrimp (recipe below)
Tortellini Salad
Antipasto Platter with Grape Tomato & Caper Salad
Tarragon Chicken Salad-Stuffed Profiteroles
Marinated Cheese
Grand Marnier & Spiced Rum Fruit Dip
Shrimp Curry Mango Bites
Tapenade Crostini
Toasted Pesto Rounds

The savories
For dessert:
Almond-Raspberry Bars
Caramel-Walnut Bars
Lemon-Coconut Bars
Raspberry Chocolate Truffles
Mini Mocha-Toffee Crunch Cheesecakes
Dark Chocolate Drunken Cherries


I told you Mom throws a great party!
The desserts


Garlic & Dill Marinated Shrimp
Source:  A Family Friend

Ingredients
2 T. butter, melted
1 T. olive oil
1 T. minced garlic
2 T. minced dill weed
2 T. minced shallots (or grated mild onion)
2 T. fresh lemon juice
Dash cayenne pepper
Salt & pepper, to taste
2 lbs. peeled & deveined cooked shrimp

Directions
1.  Mix all ingredients, except shrimp, to make the marinade.  Pour marinade over shrimp.  

2.  Refrigerate for several hours before serving.

Enjoy!

Garlic & Dill Marinated Shrimp
reade more... Résuméabuiyad

2nd Bee Robbing of the Season!

We got to rob our bees on Sunday for the second robbing of the season ... two weeks earlier than usual!! 

Why am I so excited about this?  Because it means that we may be able to get in a third robbing this season, which is extremely rare.  Mark's cut-off date for robbing each year is July 15.  He absolutely will not rob the bees after this, to make sure they have enough time left in the summer to make their stash of honey for food through the winter.  Typically, we rob in late May and then again sometime between July 4th and July 15th.  This year, the bees had replenished the honey supply super quickly after the first robbing, so we were able to rob them again here in mid-June.

Another reason I'm so excited is that I made my debut as the cap-cutter.  Yes, a new responsibility has been added to my Assistant Beekeeper role.  I'm honored to be have been deemed worthy to wield the knife!

Keep working, little bees!!  Mark and I would love to steal share in your honey one more time this summer!

Here is a sampling of pictures from Sunday's robbing - views I didn't capture in our previous robbing.  If you'd like to check out pictures of the whole process, click here to read my post from our May robbing.  Oh, and on a side note ... I'm working on a recipe for Honey Cheesecake.  I'll post that recipe as soon as I feel it's blog-worthy.  Enjoy the pictures!


 That's Mark scraping (cleaning) the excluder.  The excluder is the wire "rack" you see ... the wires are close enough together to prevent the queen from getting through (the queen is just a bit bigger than all the other bees).  The box from which we rob our honey is placed on top above the excluder.  The result?  All eggs are laid in the box below the excluder and we rob from frames that are egg-free in a box above the excluder.  Oh, and Mark's being all manly and not wearing gloves, or his bee keeper suit ... I wish he wouldn't do that.  WEAR YOUR SUIT AND GLOVES, Mark!  Join me in "yelling" at him, will ya?


 This is the box that was above the excluder, and Mark's just taken it off the hive to bring it inside for us to rob.  This box is called a "super."  See all those bees still hanging around on it?  We don't want to bring those inside.  So, how do we get them off? ...


1.  Smoke 'em ...


2.  ... brush 'em (gently!), and ...


3.  ... leaf blower 'em.  Yes, leaf blower.  That definitely gets any of the tough hanger-around'ers to depart.  This 3-step method seems to work really well.  This robbing, we brought zero bees inside, and last time we only brought in three.  Pretty good, I'd say!


This is Mark taking a frame out of the super.  There are nine frames in there.


This is a close-up of the honey comb in the frame.  I think it's beautiful!  That white-ish stuff is the caps.  We'll cut that off to release the honey.


And that's me making my debut as the cap cutter!!  Mark says I did an excellent job.  Yay!
We got to rob our bees on Sunday for the second robbing of the season ... two weeks earlier than usual!! 

Why am I so excited about this?  Because it means that we may be able to get in a third robbing this season, which is extremely rare.  Mark's cut-off date for robbing each year is July 15.  He absolutely will not rob the bees after this, to make sure they have enough time left in the summer to make their stash of honey for food through the winter.  Typically, we rob in late May and then again sometime between July 4th and July 15th.  This year, the bees had replenished the honey supply super quickly after the first robbing, so we were able to rob them again here in mid-June.

Another reason I'm so excited is that I made my debut as the cap-cutter.  Yes, a new responsibility has been added to my Assistant Beekeeper role.  I'm honored to be have been deemed worthy to wield the knife!

Keep working, little bees!!  Mark and I would love to steal share in your honey one more time this summer!

Here is a sampling of pictures from Sunday's robbing - views I didn't capture in our previous robbing.  If you'd like to check out pictures of the whole process, click here to read my post from our May robbing.  Oh, and on a side note ... I'm working on a recipe for Honey Cheesecake.  I'll post that recipe as soon as I feel it's blog-worthy.  Enjoy the pictures!


 That's Mark scraping (cleaning) the excluder.  The excluder is the wire "rack" you see ... the wires are close enough together to prevent the queen from getting through (the queen is just a bit bigger than all the other bees).  The box from which we rob our honey is placed on top above the excluder.  The result?  All eggs are laid in the box below the excluder and we rob from frames that are egg-free in a box above the excluder.  Oh, and Mark's being all manly and not wearing gloves, or his bee keeper suit ... I wish he wouldn't do that.  WEAR YOUR SUIT AND GLOVES, Mark!  Join me in "yelling" at him, will ya?


 This is the box that was above the excluder, and Mark's just taken it off the hive to bring it inside for us to rob.  This box is called a "super."  See all those bees still hanging around on it?  We don't want to bring those inside.  So, how do we get them off? ...


1.  Smoke 'em ...


2.  ... brush 'em (gently!), and ...


3.  ... leaf blower 'em.  Yes, leaf blower.  That definitely gets any of the tough hanger-around'ers to depart.  This 3-step method seems to work really well.  This robbing, we brought zero bees inside, and last time we only brought in three.  Pretty good, I'd say!


This is Mark taking a frame out of the super.  There are nine frames in there.


This is a close-up of the honey comb in the frame.  I think it's beautiful!  That white-ish stuff is the caps.  We'll cut that off to release the honey.


And that's me making my debut as the cap cutter!!  Mark says I did an excellent job.  Yay!
reade more... Résuméabuiyad

Strawberry Summer Cake


My family is officially in love with this cake.  

Grant has a lovely uncle and aunt (Hi Larry and Sally!) who live on the West Coast and are huge fans of Bob's Red Mill and their products. On occasion they get to go to an actual Bob's Red Mill store in Oregon and have sent us goodies from there several times.   
A few weeks ago, I was browsing around on Smitten Kitchen and was intrigued by her recipe for Strawberry Summer Cake. It sounded pretty simple, but there was one ingredient that took me by surprise. 
Barley Flour.  
I have never seen barley flour anywhere, heard of anyone using it, or seen any recipes including it.  Ever.
Hmmm.
I wondered if it really made a difference in the cake or not, wondered if I should just try making the cake with all regular or whole wheat flour.  
Then I got an email from Aunt Sally.  She said they were going to the Bob's Red Mill store the next day and wanted me to pick some products that I would like to try.  
Barley flour was right up there on the list, as this cake was fresh on my mind.  Honestly, I never would have even considered barley flour otherwise.  
They sent me a wonderful box full of all my ideas, far exceeding my expectations.  So much fun!  
I'm busy experimenting with millet flour and spelt flour too...but more on that another time.
So, I've made the cake twice in a week now, both times including the barley flour.  It is just so delicious.  
I'm sure I'll be trying it with other berries as well, raspberries, maybe blueberries or blackberries, maybe combinations, maybe peaches.  But it will be hard to beat the strawberries.

By the way, the cake didn't slice well for me either time, but it was so delicious nobody cared.  We like it with vanilla ice cream.  

Recipe: (from Smitten Kitchen)

6 T. butter, softened
3/4 c. sugar
1 large egg
1/2 c. milk
1 t. vanilla extract
3/4 c. white whole wheat flour 
3/4 c. barley flour (or all purpose flour)
1-1/2 t. baking powder
1/2 t. salt
1 lb. strawberries, washed and hulled
2 T. sugar

Preheat oven to 350°.  Butter a 9" cake pan or deep dish pie pan (I haven't tried it, but apparently a regular 9" pie pan will overflow).  
In a mixing bowl, cream butter and sugar until light and fluffy, about 3 minutes.  Add egg, milk, and vanilla.  Mix well.
In a separate bowl, whisk together flour, barley flour, baking powder, and salt.  Add to butter mixture and combine well.  Spread into greased pan.  
Slice the berries in half (or if you're a bit short on berries, into thin slices) and distribute evenly over the cake batter.  Sprinkle with 2 T. sugar. 
Bake for 10 minutes, then reduce oven temp. to 325° and continue to bake for 45-50 minutes, or until a toothpick comes out clean.
Serve with whipped cream or ice cream if desired.  

My family is officially in love with this cake.  

Grant has a lovely uncle and aunt (Hi Larry and Sally!) who live on the West Coast and are huge fans of Bob's Red Mill and their products. On occasion they get to go to an actual Bob's Red Mill store in Oregon and have sent us goodies from there several times.   
A few weeks ago, I was browsing around on Smitten Kitchen and was intrigued by her recipe for Strawberry Summer Cake. It sounded pretty simple, but there was one ingredient that took me by surprise. 
Barley Flour.  
I have never seen barley flour anywhere, heard of anyone using it, or seen any recipes including it.  Ever.
Hmmm.
I wondered if it really made a difference in the cake or not, wondered if I should just try making the cake with all regular or whole wheat flour.  
Then I got an email from Aunt Sally.  She said they were going to the Bob's Red Mill store the next day and wanted me to pick some products that I would like to try.  
Barley flour was right up there on the list, as this cake was fresh on my mind.  Honestly, I never would have even considered barley flour otherwise.  
They sent me a wonderful box full of all my ideas, far exceeding my expectations.  So much fun!  
I'm busy experimenting with millet flour and spelt flour too...but more on that another time.
So, I've made the cake twice in a week now, both times including the barley flour.  It is just so delicious.  
I'm sure I'll be trying it with other berries as well, raspberries, maybe blueberries or blackberries, maybe combinations, maybe peaches.  But it will be hard to beat the strawberries.

By the way, the cake didn't slice well for me either time, but it was so delicious nobody cared.  We like it with vanilla ice cream.  

Recipe: (from Smitten Kitchen)

6 T. butter, softened
3/4 c. sugar
1 large egg
1/2 c. milk
1 t. vanilla extract
3/4 c. white whole wheat flour 
3/4 c. barley flour (or all purpose flour)
1-1/2 t. baking powder
1/2 t. salt
1 lb. strawberries, washed and hulled
2 T. sugar

Preheat oven to 350°.  Butter a 9" cake pan or deep dish pie pan (I haven't tried it, but apparently a regular 9" pie pan will overflow).  
In a mixing bowl, cream butter and sugar until light and fluffy, about 3 minutes.  Add egg, milk, and vanilla.  Mix well.
In a separate bowl, whisk together flour, barley flour, baking powder, and salt.  Add to butter mixture and combine well.  Spread into greased pan.  
Slice the berries in half (or if you're a bit short on berries, into thin slices) and distribute evenly over the cake batter.  Sprinkle with 2 T. sugar. 
Bake for 10 minutes, then reduce oven temp. to 325° and continue to bake for 45-50 minutes, or until a toothpick comes out clean.
Serve with whipped cream or ice cream if desired.  
reade more... Résuméabuiyad